Critical Development

Language design, framework development, UI design, robotics and more.

Archive for May, 2008

Misadventures in Pursuit of an Immutable Development Virtual Machine

Posted by Dan Vanderboom on May 23, 2008

Problem

Every three to six months, I end up having to rebuild my development computer.  This one machine is not only for development, but also acts as my communications hub (e-mail client, instant messenger, news and blog aggregator), media center, guitar effects and music recording studio, and whatever other roles are needed or desired at the time.  On top of that, I’m constantly installing and testing beta software, technical previews, and other unstable sneak peeks.  After several months of this kind of pounding, it’s no wonder the whole system doesn’t grind to a complete halt.

This is an expensive and tedious operation, not to mention time lost from poor performance.  It normally takes me a day and a half, sometimes two days, to rebuild my machine with all of the tools I use on a regular or semi-regular basis.  Drivers, SDKs, and applications have to be installed in the correct order, product keys have to be entered and software activated over the Internet and set up the way I want, wireless network access and VPN connections have to be configured, backups have to be made and application data restored once they’re reinstalled, and there is never a good time for all of the down time.  A developer’s environment can be a very complicated place!

If it’s not error messages and corruption, it’s performance problems that hurt and annoy the most.  There’s a profound difference in speed between a clean build and one that’s been clogged with half a year or more of miscellaneous gunk.  It can mean the difference in Visual Studio, for example, between a 30 second build and three or four minutes of mindless disk thrashing.

Using an immutable development machine means that any viruses that you get, or registry or file corruption that occurs–any problems that arise in the state of the machine–never gets saved, and therefore disappears the next time you start it up.  It is important, however, that everything within the environment is set up just the way you want it.  If you set up your image without ever opening Visual Studio, for example, you’ll always be prompted with a choice about the style of setup you want, and then you’d have to wait for Visual Studio to set itself up for the first time, every time.

Still, if you invest a little today in establishing a solid environment, the benefits and savings over the next year or two can be well worth the effort.  As I discovered over the past week and a half, there are a number of pitfalls and dangers involved.  If you’ve considered setting up something similar, I hope the lessons I’ve learned will be able to save you much of the trouble that I went through.

Solution

After listening to Security Now! and several other podcasts over the past couple of years about virtual machines and how they’re being used for software testing to ensure a consistent starting state, I began thinking of how nice it would be if I could guaranty that my development environment would always remain the same.  If I could get all of my tools installed cleanly to maximize performance and stability, and then freeze it that way, while still allowing me to change the state of my source code files and other development assets, I might never have to rebuild my computer again.  At least, not until it’s time to make important software upgrades, but then it would be a controlled update, from which I could easily roll back if necessary.

But how can this be done?  How can I create an immutable development environment and still be able to update my projects and save changes?  By storing mutable state on a separate drive, physical or virtual, which is not affected by virtual machine snapshots.  It turns out to be not so simple, but achievable nonetheless, and I’ll explain why and how.

If the perfect environment is to be discovered, I have several more criteria.  First, it has to support, or at least not prevent, the use of multiple monitors.  Second, I’d like to synchronize as much application data as possible across multiple computers.  Third, as I do a lot of mobile device development, I need access to USB and other ports for connecting to devices.

Implementation

For data synchronization across machines, I’ve been using Microsoft’s Mesh.com which is based on FeedSync, and is led by Ray Ozzie.  Based on my testing over the past two weeks, it actually works very well.  Though it’s missing many of the features you would expect from a mature synchronization platform and toolset, for the purposes of my goals explained in this article, it’s a pretty good choice and has already saved me a lot of time where I would have otherwise been transferring files to external drives and USB keys, or e-mailing myself files and trying to get around file size and content limitations.  If this is the first time you’ve heard of Mesh, make a point of learning more about it, and sign up for the technical preview to give it a test drive!  (It’s free.)

Originally I wanted to use Virtual PC to create my development virtual machine, however as of the 2007 version, it still does not support USB access, so immediately I had to rule it out.  I downloaded a demo of VMWare’s Workstation instead, which does support USB and provides a very nice interface and set of tools for manipulating VMs.

The diagram below illustrates the basic system that I’ve created.  You’ll notice (at the bottom) that I have multiple development environments.  I can set these environments up for different companies or software products that each have unique needs or toolsets, and because they’re portable (unlike normal disk images), I can share them with other developers to get them up and running as quickly as possible.

Ideal Development Environment

Partitioning of the hard drive, or the use of multiple hard drives, is not strictly necessary.  However, as I’m working with a laptop and have only a single disk, I decided to partition it due to the many problems I had setting up all of the software involved.  I rebuilt the machine so many times, it became a real hassle to restore the application data over and over again, so putting it on a separate partition allowed me to reformat and rebuild the primary partition without constantly destroying this data.

My primary partition contains the host operating system, which is Windows XP Professional SP3 in my case.  (If you’re using Vista, be aware that Mesh will not work with UAC (user account control) disabled, which I find both odd and irritating.)  The host OS acts as my communication workstation where I read e-mail, chat over messenger, read blogs and listen to podcasts, surf the Internet and save bookmarks, etc.  I always want access to these functions regardless of the development environment I happen to have fired up at the time.

Mesh is installed only on the host operating system.  To install it on each virtual machine would involve having multiple copies of the same data on the same physical machine, and clearly this isn’t desirable.  I considered using VMWare’s ESXi server, which allows you to run virtual machines off the bare metal instead of requiring a host operating system, but as I always want my communications and now also synchronization software running, their Workstation product seemed like an adequate choice.  Which is great because it’s only $189 at the time I’m writing this, opposed to $495 for ESXi Server.

With the everyday software taken care of in the host OS, the development virtual machines can be set up unencumbered by these things, simplifying the VM images and reducing the number of friction points and potential problems that can arise from the interaction of all of this software on the same machine.  That alone is worth considering this kind of setup.

Setting up my development VM was actually easier than installing the host OS since I didn’t have to worry about drivers.  VMWare Workstation is very pleasant to use, and as long as the host OS isn’t performing any resource intensive operations (it is normally idle), the virtual machine actually runs at “near native speed” as suggested by VMWare’s website.  The performance hit feels similar to using disk encryption software such as TrueCrypt.  With a 2.4 GHz dual-core laptop, it’s acceptable even by my standards.  I’m planning to start using a quad-core desktop soon, and ultimately that will be a better hardware platform for this setup.

Hiccup in the Plan (Part 1)

The first problem I ran into was in attempting to transfer a virtual machine from one computer to another.  Wanting to set up my new super-environment on a separate computer from my normal day-to-day development machine, I set up VMWare on one computer and when I thought I had the basics completed, I attempted to transfer the virtual machine to my external hard drive.  Because the virtual disk files were over 2 GB and the external hard drive is formatted as FAT32 (which has a file size limitation of 2 GB), I was immediately stopped in my tracks.  I tried copying the files over the local network from one computer to the other, but after 30 minutes of copying, Windows kindly informed me that a failure had occurred and the file could not, in fact, be found.  (Ugh.)  Lesson learned: VMWare has an option, when creating a new virtual machine, to break up virtual disks into 2 GB files.  From that point on, I decided not only to use this option, but also to simply build the virtual machines on the actual target computer, just in case.

The next trick with VMWare was in allowing the virtual machine to share a disk with the host operating system.  My first route was to set up a shared folder.  This is a nice feature, and it allows you to select a folder in your host OS to make visible to the virtual machine.  I thought it would be perfect.  However, Visual Studio saw it as non-local and therefore didn’t trust it.  In order to enable Visual Studio to trust it, you have to change machine-level security configuration (in the VM).  There are two ways of doing this: there is a .NET Configuration tool (mscorcfg.msc) with a nice user interface, and then there is the command-line caspol.exe tool with lots of confusing options and syntax to get right.

Navigating to Administrative Tools, I was stumped to find that I didn’t have this nice GUI tool any more.  I’ve fully converted everything to Visual Studio 2008 and no longer work in 2005, so the last time I built my machine, I ran the VS2008 install DVD.  I learned the hard way that Microsoft no longer includes this tool in the new Visual Studio 2008 install DVD.  I Googled around to discover that Microsoft, for reasons unknown, did in fact decide to remove this tool from their installer, and that if I wanted to have it, I would have to install (first) the .NET 2.0 Redistributable, (second) the .NET 2.0 SDK, and (finally) Visual Studio 2008.  This would mean rebuilding the VM… again.  I tried caspol.exe briefly and finally gave up (the example I found in the forums didn’t work), telling myself that I really did want this GUI tool anyway, and if I was going to set up the perfect development environment, it was worth one more rebuild to get it right.

Several blue screens of death, some puzzling file corruption, and two reinstallations later, I was thinking that the prescribed solution I was attempting wasn’t all it was cracked up to be after all.  Whoever suggested it was messing with me, and was probably crazy anyway.  I did eventually get these components installed and working by simply repeating the procedure, and after using the configuration tool, Visual Studio did seem pretty happy to open the solutions and build them for me.

Until I opened my other solution and tried to build it, that is.  I keep custom controls and designers in a separate solution because of a post-build task that runs and registers the control designers (which is itself an infuriating requirement, but that’s for another article).  Whenever I tried building these projects, I would get an error that access was denied to create some kind of resource file.  I looked at the properties of the shared folder and saw that the file system claimed to be HPFS instead of NTFS.  HPFS is a proprietary format of VMWare’s that somehow provides an accessibility tunnel to the real underlying storage format, and I don’t know anything else about it, but I wouldn’t be surprised if that didn’t have something to do with my problem.  Visual Studio does some finicky things, and VMWare certainly does its share of hocus pocus.  Figuring out the possible interaction between them was going to be beyond my voodoo abilities and resources, so I had to find another way around this shared disk situation if I planned on developing custom controls in this environment.

Hiccup in the Plan (Part 2)

My Dell Latitude D830 is four months old.  I requested a Vostro but was absolutely refused by the company I work for, who shall remain nameless.  Supposedly the Latitude’s are a “known quantity”, will have fewer problems, and are therefore better for support reasons.  Regardless, the D830 is for the most part a good, fast machine.  This one in particular, however, became a monster in the past week during the time I was trying to get this new setup working, costing me a full week of lost time and a great deal of frustration.  Every time I thought I had isolated the cause, some other misbehavior appeared to confuse matters.  Each step of troubleshooting and repair seemed reasonable at the time, and yet as new symptoms emerged, the dangling carrot moved just beyond my reach, my own modern reenactment of Sisyphus’s repeated torment.

MeshCorruption

Not only was I getting Blue Screens of Death several times a day, but CHKDSK would start up before Windows and all kinds of disk problems would be discovered, such as orphaned files and bad indexes.  Furthermore, the same things were happening with the virtual disks, and VMWare reported fragmentation on those disks immediately after installing the operating system and a few tools.  There were folders and files I couldn’t rename or delete, and running the Dell diagnostics software turned up nothing at all.

Finally, having a second D830 laptop, the Dell tech suggested swapping hard drives.  After installing my whole environment, plus the VMs, about a dozen times, I really didn’t feel like going through this yet again, but it seemed like a reasonable course of action, and so I went through the process again.  Getting almost all the way through everything without a problem, I finally (with a smile) rebooted my VM and waited for it to come back up, only to see CHKDSK run and find many pages of problems once again.

Warning: The great thing about Mesh is that you can make changes to your files, such as source code, recompile, and all of those changes shoot up into the cloud in a magical dance of synchronization, and those changes get pushed down to all the other computers in your mesh.  What’s scary, though, is when you have a hard drive with physical defects that corrupts your files.  Those corruptions also get pushed up to the cloud, and this magically corrupts the data on all of the computers in your mesh.  So be aware of this!

The Value of Offline Backups

Make backups.  Check your code into version control.  Mesh is a great tool for synchronizing data, and initially I thought this would be sufficient for backups of at least some of my data, but it falls short in several ways.

First, Mesh doesn’t version your backups.  Once you make a change and you connect to the Internet, everything gets updated immediately.  If data is accidentally deleted or corrupted, these operations will replicate to the cloud and everywhere in your mesh.  Versioned backups, as snapshots in time, are the only way to ensure that you can recover historical state if things go awry as they did for me.

Second, Mesh is great for synchronizing smaller, discrete files that either aren’t supplemented with metadata, or whose metadata also exists in files within the same folder structure and which also gets synchronized.  By the latter, I mean systems such as Visual Studio projects and files: the files are referenced by project files, and project files referenced by solution files, but these are all small, discrete files themselves that can also be seamlessly synchronized.  When I add a file to a project and save, Mesh will update the added file as well as the project file.

Application data that doesn’t work well would be any kind of monolithic data store, such as a SQL Server database or an Outlook’s (.pst) data file.  Every time you got an e-mail and your .pst file changed, the whole file would be sent up to Mesh, and if your e-mail files get as large as mine, that would be a problem.  Hopefully in the future, plug-ins will be developed that can intelligently synchronize this data as well through Mesh.

I’m using and highly recommend Acronis TrueImage for backups.  It really is a modern, first-rate backup solution.

Conclusion

In the end, Dell came and replaced my motherboard, hard drive, and DVD-RW drive (separate problem!), and I was able to get back to building my immutable development environment.  Instead of using shared folders, VMWare lets you add a hard drive that is actually the physical disk itself, or a partition of it.  Unfortunately, VMWare doesn’t let you take a snapshot of a virtual machine that has such a physical disk mounted.  I don’t know why, and I’m sure there’s a reason, but the situation does suck.  The way I’ve gotten around it is to finish setting up my environment without the additional disk mounted, take a snapshot, and then add the physical disk.  I’ll run with it set up for a day or two, allowing state to change, and then I’ll remove the physical disk form the virtual machine, revert to the latest snapshot, and then add the physical disk back in to start it up again.  This back-and-forth juggling of detaching and attaching the physical disk is less than ideal, but ultimately not so bad as the alternative of not having an immutable environment, and I haven’t had the last word quite yet.

I’ll continue to research and experiment with different options, and will work with VMWare (and perhaps Xen) to come up with the best possible arrangement.  And what I learn I will continue to share with you.

Posted in Custom Controls, Development Environment, Uncategorized, Virtualization, Visual Studio | 5 Comments »

Spb Mobile Shell: An Alternative Windows Mobile Shell

Posted by Dan Vanderboom on May 6, 2008

Spb Software House has been creating some great Windows Mobile software for a while now, but recently they released their Spb Mobile Shell, and I’m so impressed that I felt the need to tell everyone about it.  The only reason it doesn’t quite rival the iPhone interface is its lack of scope: it doesn’t (yet?) replace all of the built-in applications for managing tasks, calendar items, file exploration, process/task management, and so on.

image image image image

Why am I so enamored with their user interface?  Let me count the ways:

  1. Visual effects such as linear gradients, faded backgrounds for emphasizing foreground popups, fast animated page transitions, and a choice of skin-like color schemes.
  2. Large, touch friendly buttons that eliminate the need to pull out your stylus and poke at impossibly tiny areas of the screen.
  3. A large button bar along the bottom, and the elimination of the start menu along the top and the Windows Mobile menu along the bottom (with only two top-level options).
  4. Selection of phone contacts using photo buttons.
  5. Gesture recognition of finger movements to flip pages.
  6. The ability to customize menus and other settings.

For only $29.95 (or packaged together with three other useful applications for $49.95), Spb Mobile Shell is a steal.  I’ve experimented with a few other shell applications, and had problems with glitch and buggy behavior, but so far this little gem has performed marvelously in all regards.

I hope they eventually provide some way to integrate new applications into their shell.  It would be nice to take advantage of some of their visual layouts, message box pop up effects, and so on, to provide an interface in my own software that’s consistent with their shell.  Better yet, the Windows Mobile team should throw in the towel with their existing shell and buy this one to use as a guideline to replace theirs.  As Mark Miller so rightly observed in the recent Dot Net Rocks episode “The Science of Great UI“, the Windows Mobile 5 user interface sucks.  Companies like Spb wouldn’t be providing alternatives if this wasn’t the case.  From what I’ve seen of Windows Mobile 6, things aren’t looking much better there, either.

Posted in User Interface Design, Windows Mobile | Leave a Comment »

Compact Framework Controls (Part 3): Linear Gradients

Posted by Dan Vanderboom on May 5, 2008

[This article is part of a series that starts in this article and precedes this one here.]

Linear Gradients

Linear gradients are a nice, subtle effect that can turn a boring control into something more interesting and professional looking.  You can use a linear gradient for the entire background of your control, which I’ll demonstrate in this article, or you can paint one or more regions selectively to display a gradient.  A linear gradient is a gradual transition from one color to another, and while you can transition through multiple colors along an axis, going from blue to red to green to white to black if you wanted, I’m going to start simple and create a control that blends between only two colors.  You can also define the line of change to be any angle: vertical (as shown in the example below), horizontal, or some other angle.  I’ll show how to draw just the vertical and horizontal linear gradients.

Linear Gradient Example

I’ll be using the control from my previous article, and adding to it, to demonstrate linear gradients.  We’re going to need some new properties to support gradients, so first we need to add a couple enumerations.

public enum RegionFillStyle
{
    SolidColor,
    LinearGradient
}

public enum LinearGradientDirection
{
    Horizontal,
    Vertical
}

And now the new properties.

private RegionFillStyle _FillStyle = RegionFillStyle.SolidColor;
[DefaultValue(RegionFillStyle.SolidColor)]
public RegionFillStyle FillStyle
{
    get { return _FillStyle; }
    set { _FillStyle = value; Refresh(); }
}

private LinearGradientDirection _LinearGradientDirection = LinearGradientDirection.Vertical;
[DefaultValue(LinearGradientDirection.Vertical)]
public LinearGradientDirection LinearGradientDirection
{
    get { return _LinearGradientDirection; }
    set { _LinearGradientDirection = value; Refresh(); }
}

private Color _BackColor2 = Color.White;
public Color BackColor2
{
    get { return _BackColor2; }
    set { _BackColor2 = value; Refresh();  }
}

The goal is to draw a background for our control that is a linear gradient, fading from BackColor to BackColor2.  We’re going to use a technique called interpolation, which is the calculation of new data points based on the values of adjacent data points.  In our case, we’re going to be interpolating color values.  We know the color at the top and the bottom (in the case of a vertical gradient), so a pixel halfway between them spatially should have a color value that is halfway between the color values at both ends.  Because colors are manipulated in bitmaps with an RGB scheme (using red, blue, and green aspects), we actually have three component values that need to be interpolated.

Understanding the Math

If our control is 100 pixels tall, and the color at the bottom is 100 units less blue than at the top, the translation is very simple: as we move down each pixel from top to bottom, we’ll subtract 1 unit of color from the blue value.  The challenge lies in the fact that we can’t assume our height and our color values will line up so nicely.  Furthermore, we have two other colors to deal with, and they may need to change at different rates or in different directions: the color may become slightly more red while simultaneously becoming drastically less green.

So we’re going to need some way of finding the scaling factor between the height or width of the control and the distance in color values for red, green, and blue separately.  In our example of 100 pixels to 100 color units, we have a 1:1 scaling factor.  If we instead had to make a color change of 200 units, we’d have a scaling factor of 1:2, or 1 pixel for 2 units of color change.  Another way to think of this is to say that for every pixel we move along the line, we’re going to increase or decrease our color by 2 units.

double RedScale = (double)Height / (BackColor2.R - BackColor.R);

The RedScale variable divides our height by our gradient’s difference (or change) in redness, and we make the same scaling calculation with green and blue.  This scaling takes increasing and decreasing color changes into account based on whether the subtraction expression on the right results in a positive or negative number.  As we move along the y axis, we’ll create a color that uses BackColor as a base and adds RGB values to it that divide the current y position with this scaling factor.  Let’s take a look at that code:

Bitmap LinearGradient = null;

if (LinearGradientDirection == LinearGradientDirection.Vertical)
{
    double RedScale = (double)Height / (BackColor2.R - BackColor.R);
    double GreenScale = (double)Height / (BackColor2.G - BackColor.G);
    double BlueScale = (double)Height / (BackColor2.B - BackColor.B);

    LinearGradient = new Bitmap(1, Height);
    for (int y = 0; y < Height; y++)
    {
        int red = BackColor.R + (int)((double)y / RedScale;
        int green = BackColor.G + (int)((double)y / GreenScale;
        int blue = BackColor.B + (int)((double)y / BlueScale;

        Color color = Color.FromArgb(red, green, blue);
        LinearGradient.SetPixel(0, y, color);
    }
}

if (LinearGradient != null)
{
    FillBrush = new TextureBrush(LinearGradient);
}

After calculating our scaling factors, we define a bitmap that’s as tall as our control, but only one pixel wide.  You can see this bitmap being used to create a TextureBrush at the bottom of the code.  This brush will be used to fill the entire area from left to right, copying the bitmap across the entire surface, so there’s no need to make it any wider than a single pixel.  (For horizontal gradients, we do the opposite: create a bitmap as wide as our control but only one pixel tall.)

In our hypothetical 100-pixel-tall control, with a red value that decreases 200 units from top to bottom (and therefore has a scaling factor of -0.5), we calculate each pixel’s redness by dividing y by -0.5.  At pixel y=25, which is 25% of the way down, we get a value of -50, which is 25% of -200.  At pixel y=75, we get 75 / -0.5 = -150.  So we take our original BackColor.R, and add this negative number, which makes it decrease from the base color as desired.

The only thing we need to do now is to ensure that each of our three color values never go outside the range of 0 to 255, otherwise we’ll get an error thrown from the Bitmap class.  We can do this with the Math class’s methods Min and Max, like this:

int red = Math.Max(Math.Min(BackColor.R + (int)((double)y / RedScale), 255), 0);
int green = Math.Max(Math.Min(BackColor.G + (int)((double)y / GreenScale), 255), 0);
int blue = Math.Max(Math.Min(BackColor.B + (int)((double)y / BlueScale), 255), 0);

Min returns the smaller of two numbers, and since we pass in 255 along with our calculated color, if our calculation is over 255, then the value it will return is 255.  Max does the opposite, and the combination ensures we stay within the valid range.

Results

The code sample above only showed the code for a vertical gradient, so here is the complete listing of our control with the logic for horizontal gradients as well.

using System;
using System.Collections.Generic;
using System.Windows.Forms;
using System.Drawing;
using System.Reflection;
using System.ComponentModel;

namespace CustomControlsDemo
{
    public class ClippingControl : Control
    {
        private RegionFillStyle _FillStyle = RegionFillStyle.SolidColor;
        [DefaultValue(RegionFillStyle.SolidColor)]
        public RegionFillStyle FillStyle
        {
            get { return _FillStyle; }
            set { _FillStyle = value; Refresh(); }
        }
        
        private LinearGradientDirection _LinearGradientDirection = LinearGradientDirection.Vertical;
        [DefaultValue(LinearGradientDirection.Vertical)]
        public LinearGradientDirection LinearGradientDirection
        {
            get { return _LinearGradientDirection; }
            set { _LinearGradientDirection = value; Refresh(); }
        }
        
        private Color _BackColor2 = Color.White;
        public Color BackColor2
        {
            get { return _BackColor2; }
            set { _BackColor2 = value; Refresh(); }
        }

        protected override void OnPaint(PaintEventArgs e)
        {
            // define a canvas for the visual content of the control
            Bitmap MyBitmap = new Bitmap(Width, Height);
            Graphics g = Graphics.FromImage(MyBitmap);

            Brush FillBrush = null;
            if (FillStyle == RegionFillStyle.SolidColor)
            {
                FillBrush = new SolidBrush(BackColor);
            }
            else if (FillStyle == RegionFillStyle.LinearGradient)
            {
                Bitmap LinearGradient = null;

                if (LinearGradientDirection == LinearGradientDirection.Horizontal)
                {
                    double RedScale = (double)Width / (BackColor2.R - BackColor.R);
                    double GreenScale = (double)Width / (BackColor2.G - BackColor.G);
                    double BlueScale = (double)Width / (BackColor2.B - BackColor.B);

                    LinearGradient = new Bitmap(Width, 1);
                    for (int x = 0; x < Width; x++)
                    {
                        int red = Math.Max(Math.Min(BackColor.R + (int)((double)x / RedScale), 255), 0);
                        int green = Math.Max(Math.Min(BackColor.G + (int)((double)x / GreenScale), 255), 0);
                        int blue = Math.Max(Math.Min(BackColor.B + (int)((double)x / BlueScale), 255), 0);

                        Color color = Color.FromArgb(red, green, blue);
                        LinearGradient.SetPixel(x, 0, color);
                    }
                }
                else if (LinearGradientDirection == LinearGradientDirection.Vertical)
                {
                    double RedScale = (double)Height / (BackColor2.R - BackColor.R);
                    double GreenScale = (double)Height / (BackColor2.G - BackColor.G);
                    double BlueScale = (double)Height / (BackColor2.B - BackColor.B);

                    LinearGradient = new Bitmap(1, Height);
                    for (int y = 0; y < Height; y++)
                    {
                        int red = Math.Max(Math.Min(BackColor.R + (int)((double)y / RedScale), 255), 0);
                        int green = Math.Max(Math.Min(BackColor.G + (int)((double)y / GreenScale), 255), 0);
                        int blue = Math.Max(Math.Min(BackColor.B + (int)((double)y / BlueScale), 255), 0);

                        Color color = Color.FromArgb(red, green, blue);
                        LinearGradient.SetPixel(0, y, color);
                    }
                }

                if (LinearGradient != null)
                {
                    FillBrush = new TextureBrush(LinearGradient);
                }
            }

            if (FillBrush != null)
            {
                g.FillRectangle(FillBrush, ClientRectangle);
            }

            // draw graphics on our bitmap
            g.DrawLine(new Pen(Color.Black), 0, 0, Width - 1, Height - 1);
            g.DrawEllipse(new Pen(Color.Black), 0, 0, Width - 1, Height - 1);

            // dispose of the painting tools
            g.Dispose();

            // paint the background to match the Parent control so it blends in
            e.Graphics.FillRectangle(new SolidBrush(Parent.BackColor), ClientRectangle);

            // define the custom shape of the control: a trapezoid in this example
            List<Point> Points = new List<Point>();
            Points.AddRange(new Point[] { new Point(20, 0), new Point(Width - 21, 0), 
                new Point(Width - 1, Height - 1), new Point(0, Height - 1) });

            // draw that content inside our defined shape, clipping everything that falls outside of the region;
            // only if the image is much smaller than the control does it really get "tiled" and act like a textured painting brush
            // but our bitmap image is the same size as the control, so we're just taking advantage of clipping
            Brush ImageBrush = new TextureBrush(MyBitmap);

            e.Graphics.FillPolygon(ImageBrush, Points.ToArray());
        }
    }
}

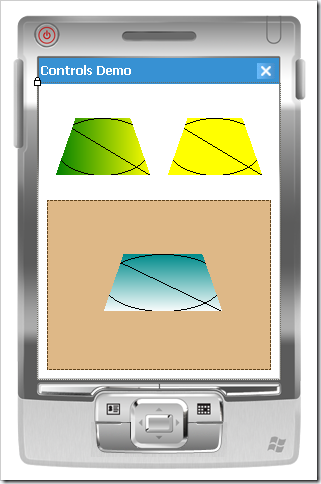
Placing a couple of these controls on a form, I can set one of them to use a solid background (yellow), and the others to use vertical and horizontal linear gradients.

Linear Gradient Control Screenshot

Conclusion

Linear gradients are a great effect to have in your repertoire of techniques.  Compact Framework applications especially tend to be flat and dull, with an unimpressive array of built-in controls, and with more focus on user interfaces like the iPhone and some of the cool new HTC touch devices, the desire for fancier interfaces is growing.  As we start to mix operations like polygon clipping and quasi-transparency (presented in the previous article), linear gradients, and others, we can put together a bag of tricks for composing beautiful and interesting user experiences.

Posted in Algorithms, Compact Framework, Custom Controls, User Interface Design, Windows Forms | 9 Comments »

Compact Framework Controls (Part 2): Polygon Clipping

Posted by Dan Vanderboom on May 4, 2008

[This article is part of a series that starts in this article.]

My intention is to cover a full spectrum of activities around custom control development, with an emphasis on the compromises, workarounds, and special care that must be taken when developing controls for the Compact Framework.  In my first article, I talked about how most design-time attributes must be applied to control classes and their members, and what some of those attributes mean.  I have a number of articles planned that explore those attributes more, and will go into extending the design-time experience in more depth, but I’m going to take a detour into custom painting of the control surface first, so we have a control to reference and work with in the examples.

Polygon Clipping

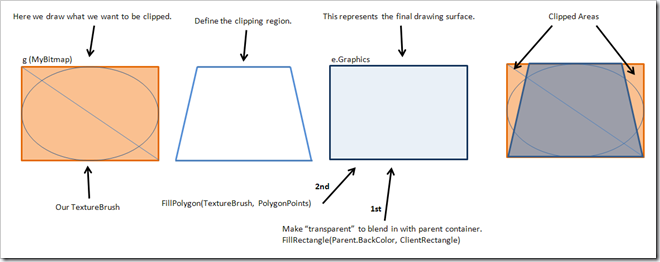
If you’re new to creating graphical effects and unfamiliar with the techniques invovlved, clipping refers to the chopping off of an image based on some kind of border or boundary.  In Windows Forms interfaces, controls are inherently rectangular because clipping occurs automatically at the window’s boundary (which is a shame considering how this presumption of need slows rendering, and WPF takes good advantage of not doing so).  Everything outside the control’s outer shape doesn’t get drawn at all.  You can draw anywhere you want, including negative coordinates, but only the points that fall within the clipping region will be displayed.

Clipping Illustration

But what if you want to make your control a different shape, other than the standard rectangle, like an ellipse or a rounded rectangle?  How do you make sure that whatever you draw inside never leaks outside of your defined shape?  In the full .NET Framework, there is a Region property in the Control class that defines these boundaries, and there are several good articles that explain this.  The clipping mask is applied based on that Region’s definition.  In Compact Framework, the Region property doesn’t exist, and you’re forced to find your own way of defining different shapes.

The key to this is to understand the Graphics class’s Fill methods.  While FillEllipse and FillRectangle definitely have their uses, I’d like to focus on situations that are a little bit more demanding, such as when you want to represent a more complex shape like a rounded rectangle (with many points) or some kind of UML diagram element.  FillPolygon takes a list of Points, and with them can define the most eccentric and specific of shapes.  By filling a polygon with an image using a TextureBrush, clipping happens automatically as part of the operation.

Let’s take a look at some code to see how we perform each of these steps: preparing and drawing on a bitmap image in memory, defining our shape’s boundaries, and then clipping that image within the specified shape.

using System;
using System.Collections.Generic;
using System.Windows.Forms;
using System.Drawing;
using System.Reflection;

namespace CustomControlsDemo
{
    public class ClippingControl : Control
    {
        protected override void OnPaint(PaintEventArgs e)
        {
            // define a canvas for the visual content of the control
            Bitmap MyBitmap = new Bitmap(Width, Height);

            // create a painting tools object
            Graphics g = Graphics.FromImage(MyBitmap);

            // draw graphics on our bitmap
            g.FillRectangle(new SolidBrush(Color.PaleGoldenrod), ClientRectangle);
            g.DrawLine(new Pen(Color.Black), 0, 0, Width - 1, Height - 1);
            g.DrawEllipse(new Pen(Color.Black), 0, 0, Width - 1, Height - 1);

            // dispose of the painting tools
            g.Dispose();

            // define the custom shape of the control: a trapezoid in this example
            List<Point> Points = new List<Point>();
            Points.AddRange(new Point[] { new Point(20, 0), new Point(Width - 21, 0), 
                new Point(Width - 1, Height - 1), new Point(0, Height - 1) });

            // draw that content inside our defined shape, clipping everything that falls outside of the region;
            // only if the image is much smaller than the control does it really get "tiled" and act like a textured painting brush
            // but our bitmap image is the same size as the control, so we're just taking advantage of clipping
            Brush ImageBrush = new TextureBrush(MyBitmap);
            e.Graphics.FillPolygon(ImageBrush, Points.ToArray());
        }
    }
}

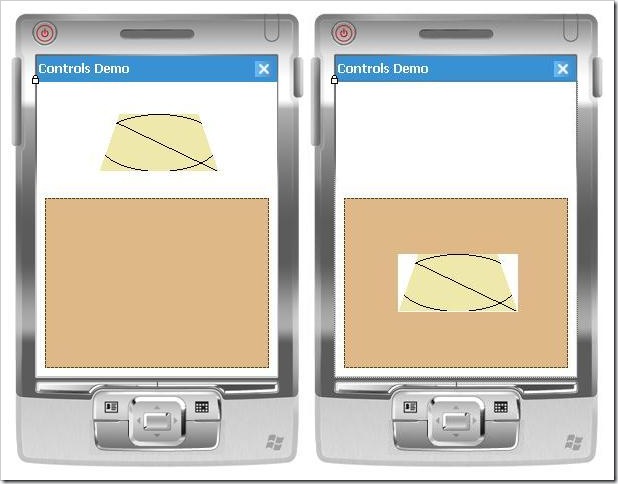
Although this control has a silly shape and doesn’t do much yet, it does illustrate the basics of painting within the bounds of an irregular shape.  As long as we draw on MyBitmap, everything will be properly clipped by the call to FillPolygon.  However, as you can see in the screenshots below, the white background around our custom shape could be a problem.  You can change the BackColor property to match the color of the container its on (a Panel control in this case, which is Color.BurlyWood), but really it makes more sense for BackColor to describe the color within our shape.  We’d like the surrounding background to blend in with whatever container the control is sitting in.

first version

We can accomplish this with two simple changes.  First, at some point before the FillPolygon call, we need to fill the entire control’s area with the BackColor property of the parent control.  We will draw using the e.Graphics object, which paints on the whole rectangular control, not our g Graphics object, whose contents get clipped.  Then, instead of hard coding Color.PaleGodenrod, we can use the BackColor property to specify our fill color.  Here is the changed section of code:

// draw graphics on our bitmap
g.FillRectangle(new SolidBrush(BackColor), ClientRectangle);
g.DrawLine(new Pen(Color.Black), 0, 0, Width - 1, Height - 1);
g.DrawEllipse(new Pen(Color.Black), 0, 0, Width - 1, Height - 1);

// dispose of the painting tools
g.Dispose();

e.Graphics.FillRectangle(new SolidBrush(Parent.BackColor), ClientRectangle);

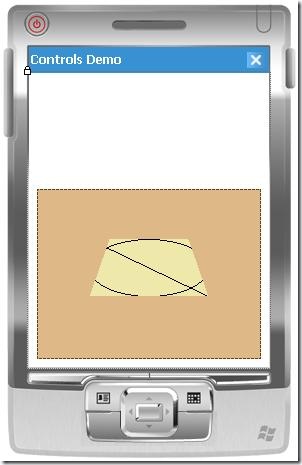
Now if we set the BackColor to PaleGodenrod, we’ll get this rendering:

transparent background

Dragging the control off the panel and into the white area will cause the area around the control to paint white, so now you can see how it blends in with whatever background we have as long as it’s a solid color.

In a future article, after I’ve covered how to draw arcs and curves, I will revisit this technique and demonstrate how to draw rectangles with rounded corners.

[This article is part of a series that continues in this article.]

Posted in Algorithms, Compact Framework, Custom Controls, User Interface Design, Visual Studio, Windows Forms, Windows Mobile | 12 Comments »