Critical Development

Language design, framework development, UI design, robotics and more.

Archive for the ‘Compact Framework’ Category

Windows Phone 7 – Platform

Posted by Dan Vanderboom on August 20, 2010

A Scorching Hot Market

The smart phone market is the hottest market in the computer world, based on unbelievable growth.  It surpasses the desktop “personal computer”, the PC, in finding its way into the pockets and hands of consumers who might not otherwise buy a larger computer; and in doing so, has established itself as the ultimate personal computer.

It’s like filling a ditch with large boulders until no more will fit, and then filling the remaining space with smaller debris.  Smart phones, and all cell phones to an even larger extent, are that debris.  And in the future, we’ll fill what space is left with granules of sand.

Looking at the Windows Phone from every angle, from features to development patterns, from its role in the market to its potential in peer-to-peer and cloud computing scenarios, overall I have to admit I am very impressed and quite excited.  I also have some harsh criticism; and because of my excitement and optimism, strong hope that these concerns will be addressed as matters of great urgency.  If Microsoft is serious about competing with Android and iPhone, they’ll have to invest heavily in doing what they’ve been so good at: giving developers what they want.

The Consumer Experience: Entertainment

Microsoft’s primary focus is on the consumer experience, and I think that focus is aptly set.  But that’s the goal, and supporting developers is the means to accomplish that.  You can’t separate one from the other.  However, you must always prioritize; and while features like background thread execution has many solid business cases, it has to wait for consumer experience features to be refined and reliability guarantees to be worked out.

What this means is that Microsoft is paying much more attention to Design with a capital D.  They’re taking tight control over the operating system’s shell UI in order to provide consistency across devices and carriers –taking a lesson from Android, which is painfully fragmented—and have announced some exciting new controls such as TiltContentControl, Panorama and Pivot.

By focusing on the consumer, Microsoft is in essence really just reminding themselves not to think like a company for enterprise customers.  Let’s face it: Microsoft is first and foremost an enterprise products company.  But by integrating XNA and Xbox Live into the Windows Phone platform, they’re creating a phone with a ton of gamer–and therefore non-enterprise–buzz.

Entertainment is Windows Phone’s number one priority.  Don’t worry: the enterprise capabilities you want will come: as services in the OS or as apps that Microsoft and third-parties publish.  But those enterprise scenarios will be even more valuable as the entertaining nature of the device puts it into millions and millions of hands.

Introducing Funderbolt Games

To take advantage of this explosion of interest in smart phones and gaming, and having developed mobile device software for the past five years, I’ve recently started a company called Funderbolt Games.  We’re developing games (initially targeting Windows Phone and Android) for children from about one to five years old, and will eventually publish casual games for adults as well.

I’ve been working with a fantastic artist, Shannon Lazcano, in building our first Silverlight game for Windows Phone.  It will be a simple adventure game with lots of places and activities to explore as a family of mice interact with a rabbit, a dog, a frog, some fireflies, dragonflies, and more.  Based on heaps of research of kids games on the iPhone, and having watched young children play most of the games in the App Store over the past two years, the games we’re creating are guaranteed to keep young kids entertained for dozens of hours.

In the next few weeks, I’ll publish more details and some screen shots.  The target for our first title is October 27th (PDC 2010).

The Shell User Interface

The Android operating system’s openness has become one of its weaknesses.  Shell UI replacements like Motorola’s Blur and HTC’s Sense are modifications of the operating system itself.  When a new version of Android is released, these manufacturer’s take their sweet time making the necessary adaptations with their custom front ends, and customers end up several versions behind–much to their chagrin.

It would be much better to write shell replacements as loosely coupled applications or services, and design the OS to make this easy.  I completely support companies innovating in the shell UI space!  We need to encourage more of this, not to lock them out.  These experiments advance the state of the art in user experience design and provide users with more options.  If anything, the only rule coming from the platform should be that nobody shall prevent users from changing shells.

Because the smartphone is such a personal device, it makes sense that different modes of interaction might rely in part on personal taste.  Some users are simply more technical than others (developers), or need to be shielded from content as well as messing things up (children), and there are people with various disabilities to consider as well.  One UI to rule them all can’t possibly be the right approach.

Despite this, it’s really not a shock then that Windows Phone 7 will have a locked down shell UI in its first and probably second versions.  Flexibility and choice sound good in theory, but in reality can create quite a mess when done without careful planning, and the Windows Phone team has a substantial challenge in figuring out how to open things up without producing or encouraging many of the same problems they see elsewhere.  I’ll be eagerly watching this drama unfold over the first year that Windows Phones are in the wild.

That being said, I have to admit I’m not a fan of the Windows Phone 7 Start Menu.  It feels disappointingly flat and imbalanced, wasting a good bit of screen real estate to the right of the tile buttons.  I’m glad they attempted something different, but I think they have a long way to go toward making it that sexy at-a-glance dashboard that would inspire any onlooker to go wide-eyed with envy.

The demo videos of Office applications are likewise drab.  Don’t get me wrong: the fonts, as everyone is quick to point out, are beautiful, and we all love the parallax scrolling effects.  But we’ve come to expect and appreciate some chrome: those color gradients and rounded corners and other interesting geometrical shapes that help to define a sense of visual structure.  As noted by several tweeple, it sometimes looks like a hearkening back to ye olden days of text-only displays.  More beautiful text, but nothing beyond that to suggest that we’ve evolved beyond the printing press.

The one line I keep hearing over and over again is that Microsoft is serious about keeping an aggressive development cycle, revving Windows Phone quickly to catch up to their competitors.  The sting of Windows Mobile’s abysmal failure is still fresh enough to serve as an excellent motivator to make the right decisions and investments, and do well by consumers this time.

A Managed World

There are a few brilliant features of Windows Phone 7.  One of them is the requirement for a hardware “Navigate Back” button.  As a Windows Mobile developer working within the constraints of small screens, I never had enough room, and sacrificing space on nearly every screen for a back button was painful.  Not only did you have to give up space, you also had to make it fit your application’s style.  Windows Forms with the Compact Framework (Rest In Peace) was not fun to work with.

We’re entering a new era.  The Windows Phone will only allow third party applications to be written in managed code.  I couldn’t imagine any better news!  Why?  We don’t have to concern ourselves with PInvoke or trying to interoperate with COM objects.  We also don’t have to worry about memory leaks or buffer overruns: the garbage collection and strong-type system in the CLR takes care of these.  Not only do I not have to worry about these problems as a .NET developer, I also don’t have to worry about my app being negatively impacted by an unmanaged app on the same device, and I don’t have to worry about these problems emerging on my own personal phone despite what apps are installed.

I’ve been plagued by my iPhone lately because of unstable apps, especially since I upgraded to iOS 4.x.  I can’t tell you how many times that an app dies because it’s just so damn frequent, and my frustration level is rising.  The quality of Apple’s own apps are just as bad: not only does iTunes sync not work correctly on a PC, but I can’t listen to my podcasts through the iPod app without finding that I can’t play a podcast I downloaded (but I can stream it), or that playback works for a while before it starts to stutter the audio and locks up my whole phone.  These are signs of a fragile platform and an immature, unmanaged execution environment.

I used to be a technology apologist, but I find myself increasingly critical when it relates to my smart phone.  I demand reliability.  Forcing applications to use managed code is an excellent way to do that.  Once your code is wrapped in such a layer, the wrapper itself can evolve to provide continuously improving reliability and performance.

If you have significant investments in unmanaged code for Windows Mobile devices, it’s too late for sympathy.  The .NET platform is over a decade old, and managed execution environments have clearly been the future path for a long time now.  You’ve had your chance to convert your code many times over.  If you haven’t done so yet and you still think your old algorithms and workflows are valuable, it’s time to get on board and start porting.  Pressuring Microsoft to open up Windows Phone to unmanaged code is a recipe for continued instability and ultimately disaster for the platform.

In fact, I would consider the Windows Phone 7 OS to be one step closer to an OS like Singularity, which is a research operating system written in managed code.  As some pundits have predicted or recommended that Apple extrapolate iOS to the desktop and eventually drop OSX, we might see a merge of desktop and mobile OS technologies at Microsoft, or at least a borrowing of ideas, to move us closer to a Singularity-like OS whose purpose is improving the reliability of personal computing.

A Bazillion Useless Apps

There are a ton of crappy apps in the Apple App Store and the Android Marketplace.  I’d say it’s a pretty heavy majority.  Perhaps they shouldn’t be boasting how many apps they have, as if quality and quantity were somehow related.  I have a feeling that Microsoft’s much stronger developer platform will produce a higher signal-to-noise ratio in their own marketplace, and I’ll explain why.

Web developers spend their time attempting cross-browser and cross-version support, Apple developers spend their time tracking down bugs that prevents even basic functionality from working well, and Android developers spend their time trying to support a fragmented collection of phone form factors, screen sizes, and graphics processors.  I suspect Microsoft developers will find a sweet spot in being able to spend the majority of their time building the actual features that have business or entertainment value.

Why?  There are only two supported screen resolutions for Windows Phone 7, and the nice list of hardware requirements give developers a strong common foundation they can count on (while still leaving room for innovation above and beyond that), providing the same kind of consistent platform that Apple developers enjoy.  In addition, the operating system will be updated over the air, so all connected devices will run the same version.  Without OS modifications like shell UI replacements that can delay that version’s readiness, there’s greater consistency and therefore less friction.

These factors don’t account for problems that can still result from sloppy programming and low standards, but fewer obstacles will remain to building high quality applications.  A rich ecosystem of Silverlight and XNA control libraries, frameworks, and tooling already exists.  With incredible debugging tools that further help to improve quality, my bet is that we’ll see much more focus on valuable feature development.

PDC 2010

I’m one of the lucky 1000 developers going to the Professional Developer Conference this year at Microsoft’s Campus in Redmond, WA from October 27-29.  I’m looking forward to learning more about the platform and hope to get my hands on one.  I’m also working on two Windows Azure projects, a big one for a consulting project and a personal one which will be accessed through a Windows Phone app, so I’m excited to catch some of the Azure sessions and meet their team as well.

If you’re also headed to PDC and are interested in meeting up while in Redmond/Seattle, leave me a comment! I’m always interested to hear and share development and technology ideas.

Posted in Compact Framework, Development Environment, iPhone, PDC10, Silverlight, Windows Phone 7 | 1 Comment »

Observations on the Evolution of Software Development

Posted by Dan Vanderboom on September 18, 2008

Neoteny in the Growth of Software Flexibility and Power

Neoteny is a biological phenomenon of an organism’s development observed across multiple generations of a species.  According to Wikipedia, neoteny is “the retention, by adults in a species, of traits previously seen only in juveniles”, and accounts for many evolutionary shifts, including the human brain’s ability to remain elastic and malleable later in life than those of our distant ancestors.

So how does this relate to software?  Software is a great deal like an organic species.  The species emerged (not long ago), incubated in a more or less fragile state for a number of decades, and continues to evolve today.  Each software application or system built is a new member of the species, and over the generations they have become more robust, intelligent, and useful.  We’ve even formed a symbiotic relationship with software.

Consider the fact that software running on computers was at one time compiled to machine language code for a specific processor.  With the invention of platform-independent instruction sets and their associated runtimes performing just-in-time compilation (Java’s JVM and .NET Framework’s CLR), we’ve delayed the actual production of machine language code until it’s actually needed on the target machine.  The compiler produces a slightly more abstract representation of the program logic, and an extra translation step at installation or runtime is needed to complete the process to make the software usable.

With the growing popularity of dynamic languages such as Lisp, Python, and the .NET Framework’s upcoming release of its Dynamic Language Runtime (DLR), we’re taking another step of neoteny.  Instead of a compiler generating instruction byte codes, a “compiler for any dynamic language implemented on top of the DLR has to generate DLR abstract trees, and hand it over to the DLR libraries” (per Wikipedia).  These abstract syntax trees (AST), normally an intermediate artifact created deep within the bowels of a traditional compiler (and eventually discarded), are now persisted as compiler output.

Traits previously seen only in juveniles… now retained by adults.  Not too much of a metaphorical stretch!  The question is: how far can we go?  And I think the answer depends on the ability of hardware to support the additional “just in time” processing that needs to occur, executing more of the compiler’s tail-end tasks within the execution runtime itself, providing programming languages with greater flexibility and power until the compilation stages we currently execute at design-time almost entirely disappear (to be replaced, perhaps, by new pre-processing tasks.)

I remember my Turbo Pascal compiler running on a 33 MHz processor with 1 MB of RAM, and now my cell phone runs at 620 MHz (with a graphics accelerator) and has gigabytes of memory and storage.  And yet with the state of things today, the inclusion of language-specific compilers within the runtime is still quite infeasible.  In the .NET Framework, there are too many potential languages that people might attempt to include in such a runtime: C#, F#, VB, Boo, IronPython, etc.  Trying to cram all of those compilers into a universal runtime that would fit (and perform well) on a cell phone or other mobile device isn’t yet feasible, which is why we have technologies with approaches like System.Reflection.Emit (on the full .NET Framework), and Mono.Cecil (which works on Compact Framework as well).  These work at the platform-independent CIL level, and so can interpret and generate programs generically, interact with each others’ components, and so on.  One metaprogramming mechanism can therefore be reused across all .NET languages, and this metalinguistic programming trend is being discussed on the C# and other language design teams.

I’ve just started using Mono.Cecil, chosen because it is cross-platform friendly (and open source).  The API isn’t very intuitive, but because the source is available, and because extension methods can go a long way to making it more accessible, it’s a great option.  The documentation is sparse, and assembly generation has some performance issues, but it’s a work-in-progress with tremendous potential.  If you’re doing any kind of static analysis or have any need to dynamically generate and consume types and assemblies (to get around language limitations, for example), I’d encourage you to check it out.  A comparison of Mono.Cecil to System.Reflection can be found here.  Another library called LinFu, which performs lots of mind-bending magic and actually uses Mono.Cecil, is also worth exploring.

VB10 will supposedly be moving to the DLR to become a truly dynamic language, which considering their history of support for late binding, makes a lot of sense.  With a dynamic language person on the C# 4.0 team (Jim Hugunin from IronPython), one wonders if C# won’t eventually go the same route, while keeping its strongly-typed feel and IDE feedback mechanisms.  You might laugh at the idea of C# supporting late binding (dynamic lookup), but this is being planned regardless of the language being static or dynamic.

As the DLR evolves, performance optimizations are being discovered and implemented that may close the gap between pre-compiled and dynamically interpreted languages.  Combine this with manageable concurrent execution, and the advantages we normally attribute to static languages may soon disappear altogether.

The Precipitous Growth of Software System Complexity

We’re truly on the cusp of a precipitous period of growth for software complexity, as an exploding array of devices and diverse platforms around the world connect in an ever-more immersive Internet.  Taking full advantage of parallel and distributed computing environments by solving the challenges of concurrency and coordination, as well as following the trend toward increased integration among software components, is pushing software complexity into new orders of magnitude.  The strategies we come up with for organizing these systems will have to take several key factors into consideration, and we will have to raise the level of abstraction to a point that may be hard for us to imagine with our existing tools and languages.

One aspect that’s clear is the rise of declarative or intention-based syntax, whether represented as XML, Domain Specific Langauges (DSL), attribute decoration, or a suite of new visual modeling editors.  This is in part a consequence of raising the abstraction level, as lower-level libraries are entrusted to solve common problems and take advantage of common opportunities.

Another is the use of Inversion of Control (IoC) containers and dependency injection in component based architectures, thereby standardizing the lifecycle of the application and its components, and providing a common environment or ecosystem for all of its components, as well as introducing a common protocol for component location, creation, access, and disposal.  This level of consistency is valuable for sharing a common understanding of how to troubleshoot software components.  The more predictable a component’s interaction with the rest of the system, the easier it is to debug and modify; conversely, the more unique it and its communication system is, the more disparity there is among components, and the more difficult to understand and modify without introducing errors.  If software is a species and applications are individuals, then components are the cells of a system.

Even the introduction of functional programming languages into the mainstream over the past couple years is due, in part, to the ability of those languages to provide more declarative support, more syntactic flexibility, and new ways of dealing with concurrency and coordination issues (such as immutable values) and light-weight, ad hoc data structures (tuples).

Balancing the Forces of Coupling, Cohesion, and Modularity

On a fundamental level, the more that components are independent, the less coupled and the more modular and flexible they are.  But the more they can communicate with and are allowed to benefit from each other, the more interdependent they become.  This adds to cohesiveness and synergy, but also stronger coupling to a community of abstractions.

A composition of services has layers and segments of interdependence, and while there are dependencies, these should be dependencies on abstractions (interfaces and not implementations).  Since there will be at least one implementation of each service, and the extensibility exists to build others as needed, dependency is only a liability when the means for fulfilling it are not extensible.  Both sides of a contract need to be fulfilled regardless; service-oriented or component-based designs merely provide a mechanism for each side to implement and fulfill its part of the contract, and ideally the system also provides a discovery mechanism for the service provider to publish its availability for other components to discover and consume it.

If you think about software components as a hierarchy or tree of services, with services of one layer depending on more root services, it’s easy to see how this simplifies the perpetual task of adding new and revising existing functionality.  You’re essentially editing an outline, and you have opportunities to move services around, reorganize dependencies easily, and have many of the details of the software’s complexity absorbed into this easy-to-use outline structure (and its supporting infrastructure).  Systems of arbitrary complexity become feasible, and then relatively routine.  There’s a somewhat steep learning curve to get to this point, but once you’ve crossed it, your opportunities extend endlessly for no additional mental cost.  At least not in terms of how to compose your system out of individual parts.

Absorbing Complexity into Frameworks

The final thing I want to mention is that a rise in overall complexity doesn’t mean that the job of software developers necessarily has to become more difficult than it is currently.  With the proper design of components that abstract away the complexity into reusable frameworks with intuitive interfaces, developers at the business logic level don’t need to be aware of the inner complexity, in the same way that software developers are largely absolved of the responsibility of thinking about the processor’s inner workings.  As we build our technology stack higher and higher, like the famed Tower of Babel, we must make sure that it’s organized and structured in a way to support that upward growth and the load imposed upon it… so it doesn’t come crashing down.

The requirements for building components tomorrow will not be the same as they were yesterday.  As illustrated in this account of the effort involved in a feature change at Microsoft, in the future, we will also want to consider issues such as tool-assisted refactorability (and patterns that frustrate this, such as “magic strings”), and due to an explosion of component libraries, discoverability of types, members, and their use.

A processor can handle any complexity of instruction and data flow.  The trick is in organizing all of this in a way that other developers can understand and work with.

Posted in Compact Framework, Component Based Engineering, Concurrency, Design Patterns, Development Environment, Distributed Architecture, Functional Programming, Mobile Devices, Object Oriented Design, Problem Modeling, Reflection, Service Oriented Architecture, Software Architecture, Visual Studio | 1 Comment »

Bad SDK Installation Practices

Posted by Dan Vanderboom on July 8, 2008

Some Compact Framework SDKs (SQLCE, Symbol, OpenNETCF), when they install on a development machine, install a deployment “package”, which is a Visual Studio construct that associates one or more assemblies with a CAB file.  When you add a reference to one of those assemblies and deploy to a device, the entire CAB file installs instead of the individual assembly.

In Visual Studio 2005, the definition of these deployment packages consists of an XSL file deeply nested in the Application Data folder (the file name is conman_ds_package.xsl).  Though I couldn’t find any reference to this at all on the Internet when I first played around with this, you can edit this file, and even remove package definitions altogether, which will circumvent this mechanism and deploy only the assemblies you explicitly reference, as you would expect it to behave in the first place.

I’m not recommending this as a general practice, but it sometimes comes in handy: it’s nice to have that level of control over which assemblies are selected and how they get deployed.  My article on the frustrations and oddness with references illustrates some of the problems of “hiding the details” to such an extent that the ultimate behavior is unpredictable and difficult to troubleshoot.

I have so far been unable to find these deployment package definitions in Visual Studio 2008, nor have I found any part of the IDE that allows you to view or edit this.  This is a fundamental design flaw.  If you’re going to raise the level of abstraction, providing a way to make the guts visible and editable is essential for traceability and debugging, especially when the mechanism itself is flawed or is misused by third-party vendors.

For example, there is apparently some room for misinterpretation between where the CAB is located and where Visual Studio actually looks for it when deploying to a device.  When deploying a Symbol DLL file, Visual Studio notices that a Symbol deployment package exists, presumes it’s installed under the current Visual Studio directory (in my case, with Visual Studio 2008, it’s the directory Visual Studio 9.0), and proceeds to deploy from that location.  Unfortunately, the CAB file doesn’t actually exist there, so a deployment error results.

It looks here:

C:\Program Files\Microsoft Visual Studio 9.0\SmartDevices\SDK\Symbol Technologies

However, the SDK was actually installed here:

C:\Program Files\Microsoft Visual Studio 8\SmartDevices\SDK\Symbol Technologies

Error    1    Deployment and/or registration failed with error: 0x8973190d. Error opening file ‘C:\Program Files\Microsoft Visual Studio 9.0\smartdevices\sdk\Symbol Technologies\wce500\armv4i\symbol.all.arm.cab’. Error 0x80070003: The system cannot find the path specified.
      Device Connectivity Component  

Symbol’s .NET SDK v1.4 presumes you are using Visual Studio 2005, and installs itself into the Visual Studio 8.0 directory under Program Files.  This presumption is such an obviously bad practice, it simply shocks me.  They have their own install directory in “C:\Program Files\Symbol Mobility Developer Kit for .NET” where (a little deeper) they keep a copy of the CAB file, which exists independent of any tool that might use it (different versions of Visual Studio, SharpDevelop, etc.).

SQL Server CE / Compact has the same problem, depending on whether it gets installed with Visual Studio or is installed as a separate SDK.  I mentioned SQLCE SDK directory confusions in this article.

So take note: if you’re distributing an SDK, use a little common sense (and consistency) when deciding where to install it, and what presumptions you’re making about your audience.  Learn from SQLCE, Symbol, and others, what not to do.

Posted in Compact Framework, SQL Server Compact, Visual Studio | Leave a Comment »

Compact Framework Controls (Part 3): Linear Gradients

Posted by Dan Vanderboom on May 5, 2008

[This article is part of a series that starts in this article and precedes this one here.]

Linear Gradients

Linear gradients are a nice, subtle effect that can turn a boring control into something more interesting and professional looking.  You can use a linear gradient for the entire background of your control, which I’ll demonstrate in this article, or you can paint one or more regions selectively to display a gradient.  A linear gradient is a gradual transition from one color to another, and while you can transition through multiple colors along an axis, going from blue to red to green to white to black if you wanted, I’m going to start simple and create a control that blends between only two colors.  You can also define the line of change to be any angle: vertical (as shown in the example below), horizontal, or some other angle.  I’ll show how to draw just the vertical and horizontal linear gradients.

Linear Gradient Example

I’ll be using the control from my previous article, and adding to it, to demonstrate linear gradients.  We’re going to need some new properties to support gradients, so first we need to add a couple enumerations.

public enum RegionFillStyle
{
    SolidColor,
    LinearGradient
}

public enum LinearGradientDirection
{
    Horizontal,
    Vertical
}

And now the new properties.

private RegionFillStyle _FillStyle = RegionFillStyle.SolidColor;
[DefaultValue(RegionFillStyle.SolidColor)]
public RegionFillStyle FillStyle
{
    get { return _FillStyle; }
    set { _FillStyle = value; Refresh(); }
}

private LinearGradientDirection _LinearGradientDirection = LinearGradientDirection.Vertical;
[DefaultValue(LinearGradientDirection.Vertical)]
public LinearGradientDirection LinearGradientDirection
{
    get { return _LinearGradientDirection; }
    set { _LinearGradientDirection = value; Refresh(); }
}

private Color _BackColor2 = Color.White;
public Color BackColor2
{
    get { return _BackColor2; }
    set { _BackColor2 = value; Refresh();  }
}

The goal is to draw a background for our control that is a linear gradient, fading from BackColor to BackColor2.  We’re going to use a technique called interpolation, which is the calculation of new data points based on the values of adjacent data points.  In our case, we’re going to be interpolating color values.  We know the color at the top and the bottom (in the case of a vertical gradient), so a pixel halfway between them spatially should have a color value that is halfway between the color values at both ends.  Because colors are manipulated in bitmaps with an RGB scheme (using red, blue, and green aspects), we actually have three component values that need to be interpolated.

Understanding the Math

If our control is 100 pixels tall, and the color at the bottom is 100 units less blue than at the top, the translation is very simple: as we move down each pixel from top to bottom, we’ll subtract 1 unit of color from the blue value.  The challenge lies in the fact that we can’t assume our height and our color values will line up so nicely.  Furthermore, we have two other colors to deal with, and they may need to change at different rates or in different directions: the color may become slightly more red while simultaneously becoming drastically less green.

So we’re going to need some way of finding the scaling factor between the height or width of the control and the distance in color values for red, green, and blue separately.  In our example of 100 pixels to 100 color units, we have a 1:1 scaling factor.  If we instead had to make a color change of 200 units, we’d have a scaling factor of 1:2, or 1 pixel for 2 units of color change.  Another way to think of this is to say that for every pixel we move along the line, we’re going to increase or decrease our color by 2 units.

double RedScale = (double)Height / (BackColor2.R - BackColor.R);

The RedScale variable divides our height by our gradient’s difference (or change) in redness, and we make the same scaling calculation with green and blue.  This scaling takes increasing and decreasing color changes into account based on whether the subtraction expression on the right results in a positive or negative number.  As we move along the y axis, we’ll create a color that uses BackColor as a base and adds RGB values to it that divide the current y position with this scaling factor.  Let’s take a look at that code:

Bitmap LinearGradient = null;

if (LinearGradientDirection == LinearGradientDirection.Vertical)
{
    double RedScale = (double)Height / (BackColor2.R - BackColor.R);
    double GreenScale = (double)Height / (BackColor2.G - BackColor.G);
    double BlueScale = (double)Height / (BackColor2.B - BackColor.B);

    LinearGradient = new Bitmap(1, Height);
    for (int y = 0; y < Height; y++)
    {
        int red = BackColor.R + (int)((double)y / RedScale;
        int green = BackColor.G + (int)((double)y / GreenScale;
        int blue = BackColor.B + (int)((double)y / BlueScale;

        Color color = Color.FromArgb(red, green, blue);
        LinearGradient.SetPixel(0, y, color);
    }
}

if (LinearGradient != null)
{
    FillBrush = new TextureBrush(LinearGradient);
}

After calculating our scaling factors, we define a bitmap that’s as tall as our control, but only one pixel wide.  You can see this bitmap being used to create a TextureBrush at the bottom of the code.  This brush will be used to fill the entire area from left to right, copying the bitmap across the entire surface, so there’s no need to make it any wider than a single pixel.  (For horizontal gradients, we do the opposite: create a bitmap as wide as our control but only one pixel tall.)

In our hypothetical 100-pixel-tall control, with a red value that decreases 200 units from top to bottom (and therefore has a scaling factor of -0.5), we calculate each pixel’s redness by dividing y by -0.5.  At pixel y=25, which is 25% of the way down, we get a value of -50, which is 25% of -200.  At pixel y=75, we get 75 / -0.5 = -150.  So we take our original BackColor.R, and add this negative number, which makes it decrease from the base color as desired.

The only thing we need to do now is to ensure that each of our three color values never go outside the range of 0 to 255, otherwise we’ll get an error thrown from the Bitmap class.  We can do this with the Math class’s methods Min and Max, like this:

int red = Math.Max(Math.Min(BackColor.R + (int)((double)y / RedScale), 255), 0);
int green = Math.Max(Math.Min(BackColor.G + (int)((double)y / GreenScale), 255), 0);
int blue = Math.Max(Math.Min(BackColor.B + (int)((double)y / BlueScale), 255), 0);

Min returns the smaller of two numbers, and since we pass in 255 along with our calculated color, if our calculation is over 255, then the value it will return is 255.  Max does the opposite, and the combination ensures we stay within the valid range.

Results

The code sample above only showed the code for a vertical gradient, so here is the complete listing of our control with the logic for horizontal gradients as well.

using System;
using System.Collections.Generic;
using System.Windows.Forms;
using System.Drawing;
using System.Reflection;
using System.ComponentModel;

namespace CustomControlsDemo
{
    public class ClippingControl : Control
    {
        private RegionFillStyle _FillStyle = RegionFillStyle.SolidColor;
        [DefaultValue(RegionFillStyle.SolidColor)]
        public RegionFillStyle FillStyle
        {
            get { return _FillStyle; }
            set { _FillStyle = value; Refresh(); }
        }
        
        private LinearGradientDirection _LinearGradientDirection = LinearGradientDirection.Vertical;
        [DefaultValue(LinearGradientDirection.Vertical)]
        public LinearGradientDirection LinearGradientDirection
        {
            get { return _LinearGradientDirection; }
            set { _LinearGradientDirection = value; Refresh(); }
        }
        
        private Color _BackColor2 = Color.White;
        public Color BackColor2
        {
            get { return _BackColor2; }
            set { _BackColor2 = value; Refresh(); }
        }

        protected override void OnPaint(PaintEventArgs e)
        {
            // define a canvas for the visual content of the control
            Bitmap MyBitmap = new Bitmap(Width, Height);
            Graphics g = Graphics.FromImage(MyBitmap);

            Brush FillBrush = null;
            if (FillStyle == RegionFillStyle.SolidColor)
            {
                FillBrush = new SolidBrush(BackColor);
            }
            else if (FillStyle == RegionFillStyle.LinearGradient)
            {
                Bitmap LinearGradient = null;

                if (LinearGradientDirection == LinearGradientDirection.Horizontal)
                {
                    double RedScale = (double)Width / (BackColor2.R - BackColor.R);
                    double GreenScale = (double)Width / (BackColor2.G - BackColor.G);
                    double BlueScale = (double)Width / (BackColor2.B - BackColor.B);

                    LinearGradient = new Bitmap(Width, 1);
                    for (int x = 0; x < Width; x++)
                    {
                        int red = Math.Max(Math.Min(BackColor.R + (int)((double)x / RedScale), 255), 0);
                        int green = Math.Max(Math.Min(BackColor.G + (int)((double)x / GreenScale), 255), 0);
                        int blue = Math.Max(Math.Min(BackColor.B + (int)((double)x / BlueScale), 255), 0);

                        Color color = Color.FromArgb(red, green, blue);
                        LinearGradient.SetPixel(x, 0, color);
                    }
                }
                else if (LinearGradientDirection == LinearGradientDirection.Vertical)
                {
                    double RedScale = (double)Height / (BackColor2.R - BackColor.R);
                    double GreenScale = (double)Height / (BackColor2.G - BackColor.G);
                    double BlueScale = (double)Height / (BackColor2.B - BackColor.B);

                    LinearGradient = new Bitmap(1, Height);
                    for (int y = 0; y < Height; y++)
                    {
                        int red = Math.Max(Math.Min(BackColor.R + (int)((double)y / RedScale), 255), 0);
                        int green = Math.Max(Math.Min(BackColor.G + (int)((double)y / GreenScale), 255), 0);
                        int blue = Math.Max(Math.Min(BackColor.B + (int)((double)y / BlueScale), 255), 0);

                        Color color = Color.FromArgb(red, green, blue);
                        LinearGradient.SetPixel(0, y, color);
                    }
                }

                if (LinearGradient != null)
                {
                    FillBrush = new TextureBrush(LinearGradient);
                }
            }

            if (FillBrush != null)
            {
                g.FillRectangle(FillBrush, ClientRectangle);
            }

            // draw graphics on our bitmap
            g.DrawLine(new Pen(Color.Black), 0, 0, Width - 1, Height - 1);
            g.DrawEllipse(new Pen(Color.Black), 0, 0, Width - 1, Height - 1);

            // dispose of the painting tools
            g.Dispose();

            // paint the background to match the Parent control so it blends in
            e.Graphics.FillRectangle(new SolidBrush(Parent.BackColor), ClientRectangle);

            // define the custom shape of the control: a trapezoid in this example
            List<Point> Points = new List<Point>();
            Points.AddRange(new Point[] { new Point(20, 0), new Point(Width - 21, 0), 
                new Point(Width - 1, Height - 1), new Point(0, Height - 1) });

            // draw that content inside our defined shape, clipping everything that falls outside of the region;
            // only if the image is much smaller than the control does it really get "tiled" and act like a textured painting brush
            // but our bitmap image is the same size as the control, so we're just taking advantage of clipping
            Brush ImageBrush = new TextureBrush(MyBitmap);

            e.Graphics.FillPolygon(ImageBrush, Points.ToArray());
        }
    }
}

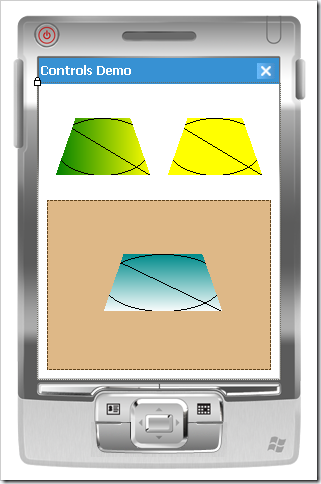
Placing a couple of these controls on a form, I can set one of them to use a solid background (yellow), and the others to use vertical and horizontal linear gradients.

Linear Gradient Control Screenshot

Conclusion

Linear gradients are a great effect to have in your repertoire of techniques.  Compact Framework applications especially tend to be flat and dull, with an unimpressive array of built-in controls, and with more focus on user interfaces like the iPhone and some of the cool new HTC touch devices, the desire for fancier interfaces is growing.  As we start to mix operations like polygon clipping and quasi-transparency (presented in the previous article), linear gradients, and others, we can put together a bag of tricks for composing beautiful and interesting user experiences.

Posted in Algorithms, Compact Framework, Custom Controls, User Interface Design, Windows Forms | 9 Comments »

Compact Framework Controls (Part 2): Polygon Clipping

Posted by Dan Vanderboom on May 4, 2008

[This article is part of a series that starts in this article.]

My intention is to cover a full spectrum of activities around custom control development, with an emphasis on the compromises, workarounds, and special care that must be taken when developing controls for the Compact Framework.  In my first article, I talked about how most design-time attributes must be applied to control classes and their members, and what some of those attributes mean.  I have a number of articles planned that explore those attributes more, and will go into extending the design-time experience in more depth, but I’m going to take a detour into custom painting of the control surface first, so we have a control to reference and work with in the examples.

Polygon Clipping

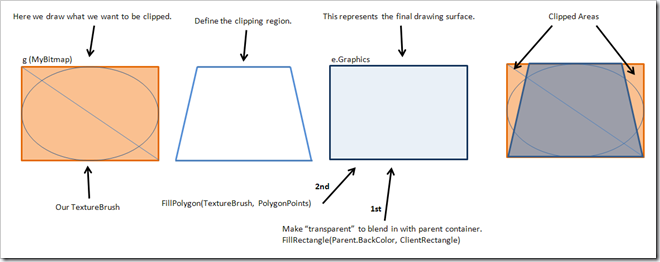
If you’re new to creating graphical effects and unfamiliar with the techniques invovlved, clipping refers to the chopping off of an image based on some kind of border or boundary.  In Windows Forms interfaces, controls are inherently rectangular because clipping occurs automatically at the window’s boundary (which is a shame considering how this presumption of need slows rendering, and WPF takes good advantage of not doing so).  Everything outside the control’s outer shape doesn’t get drawn at all.  You can draw anywhere you want, including negative coordinates, but only the points that fall within the clipping region will be displayed.

Clipping Illustration

But what if you want to make your control a different shape, other than the standard rectangle, like an ellipse or a rounded rectangle?  How do you make sure that whatever you draw inside never leaks outside of your defined shape?  In the full .NET Framework, there is a Region property in the Control class that defines these boundaries, and there are several good articles that explain this.  The clipping mask is applied based on that Region’s definition.  In Compact Framework, the Region property doesn’t exist, and you’re forced to find your own way of defining different shapes.

The key to this is to understand the Graphics class’s Fill methods.  While FillEllipse and FillRectangle definitely have their uses, I’d like to focus on situations that are a little bit more demanding, such as when you want to represent a more complex shape like a rounded rectangle (with many points) or some kind of UML diagram element.  FillPolygon takes a list of Points, and with them can define the most eccentric and specific of shapes.  By filling a polygon with an image using a TextureBrush, clipping happens automatically as part of the operation.

Let’s take a look at some code to see how we perform each of these steps: preparing and drawing on a bitmap image in memory, defining our shape’s boundaries, and then clipping that image within the specified shape.

using System;
using System.Collections.Generic;
using System.Windows.Forms;
using System.Drawing;
using System.Reflection;

namespace CustomControlsDemo
{
    public class ClippingControl : Control
    {
        protected override void OnPaint(PaintEventArgs e)
        {
            // define a canvas for the visual content of the control
            Bitmap MyBitmap = new Bitmap(Width, Height);

            // create a painting tools object
            Graphics g = Graphics.FromImage(MyBitmap);

            // draw graphics on our bitmap
            g.FillRectangle(new SolidBrush(Color.PaleGoldenrod), ClientRectangle);
            g.DrawLine(new Pen(Color.Black), 0, 0, Width - 1, Height - 1);
            g.DrawEllipse(new Pen(Color.Black), 0, 0, Width - 1, Height - 1);

            // dispose of the painting tools
            g.Dispose();

            // define the custom shape of the control: a trapezoid in this example
            List<Point> Points = new List<Point>();
            Points.AddRange(new Point[] { new Point(20, 0), new Point(Width - 21, 0), 
                new Point(Width - 1, Height - 1), new Point(0, Height - 1) });

            // draw that content inside our defined shape, clipping everything that falls outside of the region;
            // only if the image is much smaller than the control does it really get "tiled" and act like a textured painting brush
            // but our bitmap image is the same size as the control, so we're just taking advantage of clipping
            Brush ImageBrush = new TextureBrush(MyBitmap);
            e.Graphics.FillPolygon(ImageBrush, Points.ToArray());
        }
    }
}

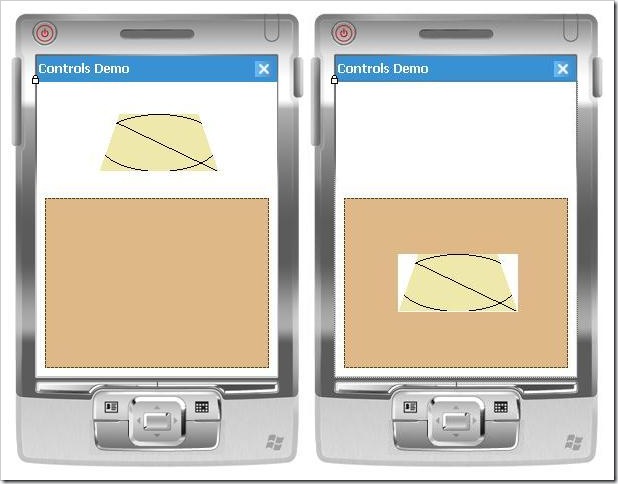
Although this control has a silly shape and doesn’t do much yet, it does illustrate the basics of painting within the bounds of an irregular shape.  As long as we draw on MyBitmap, everything will be properly clipped by the call to FillPolygon.  However, as you can see in the screenshots below, the white background around our custom shape could be a problem.  You can change the BackColor property to match the color of the container its on (a Panel control in this case, which is Color.BurlyWood), but really it makes more sense for BackColor to describe the color within our shape.  We’d like the surrounding background to blend in with whatever container the control is sitting in.

first version

We can accomplish this with two simple changes.  First, at some point before the FillPolygon call, we need to fill the entire control’s area with the BackColor property of the parent control.  We will draw using the e.Graphics object, which paints on the whole rectangular control, not our g Graphics object, whose contents get clipped.  Then, instead of hard coding Color.PaleGodenrod, we can use the BackColor property to specify our fill color.  Here is the changed section of code:

// draw graphics on our bitmap
g.FillRectangle(new SolidBrush(BackColor), ClientRectangle);
g.DrawLine(new Pen(Color.Black), 0, 0, Width - 1, Height - 1);
g.DrawEllipse(new Pen(Color.Black), 0, 0, Width - 1, Height - 1);

// dispose of the painting tools
g.Dispose();

e.Graphics.FillRectangle(new SolidBrush(Parent.BackColor), ClientRectangle);

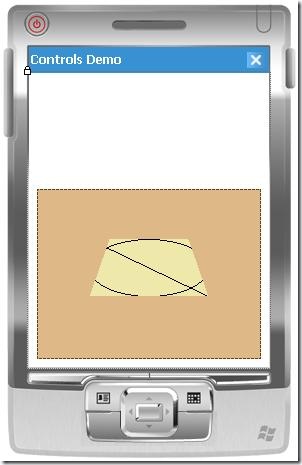
Now if we set the BackColor to PaleGodenrod, we’ll get this rendering:

transparent background

Dragging the control off the panel and into the white area will cause the area around the control to paint white, so now you can see how it blends in with whatever background we have as long as it’s a solid color.

In a future article, after I’ve covered how to draw arcs and curves, I will revisit this technique and demonstrate how to draw rectangles with rounded corners.

[This article is part of a series that continues in this article.]

Posted in Algorithms, Compact Framework, Custom Controls, User Interface Design, Visual Studio, Windows Forms, Windows Mobile | 12 Comments »

Introduction to Port-Based Asynchronous Messaging

Posted by Dan Vanderboom on April 21, 2008

…using terminology and examples from the Concurrency & Coordination Runtime in C#


Port-Based Messaging

Port-based messaging has been in practice for a long time.  In the realm of low-level electronics, components have always been operating in parallel, hardware interface ports are designed around standards, and messages are posted to those ports, queuing up somewhere until the receiver is ready to process them.  This pattern has worked extremely well in multiple domains for a long time, and its key characteristic is the decoupling of data flow from control flow.

In sequential programs, one statement runs after another each time it’s run, and the behavior is predictable and repeatable. Concurrency is difficult because you have to consider all possible interleavings of multiple simultaneous tasks, so the overall behavior is nondeterministic. Depending on the relative timings of concurrent tasks, you could get different results each time if you’re not careful to set the appropriate locks on shared resources.  Port-based messaging architectures isolate islands of state across different execution contexts, and connect them with safe, atomic messages delivered through pre-defined ports.

Basic port-based asynchronous messaging

The posting of a message to a port, as shown in Figure 1, is followed by some handler method that is receiving and processing messages.  What’s not evident in the diagram, however, is that while data flows into the port, that posting is a non-blocking call.  The sender continues on doing other work, taking the time only to queue up a message somewhere.

Queuing is important because, even with large thread pools, we can’t guaranty that a receiver will be listening at the very moment a message arrives.  Letting them queue up means the receiver doesn’t have to block on a thread to wait.  Instead, the data waits and the thread checks messages on the port when it can.

Port showing message queue

What is a Port?

So what exactly is a port?  A port is a communication end point, but not in the sense of “a web service on a physical server”.  Think much more fine grained than that, even more fine-grained than methods.  With sequential programming, we commonly use try-catch blocks and handle both the exceptional and non-exceptional results of operations within a single method.  In port-based programming, you post a message to a port, which results in some handler method running on the receiving end, and different results can be sent back on different callback ports depending on the type of message.  Instead of calling a method that returns back to you when it ends, port-based programming is about always moving forward, and unwinding a call stack has very little meaning here.

Sequence diagram of port-based messaging

We can see in the sequence diagram above (Figure 3) a collection of services that communicate with and depend on each other.  Starting from the top, the left-most service posts a message to port 1, and then goes on to do other work or surrenders its thread back to the dispatcher for other tasks that are waiting to run.  A registered method on port 1 runs, and the logic there needs another service to complete it’s task, so it posts a message on port 2, and also continues processing without waiting.  The path of solid blue arrow lines traces the message path for normal execution.  If anything goes wrong, an exception can be posted to a different callback port, shown with a red outline in the diagram.

This diagram shows one possible composition of services and data flow.  Port sets, which are simply a collection of related ports, are shown as callback receivers in pairs, but they can consist of any number of ports with any mixture of messages types, depending on the needs of the system being coordinated.  In this example, if anything goes wrong in the handler methods at ports 2, 5, or 6, an exception message will be routed to port 6, where another handler method can compensate for or report on the error.  Also note that while during startup this system may have to process data at port 4 before the logic at ports 5, 7, and 8 can run… once it gets going, there could be activity operating at many ports concurrently (not just one port per service).

Arbiters, Dispatchers, and DispatcherQueues

Now it’s time to peel away some of the layers of simplification presented so far.  (It may help to have a beer or glass of wine at this point.)

An arbiter is a rule (or set of rules) about when and how to process messages for a specific port (or set of ports).  (It is helpful to think of arbiter as a data flow or message flow coordinator.)  Should messages be pulled off the queue as soon as they arrive?  Should the software wait until 5 messages have arrived before processing them all as a group?  Should messages be checked according to a timer firing every 20 seconds?  Should logic be run only when two ports have messages waiting (a join)?  What logic should be run when one of these conditions occurs?  Can method handlers on three specific ports run concurrently until a message arrives on a fourth port, whose handler must run exclusively, and when done the other three can run again (interleave)?  These are just a few of the many coordination patterns that can be expressed with different types of arbiters (and hierarchically nested arbiters, which are ingenious).

Arbiters, Dispatchers, and DispatcherQueues

Figure 4 illustrates that an arbiter is associated with a port to monitor and a method to execute under the right conditions.  The logic of the arbiter, depending on its type and configuration, determines whether to handle the message.  It gets its thread from a thread dispatcher, which contains a thread pool.  (Not the same as System.Threading.ThreadPool, though, as there can only be one of those per process.)

The next diagram (figure 5) could represent a join coordination.  An arbiter waits for messages on two ports, and depending on how it’s defined, it may process messages from one port repeatedly, but as soon as it receives a message on the second port (it may be an exception port, for example), the whole arbiter might tear itself down so that no more handling on those port will occur.  As you are probably starting to see, composition and attachment of arbiters are key to controlling specific patterns of coordination in arbitrarily powerful and flexible ways.

Multiple DispatcherQueues and complex Arbiters.

In the Concurrency & Coordination Runtime, we can attach and detach these arbiters during runtime; we don’t have to define them statically at compile time.  There has been some criticism towards this approach because dynamic arbitration rules are much more difficult to verify formally with analysis, and are therefore difficult to optimize compilation and thread management for, but the advantages of this flexibility are enormous and the performance (see this paper by Chrystanthakopoulos and Singh) has been very impressive compared to conventional multithreading approaches.  Ultimately, it’s not about whether we can guaranty 100% that nothing will go wrong using only the mathematical models currently in our repertoire, but whether we can be productive with these techniques to release software that meets acceptable quality standards across a broad range of application domains.

I don’t think we’re going to find a better set of strategies to work with anytime soon, and when we’ve pushed this technology hard enough, the tactics will be fine tuned and we can start absorbing some of these coordination concepts into languages themselves (without sacrificing the dynamism that a library of composable parts provides).  People are going to attempt concurrent programming whether it’s safe or not, and using a library such as the CCR significantly reduces the risk of ad hoc multi-threading code.

Cooperative Multitasking

When mainstream operating systems like Windows took their first steps to support multi-tasking, cooperative versus preemptive multi-tasking was a common topic.  The idea of an operating system depending on applications to surrender control in a well-behaved way was generally and rightfully considered a bad idea.  Any kind of error or instability in software could easily bring down the entire operating system, and enforcing a quickly growing community of software vendors to share nicely wasn’t a realistic option.  Being preemptive meant that the OS could forcefully stop an application from running after giving it a small, measured slice of time, and then switch the thread to a new context where another application could run for another time slice.  Regardless of how poorly applications ran, as benevolent dictator, the OS could ensure a fair scheduling of processor time.

The solution encapsulated in the Concurrency & Coordination Runtime is, on the other hand, a cooperative multi-tasking strategy.  However, because it operates within the local scope of an individual process, and is isolated from other processes in the same OS, its risk of destabilizing the system is nonexistent.  This deep level of cooperation, in fact, is what gives the CCR its great performance.  When used correctly, which George Chrysanthakopoulos (in this video) and his colleagues have brilliantly put within our reach in the CCR library, threads don’t sit around waiting on some resource or for long-running operations to complete; instead, control is freely surrendered back to the thread pool, where it is quickly assigned to a new task.

Finally, by surrendering threads freely instead of holding onto them, a continuous flow of threads through the different activities of the system is maintained, and there is therefore always an abundance of them to handle new messages waiting on ports.  Existing threads are not wasted.  As the Tao Te Ching says:

If you want to accord with the Tao,
just do your job, then let go.

Control & Data Flow: Sequential vs. Concurrent

In sequential programs, stacks are used to unwind method calls and provide return values (return messages), and threads follow the data flow; whereas in port-based programming, threads are managed by one or more thread dispatchers that are capable of maximizing the use of that thread by making it available in a pool and sharing it with with many other (potentially unrelated) tasks.  Data flows orthogonally and according to a different coordination strategy than control flow.  This task-thread agnosticism (the opposite of thread-affinity) is similar to the statelessness of a web server such as IIS; one or more threads from a large pool are injected into the tasks of processing, rendering, and serving up huge numbers of web pages, after which those threads are recycled back into the thread pool for execution of other tasks for a highly concurrent and scalable service platform.

So herein lies the trick: in order to split this coupling between data flow and control flow, a different means is needed to compose the two coordination strategies.  In C# and other popular imperative programming languages, methods implicitly pass thread control along with data arguments (the message), and the use of the stack for method calls asserts constraints on control flow, so making the CCR work involves some interesting patterns.

That’s why port-based programming is hard to get your head around.  It’s such a large shift from common sequential logic and it requires some additional planning (and good visualizations).  It’s obviously important to have a good set of tools for expressing that coordination, a simple set of conceptual primitives that allows us to compose arbitrarily-complex coordination patterns.  These primitives, including Message, Port, PortSet, Dispatcher (thread pool), and others provide the building blocks that we can use to define these relationships.  Once we define what we want to happen with these building blocks, the CCR can make it all happen.

This level of coordination is a level beyond the strategies used by most concurrent applications and frameworks in software today, primarily because there hasn’t been a pressing need for it until recently–processors had been growing phenomenally in speed for many years.  Now, however, we’re told that processor speed has plateaued, that we now have to scale out to scale up, spreading the processing load across multiple cores.  We are very fortunate that the work being done by researchers in fields like robotics can be applied in other service oriented architectures, and is a testament to the widespread use of the .NET Framework and the fantastic efforts of some very bright individuals.

Where to Find Microsoft Robotics Studio

Robotics Studio is a free download and can be found here, and while it is full of other good stuff, it’s worth checking out for the Concurrency and Coordination Runtime alone.

Posted in Compact Framework, Concurrency, Data Structures, Design Patterns, Microsoft Robotics Studio, Object Oriented Design, Service Oriented Architecture, Software Architecture | Leave a Comment »

Visual Studio Build Bug in CF Controls Project using Generics

Posted by Dan Vanderboom on April 21, 2008

So there I was, minding my own business, creating some custom controls in a reusable framework project.  I needed to apply some design-time attributes, and because I’m working with Compact Framework, I attempted to add my DesignTimeAttributes.xtma file to accomplish this, which I’ve done many times before.

Bang!  I got an error message: “genasm.exe has encountered a problem and needs to close.  We are sorry for the inconvenience.”  In the task list was this error: “Process is terminated due to StackOverflowException.”  Stack overflow?!

I checked (and checked again) to make sure that my .xtma file was properly formatted, which it was, and I simplified it to include only a single DesktopCompatible attribute; being a boolean, I figured it was hard to mess that up (compared to something trickier like a Designer attribute).  But alas, I was stumped, and for the past week or two gave up and went without the attributes in that project, putting the majority of my controls in a separate project.

Today I decided I was on the mission of isolating the problem and getting to the bottom of this.  While I don’t know the root cause (I’ve submitted a bug report to Microsoft), I can reproduce the problem and describe the pitfall so some poor soul can find it while Googling for help.

It happens in Compact Framework projects.  To reproduce it, create a CF 3.5 project (I chose class library), and add a file with the following code:

public class atree<T> where T : atree<T>
{
} 

public class btree : atree<btree>
{
}


Note that if these classes are changed from public to internal, the problem disappears.

Then add a DesignTimeAttributes.xtma file, change nothing in it, and try to build.  Mine looks like this:

<?xml version="1.0" encoding="utf-16"?>
<Classes xmlns="http://schemas.microsoft.com/VisualStudio/2004/03/SmartDevices/XMTA.xsd">
</Classes>


That’s it, and I get the nasty errors described above.  I’m really curious to know what genasm.exe is doing, how it’s using some recursive algorithm to examine somewhat self-referencing generic definitions (I admit that the generics constraint in the code above is a bit on the odd side).

Posted in Compact Framework, Custom Controls, Visual Studio | 7 Comments »

.NET Micro Framework vs. Microsoft Robotics Studio

Posted by Dan Vanderboom on April 12, 2008

The .NET Micro Framework is a compatible subset of the full .NET Framework, similar to how the Compact Framework is a subset.  But the Micro Framework can act as its own real time operating system (RTOS) instead of loading the tiny CLR in a host operating system, and works with a variety of hardware devices, including those that don’t have their own memory management unit (MMU).  The gist is that embedded applications as well as low-level drivers can now be written in managed code (a huge leap forward), and take advantage of garbage collection, strong-typing, and other nice features that are typically absent in embedded systems programming.  This supposedly reduces errors, boosts productivity, and reduces development costs.

I’ve been watching videos like this, reading about the Micro Framework for the past few months, have pre-ordered this book from Amazon, and have been itching to get my hands on a hardware development kit to start experimenting.  The only problem is that the interfaces for these embedded devices are so foreign to me (I2C, GPIO, etc.), and I’m not exactly sure what my options are for assembling components.  What kinds of sensors are available?  Do I have to solder these pieces together or is there a nice modular plug system similar to the SATA, IDE, and PCI connectors on modern computers (but on a smaller scale)?  Do I have to write my own device drivers for anything I plug in, or is there some abstraction layer for certain classes of inputs and outputs?

The other issue that makes me hesitate is the thought of programming without language conveniences like generics on a more resource-constrained device than the Windows Mobile devices I’m already frustrated with (and have been for the past four years).

I’m not saying that I’m not excited about managed code on tiny embedded devices, and I’m not saying I won’t start playing with (and blogging about) this important technology sometime in the next few months, but I’ve discovered another platform for embedded device development with the ability to interact directly with the physical world that offers a much lower technical barrier for entry, so that’s where I’m starting.

What I’m referring to is Microsoft Robotics Studio, which is by all accounts a phenomenal platform for more than just robotics, and seems to overlap somewhat with the Micro Framework’s reach (at the intersection of the computer-digital and physical-analog worlds).  The two critical components of this architecture are the Decentralized Software Services Protocol (DSSP, originally named WSAP) and the Concurrency & Coordination Runtime (CCR).  Make sure you watch this video on the CCR, and note how George emphasizes that “it’s not about concurrency, it’s about coordination”, which I found especially enlightening.  These are highly robust and general purpose libraries, and both of them will run on Compact Framework!  (I was very impressed when I read this.)

Without having studied them both in depth yet, the CCR seems to cannibalize on the Task Parallel Library (TPL), at least conceptually, offering a much more complete system of thread manipulation and synchronization than the original System.Threading types, all for a vertical industry that has much greater demands of a concurrency framework that must, for example, deliver massive concurrency and complex coordination rules in a highly-distributed system, all the while handling full and partial failures gracefully.  Some of the patterns and idioms for making concurrency and synchronization operations easy to write and understand are masterfully designed by Henrik Nielsen and George Chrysanthakopoulos (and I thought Vanderboom was a long name!).

The fact that the CCR and DSSP were developed together is significant.  Tasks running in parallel need to be manipulated, coordinated, and tracked regardless of whether they’re running on four processors in one computer or on 256 processors spread across a hundred devices, and distributed services need a dependable way of parallelizing their efforts on individual machines.  This is a synergistic relationship, each subsystem enhancing the elegance and usefulness of the other.  So why not use the CCR in every application instead of developing the TPL?  Are these two teams actively collaborating, or have they been building the two frameworks in isolation?

I also have to make special mention of the decentralized software services, which as a protocol sits on top of HTTP in a RESTful implementation.  It supports composition of services by creating partnerships with other services, defining securely which partnerships are allowed, offering identification and discovery of services, and much more.  In this assembly then, we have a robust library for building distributed, composable, decentralized services-oriented systems with event publication and subscription, with services that can be hosted on desktop and mobile computers alike.  Wow, call me a geek, but that’s really frickin’ cool!  Some of the ideas I have for future projects require this kind of architectural platform, and I’ve been casually designing bits and pieces of such a system (and got so far as getting the communication subsystem working in CF).  Now, however, I might be turning my attention to seeing if I can’t use the Robotics Studio APIs instead.

One thing to be clear about is that Robotics Studio doesn’t support Micro Framework, at least not yet.  I wonder exactly how much value there would be to adding this support.  With hardware options such as this 2.6″ x 2.3″ motherboard with a 1.6 GHz Intel Atom processor, video support, and up to 1 GB of RAM, capable of running Windows XP or XP Embedded, and priced at $95 (or a 1.1 GHz version for $45), we’re already at a small enough form factor and scale for virtually any autonomous or semi-autonomous robotics (or general embedded) applications.  There’s also the possibility for one or more Micro Framework devices to exchange messages with a hardware module that is supported in Robotics Studio, such as the tiny board just mentioned.

Where do we go next?  For me, I just couldn’t resist jumping in with both feet, so I ordered about $500 in robotics gear from Phidgets: USB interface boards, light and tempature sensors, a 3-axis accelerometer (think Wii controller), motors and servos, an RFID reader with tags, LEDs, buttons, knobs, sliders, switches, and more.  I plan to use some of this for projects at CarSpot, and the rest simply to be creative with and have fun.  I also pre-ordered this book, but the publication date is set for June 10th, so by the time I get it, I may have already figured most of it out.

Posted in Compact Framework, Concurrency, Distributed Architecture, Micro Framework, Microsoft Robotics Studio, Service Oriented Architecture, Software Architecture | 2 Comments »

Using Extension Methods to Manipulate Control Bitmaps in Compact Framework

Posted by Dan Vanderboom on April 11, 2008

I’m loving extension methods.  All of the methods that I wish BCL classes had, I can now add.  While I consider it highly unfortunate that we can’t yet add extension properties, events, or static members of any kind, still it’s a great amount of power in terms of making functionality discoverable in ways not possible before.

During the implementation of my Compact Framework application’s MVC framework, I wanted to support displaying views modally.  However, using a screen stack of UserControls that are all hosted in a single master Form object, I lose out on this built-in functionality and so found myself in need of creating this behavior myself.  One of the difficulties in doing this is displaying a view that may not cover every portion of other views beneath it; if the user clicks on one of the views “underneath”, that control gets activated, and if pressed on a control, that control will handle the event (such as Button.Click).

My solution to the problem is simple.  Take a snapshot of the master form and everything on it, create a PictureBox control that covers the whole form and bring it to front, and set its image to the snapshot bitmap.  Doing this provides the illusion that the user is still looking at the same form full of controls, and yet if they touch any part of the screen, they’ll be touching a PictureBox that just ignores them.  The application is then free to open a new view UserControl on top of that.  When the window is finally closed, the MVC infrastructure code tears down the PictureBox, and the real interface once again becomes available for interaction.

Screenshots before and after screen capture and darkening

In addition, I wanted the ability to emphasize the modal view, so you can see from the picture above that I decided to accomplish this by de-emphasizing the background bitmap.  By darkening the snapshot, the pop-up modal view really does seem to pop out.  The only problem with bitmap manipulation using the Compact Framework library is that it’s extremely slow, but I get around this by using some unsafe code to manipulate the memory region where the bitmap image gets mapped.  (If you’re unfamiliar with the unsafe keyword, don’t worry: this code actually is safe to use.)

Here is the full source code for taking a snapshot of a form (or any control), as well as adjusting the brightness.

using System;
using System.Linq;
using System.Collections.Generic;
using System.Text;
using System.Drawing;
using System.Drawing.Imaging;
using System.Windows.Forms;
using System.Runtime.InteropServices;

public static class ControlBitmapExtensions
{
    [DllImport("coredll.dll")]
    private static extern bool BitBlt(IntPtr hdc, int nXDest, int nYDest, int nWidth, int nHeight,
        IntPtr hdcSrc, int nXSrc, int nYSrc, int dwRop);

    public struct PixelData
    {
        public byte Blue;
        public byte Green;
        public byte Red;
    }

    public static Bitmap GetSnapshot(this Control Control)
    {
        Rectangle rect = new Rectangle(0, 0, Control.Width, Control.Height - 1);
        Graphics g = Control.CreateGraphics();
        Bitmap Snapshot = new Bitmap(rect.Width, rect.Height);
        Graphics gShapshot = Graphics.FromImage(Snapshot);
        BitBlt(gShapshot.GetHdc(), 0, 0, rect.Width, rect.Height, g.GetHdc(), rect.Left, rect.Top, 0xCC0020);
        gShapshot.Dispose();

        return Snapshot;
    }

    public static unsafe Bitmap AdjustBrightness(this Bitmap Bitmap, decimal Percent)
    {
        Percent /= 100;
        Bitmap Snapshot = (Bitmap)Bitmap.Clone();
        Rectangle rect = new Rectangle(0, 0, Bitmap.Width, Bitmap.Height);

        BitmapData BitmapBase = Snapshot.LockBits(rect, ImageLockMode.ReadWrite, PixelFormat.Format24bppRgb);
        byte* BitmapBaseByte = (byte*)BitmapBase.Scan0.ToPointer();

        // the number of bytes in each row of a bitmap is allocated (internally) to be equally divisible by 4
        int RowByteWidth = rect.Width * 3;
        if (RowByteWidth % 4 != 0)
        {
            RowByteWidth += (4 - (RowByteWidth % 4));
        }

        for (int i = 0; i < RowByteWidth * rect.Height; i += 3)
        {
            PixelData* p = (PixelData*)(BitmapBaseByte + i);

            p->Red = (byte)Math.Round(Math.Min(p->Red * Percent, (decimal)255));
            p->Green = (byte)Math.Round(Math.Min(p->Green * Percent, (decimal)255));
            p->Blue = (byte)Math.Round(Math.Min(p->Blue * Percent, (decimal)255));
        }

        Snapshot.UnlockBits(BitmapBase);
        return Snapshot;
    }

    public static Bitmap Brighten(this Bitmap Bitmap, decimal PercentChange)
    {
        return AdjustBrightness(Bitmap, 100 + PercentChange);
    }

    public static Bitmap Darken(this Bitmap Bitmap, decimal PercentChange)
    {
        return AdjustBrightness(Bitmap, 100 - PercentChange);
    }
}


Because Control is extended by GetSnapshot, and Bitmap is extended by AdjustBrightness, Brighten, and Darken, I can write very clear and simple code like this on the consuming side:

Bitmap bitmap = MyForm.GetSnapshot().Darken(40);

…and voila!  I have a snapshot.  Note that because Darken extends Bitmap, it can now be used with any Bitmap.  As we read from this code from left to right, we’re observing a pipeline of transformations.  MyForm is the source data, GetSnapshot is the first step, Darken is the next change, and with more extension methods on Bitmap we could continue to process this in a way that is very natural to think about and construct.

I do have to admit that I cheated a little, though.  Even with the direct memory manipulation with pointers, it still didn’t perform very well on the Symbol and DAP devices I tested on.  So instead of adjusting the brightness on every pixel, I only darken every third pixel.  They’re close enough together that you can’t really tell the difference; however, the closer to 100 percent you darken or brighten an image, the more apparent the illusion will be, since two thirds of the pixels won’t be participating.  So it’s good for subtle effects, but I wouldn’t count on it for all scenarios.

This every-third-pixel dirty trick happens in the for loop, where you see i += 3, so go ahead and experiment with it.  Just be careful not to set it to large even numbers or you’ll end up with stripes!

Posted in Algorithms, Compact Framework, Object Oriented Design, Problem Modeling, User Interface Design, Windows Forms, Windows Mobile | 5 Comments »

Compact Framework Controls (Part 1): Creating Custom Controls and Designers

Posted by Dan Vanderboom on March 14, 2008

I’ve been having a lot of fun learning how to create rich design-time experiences for custom controls in Compact Framework for the past few days.  It’s been frustrating, and the documentation is hard to find unless you’re already familiar with the metaphors and know the buzzwords.  While this first article won’t be completely comprehensive, I will continue to write about this topic until I have covered all of the bases necessary for you to create professional, polished controls and design-time experiences suitable for commercial use or sale.

I’m going to assume you have at least some experience in creating custom controls, at least for desktop applications.  Creating custom controls for Compact Framework applications is another story, however.  Not because of any particular constraints of memory of screen real estate, but because the typical method for attaching metadata to specify design-time behavior is different.  There are some other subtleties and oddness as well that are specific to the Compact Framework.

In the full .NET Framework, we have many attributes at our disposal to specify design-time behavior; most of these can be found in System.ComponentModel.  We have access to a lot of these for mobile device applications, but because they’re not included in the Compact Framework, we need another way to associate them with our control classes and their members.  This is done through something called the “design-time attributes file”, which has an extension of .xtma.

There are two ways to add this file.  The method that people typically suggest is to add a class diagram to your project (right-click on your project in Solution Explorer, and select View Class Diagram), select an item in the diagram, edit the Custom Attributes property in the property grid (see screenshot below), click on the ellipsis (…) to open a pop-up window, and then enter an attribute such as DesktopCompatible(true).

Custom Attributes in properties

When you click the OK button, a new file will be added to your project called DesignTimeAttributes.xtma, and this file will open in Visual Studio.

This is quite a round-about way to create the file in my opinion, and it presumes that you know a valid attribute to add right from the beginning.  I personally don’t use the class diagrams, and I think it’s easier just to add the .xtma file directly, by right-clicking on your project in Solution Explorer, Add—New Item, and selecting Design-Time Attribute File.  Editing your attributes directly in this XML file instead of the pop-up window in the class designer has the benefit of providing you with some Intellisense (which it gets from the associated XSD file).

I get a little disappointed when I see people list only the most common attributes that I already know about, and then fail to mention the rest of the attributes that are supported in Compact Framework, and since the list isn’t unmanagable—and easily determined from Intellisense—I will list most of them that are supported .xtma file here, and in a future artile will provide the remaining ones.

Here’s a screenshot showing the full list of tags that you can use at the class level.  Most of them are attributes, while some of them like Event, Method, and Property allow you to specify specific members of the class so that you can apply attributes to just those members.

 Xtma attributes

This is what they mean:

  • ApplyDeviceDefaults – I couldn’t find any mention of this in the normal area of MSDN that enumerates all of the classes, but I did find it explained well in this MSDN article.
  • ComplexBindingProperties – For complex data binding, of course.
  • DefaultBindingProperty – This is for simple data binding.
  • DefaultEvent – The default event for Button is Click.  When you double-click on a control in the designer, Visual Studio switches to the code behind file and will automatically generate this event’s handler for you.  Very handy.
  • DefaultProperty – When you select a control in the designer, this is the property in the properties window that gets focus first.  For the Label control, this is the Caption property.
  • Description – The description text appears in the properties window below the grid of property names and values, and can provide useful information about the meaning of a property or event.
  • Designer – The Designer attribute is one of the primary gateways for providing rich design-time experiences for your controls.  Creating custom designers and associating your controls with them is a tricky business, and one I intend to explore in depth in this and future articles.  Because MSDN documentation in this area is rather sparse, I’ve begun contributing to the community content on the MSDN pages, and you’ll see the help I’ve added at the very bottom of the page if you follow the link for this item.
  • DesignerSerializer – Located in System.ComponentModel.Design.Serialization, a DesignerSerializer is used to provide a custom way of serializing your control to code in the designer partial class file.  I haven’t had a need yet to use this, but if someone can think of a real-world scenario that requires it, I will be happy to explore the subject further and write about it.
  • DesignTimeVisible – Indicates whether a control can be shown on a designer, and is supposedly ignored by “components with a UI presense”, whatever that means.  A little more usefully, MSDN states that it is useful when you have a control that accepts child components, such as the TreeView whose node items “should not appear in the component tray because they are drawn by the TreeView control”.  This will require some more exploration.
  • DesktopCompatible – This is the first design-time attribute I became familiar with in working with Compact Framework controls.  If you have a control that makes P/Invoke calls, Visual Studio is uncertain whether they’re device specific OS calls, and to be safe, it doesn’t execute your control’s code, which means your control can’t render itself even on the designer surface.  You get a message telling you that it’s unsafe.  To get around this, and presuming that it is indeed safe to run your control’s code on the desktop (I’ll explain more about this later, or you can read this article by XinYan), just add a DesktopCompatible attribute to the control class, and you’ll be back in business.  I’m not sure where this attribute is located; it’s not a desktop attribute, so it’s not in the full .NET Framework’s System.dll, and a search through Reflector didn’t locate it, so I’ll have to keep looking.  But it’s there, and it works.
  • Docking – Specifies the default docking behavior for controls.  This is located in System.Windows.Forms.
  • Editor – If you need a more powerful experience for editing complex properties within the properties window itself, this attribute will allow you to hook into one.  I’ll be covering over custom editors in detail.
  • ImmutableObject – Specifies that an object has no subproperties capable of being edited, per MSDN documentation.  Not sure what the benefits of that would be: perhaps to hide all properties for a class without having to hide each one separately?
  • InitializationEvent – This is used to support auto data-binding (by Visual Studio wizards I’m guessing), so it knows which event to hook into when generating the data-binding code.
  • LookupBindingProperties
  • RootDesignerSerializer – I’m not sure what this was for originally, but according to bug report, this attribute is both deprecated and broken.
  • Supported – Explained in this blog as part of Platform Verification Task.  Located in Microsoft.CompactFramework.Build.Tasks.  You can use this attribute to indicate that a class or member is not supported for the specific platform.
  • SuppressFiltering – Located in Microsoft.CompactFramework.Build.Tasks.
  • ToolboxBitmap – This simply specifies the bitmap that will be displayed in the toolbox.  Located in System.Drawing.
  • TypeConverter – Specifies the TypeConverter class used for a property.  TypeConverters are an important aspect of the design-time experience and merit further explanation.
  • Browsable – This determines whether a property or event will be displayed in the properties window, and is typically used to hide properties or events that must be public for some reason but aren’t meant to be manipulated during design time.
  • Category – If you set this to an existing category name, your property or event will appear in there; if you create your own category name, a new category will appear in the properties window.

There are a few more that are specific to properties, events, and methods, but this will give us a good start.  I’ll cover the remainder in future articles.

That seems like a lot at first glance, but chances are that you’ll only need a handful at any given time.  With a little exploration and practice (and guidance from myself and others whose blogs and other resources I’ll share), you could soon be a master of rich, no-compromise custom control development for Compact Framework applications.  I believe this is a worthy cause, for one because there is a scarcity of good third-party controls, especially when compared to the abundance that we have for the desktop world of .NET development; but also because I have personally struggled with Compact Framework development and have always thought it would be nice to have a step-by-step series of tutorial to follow for creating custom controls.  I’ve found many useful and helpful articles, but nothing that really brings it all together in a clear manner.

Here is an example .xtma file for a new user control I created that has Category and Description attributes on a property I created called HighlightForeColor:

XTMA

The magic happens when you build your custom control project.  Visual Studio builds not only your control project in its runtime form, but also generates another assembly with .asmmeta.dll after your own target assembly name.

Build output

If you use Reflector to disassemble it, you will see that this is a design-time component that contains all of your classes and their members with real attributes attached.  Strangely, it does not contain any code, and parameters have no names.  The purpose is simply to be a carrier of attributes.  This is a screen shot from Reflector, showing the attached attributes:

Reflector

I’m puzzled by this implementation detail.  Attributes are so insignificant in size, being just metadata tags.  If Microsoft had just included them in the Compact Framework, it seems they could have avoided the requirement for this second, oddly-empty assembly (and there is a third, for custom designers and editors, as you’ll see later).  Unless there’s something else to it that I’m missing…

[This article is part of a series that continues in this article.]

Posted in Compact Framework, Custom Controls, User Interface Design, Visual Studio, Windows Forms, Windows Mobile | 10 Comments »