[Updated 8/14/2014] The source code for this library can be found here at GitHub. Also check out my blog post announcing it.
[This is the first article in a series of intelligent data structures, which is continued here with KeyedList.]
I’ve always thought it was odd that the .NET Framework never shipped with a Tree or Tree class in its collection namespaces. Most of the other classic data structures are there: List, Dictionary, Stack, Queue, and so on. Where then is Tree? I have no idea, but finding myself in need of one, I decided to build one, and in doing so realized that it was a little trickier than I first imagined it would be. Certainly it isn’t difficult to get some kind of tree working, even without support for generics, but building one that is truly intuitive to use was a real challenge. In this article I will share what I came up with, and will illustrate the thought process behind each of the design decisions that I made as a study in object-oriented design and the use of some cool C# language features like generics constraints.
First, what is a tree data structure and what is it used for? A tree is, in layman’s terms, a collection of nodes (items) that are connected to each other in such a way that no cycles (circular relationships) are allowed. Examples abound in organization charts, family trees, biological taxonomies, and so forth. Trees are incredibly useful structures because they allow us to represent hierarchies and to compose complex structures out of basic parts and simple relationships. In the world of programming specifically, this provides a mechanism for extensibility across many domains, and a container to assist us in searching, sorting, compressing, and otherwise processing data in efficient and sophisticated ways. Trees are also a natural fit for use in the composite design pattern, where a group of objects can be treated (or processed) like a single object.
Just as it’s possible to implement recursive algorithms non-recursively, it’s also possible to create non-hierarchical data structures to store data that would more logically be stored in a tree. In these cases, your code is typically much more clear when organized in a tree, leading to greater maintainability and refactorability. Recursion itself, while not exceptionally common in every day programming tasks, plays a more important role in some interesting ways with trees and traversal patterns. Traversal is the term used to describe how nodes in a tree are visited. Later I’ll demonstrate some tree traversal techniques that you can use.
Binary vs. Non-Binary Trees
What are binary trees, and why the focus on non-binary trees? Binary trees are a special kind of tree in which each node can only have two children, often referred to as left and right child nodes. These special trees are very useful for sophisticated searching, sorting, and other algorithms. However, trees that allow any number of children seem to abound in more general, every-day programming scenarios, as you’ll see from examples below. In a follow-up article, I’ll demonstrate how you can create a BinaryTree class that inherits from Tree and applies the necessary restrictions and some useful abstractions. Below (figure 1) is a binary tree, which I present here to contrast with the non-binary trees that we’ll be covering in detail.
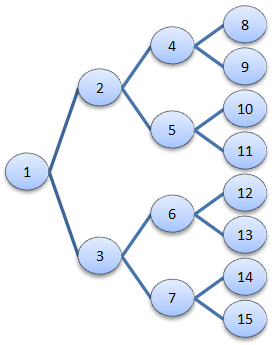
Figure 1. A generic binary tree.
For more information on implementing and using binary trees, see this article which is part of a larger series on data structures.
Examples of Non-Binary Trees
A simple example of a non-binary tree is the file system in any modern operating system. The diagram below (figure 2) illustrates a small part of the structure of the Windows file system. Folders can be nested inside other folders as deeply as needed, providing the ability to compose a complex organizational structure for storing files. The traversal path—from the root to some other node—can be represented by a canonical resource descriptor such as C:\Windows\system32.

Figure 2. The file system is a tree structure of folders containing other folders.
This hierarchical structure can be represented and visualized in different ways, though the underlying relationships are the same. The screenshot below (figure 3) is of Windows Explorer on my development computer. The control is the common TreeView, which supplies a way in this case for users to explore and interact with the tree data structure of the file system.

Figure 3. A tree view control in Windows Explorer provides access to a hierarchy of nested folders.
Another example is the organization of controls in a form (for Windows Forms) or in a window (for WPF). The next diagram (figure 4) depicts the relationship of controls containing child controls, which may in turn contain their own children, and so on.
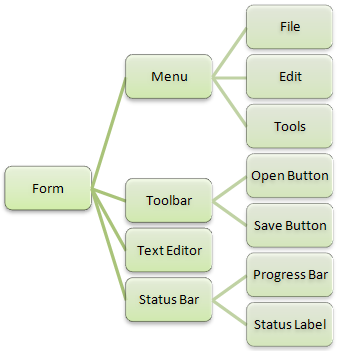
Figure 4. A user interface is composed of a tree of controls that contain other controls.
This is also manifested through a user interface with the Document Outline window in Visual Studio, which is very useful for selecting deeply nested controls, or container controls that are otherwise difficult to select in the forms designer itself. This is shown in figure 5, where you can clearly see the different levels of all controls.
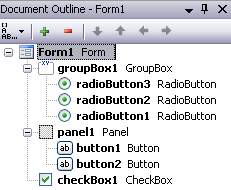
Figure 5. The document outline window in Visual Studio for a Windows Forms screen.
Defining the Basic Components
There is a lot of formal terminology in graph theory to contend with, but for our purposes, we only really need to be concerned with a few basic terms.
- Tree – This refers to a collection of nodes connected by parent-child relationships in a hierarchical structure.
- Parent – A node one level up from the current node.
- Child – A node one level down from the current node.
- Node – One item in a tree with an optional parent and zero or more children.
- Root Node – A special node with no parent. A tree can have only one root node.
- Subtree – A section of a larger tree including the non-root node of a larger tree, plus all of its children.
That’s not so bad, is it? In designing a reusable tree data structure, it’s important to establish a consistent and sensible pattern for semantics. In fact, coming up with good names for the components of our data structure may be the most difficult part. With poor identifiers, even simple structures can be confusing to those using it.
Begin with the End in Mind
I began with a quasi-test-driven development approach. I asked myself how I’d like the end result to look when consuming the new data structure. I knew from the start that a tree data structure that didn’t use generics wasn’t going to be very useful. Imagine this code:
Tree ObjectTree;
What is the type of each node in the tree? If I’m going to use this in different scenarios, the only answer is to make it an object, so that I could store whatever I liked in my tree, but this would require a lot of casting and a lack of type checking at compile type. So instead, using generics, I could define something like this:
Tree <string> StringTree;
This is much better, and leads to two more steps that we’ll need to take conceptually. The first one is that I will definitely want a tree of nodes for custom types in my software’s problem domain, perhaps Customer or MobileDevice objects. Like strings, these objects are (for our purposes here) simply dumb containers of data in the sense that they are unaware of the tree structure in which they reside. If we take this one level further, and consider custom types that are aware of their place within the tree (and can therefore particpate in much richer ways to compose hierarchical algorithms), we’ll need to consider how to make that awareness happen. I will explain this in more detail later in this article.
public class Tree : TreeNode
{
public Tree() { }
public Tree(T RootValue)
{
Value = RootValue;
}
}
This definition of Tree is really a matter of semantics and syntax preference. I’m creating an alias for the TreeNode type, claiming that a Tree is a node itself—the root node in a Tree, by convention. I call this a synonym type. Here’s a very simple example of its use:
Tree<string> root = new Tree<string>();
root.Value = “zero”;
int d0 = zero.Depth;
TreeNode<string> one = zero.Children.Add(“one”);
int d1 = one.Depth;
TreeNode<string> twoa = one.Children.Add(“two-a”);
TreeNode<string> twob = one.Children.Add(“two-b”);
TreeNode<string> twoc = one.Children.Add(“two-c”);
string twocstr = twoc.Value;
int
d2 = two.Depth;
You can tell a few things by looking at this code:
- The root node is defined as a Tree, but is manipulated like the other TreeNodes because it inherits from TreeNode.
- Each node’s value is stored in a property called Value, which has a type of T (using generics).
- A Depth property indicates how deeply in the tree the node is nested (the root has a depth of 0).
- The Add method in the Children TreeNode collection returns a TreeNode object, making it easier to create a new node and get a handle to it in the same statement.
Connecting Nodes to Their Parents & Children
The intelligence needed to make a Tree work resides in two classes: TreeNode and TreeNodeList. I could have used a standard collection type for TreeNodeList, but each TreeNode links to both Parent and Children nodes, which are two fundamentally different relationships; and I wanted parent and child nodes to connect and disconnect automatically behind-the-scenes—if you add a child to X, that child’s Parent property should automatically be set to X, and vice versa. That requires hooking into the Add method in a custom collection class to manage those relationships. TreeNodeList therefore looks like this:
public class TreeNodeList : List<TreeNode>
{
public TreeNode Parent;
public TreeNodeList(TreeNode Parent)
{
this.Parent = Parent;
}
public new TreeNode Add(TreeNode Node)
{
base.Add(Node);
Node.Parent = Parent;
return Node;
}
public TreeNode Add(T Value)
{
return Add(new TreeNode(Value));
}
public override string ToString()
{
return “Count=” + Count.ToString();
}
}
The ToString override is very important for making your debugging sessions more manageable. Without this kind of assistance, especially when troubleshooting recursive, hierarchical algorithms, you may go crazy digging through the debugger’s own tree view control to find what you’re looking for.
The Tree Node
The TreeNode itself gets a little tricky. If you update the Parent property because a node is going to be moved to another part of the tree, for example, you want to make sure that it gets removed from the Parent’s list of Children, and you also want to add it as a child to the new Parent. If the Parent was null, or is being set to null, then only one of those operations (remove or add) is necessary.
Here are the primary structural and payload-containing portions of this early version of the TreeNode class:
public class TreeNode : IDisposable
{
private TreeNode _Parent;
public TreeNode Parent
{
get { return _Parent; }
set
{
if (value == _Parent)
{
return;
}
if (_Parent != null)
{
_Parent.Children.Remove(this);
}
if (value != null && !value.Children.Contains(this))
{
value.Children.Add(this);
}
_Parent = value;
}
}
public TreeNode Root
{
get
{
//return (Parent == null) ? this : Parent.Root;
TreeNode node = this;
while (node.Parent != null)
{
node = node.Parent;
}
return node;
}
}
private TreeNodeList _Children;
public TreeNodeList Children
{
get { return _Children; }
private set { _Children = value; }
}
private T _Value;
public T Value
{
get { return _Value; }
set
{
_Value = value;
if (_Value != null && _Value is ITreeNodeAware)
{
(_Value as ITreeNodeAware).Node = this;
}
}
}
}
There are two ways we could find the Root node. The commented line shows a succinct way to walk the tree (recursively) toward successive parents until Parent is null. The actual implementation being used shows another way, using a simple while loop. I prefer this because in the event of debugging, it’s easy to step through a loop, and a little more difficult to jump through the same property on multiple, perhaps many, different instances of TreeNode. I follow the same pattern for the Depth property (below).
A tree structure isn’t very useful, however, unless it can carry some kind of payload. You want to build a tree of something, and it’s handy that we can use generics to tell the compiler that we want a Tree of strings (Tree), for example. That’s what the Value property is for, and why its type is the generic type parameter T.
To instantiate and initialize TreeNodes, you’ll need some constructors. Here are two of them I defined:
public TreeNode(T Value)
{
this.Value = Value;
Parent = null;
Children = new TreeNodeList(this);
}
public TreeNode(T Value, TreeNode Parent)
{
this.Value = Value;
this.Parent = Parent;
Children = new TreeNodeList(this);
}
The Tree Node Payload’s Awareness of its Place in the Tree
You probably noticed in the last section that the Value object is checked to see if it implements the ITreeNodeAware interface. This is an optional extensibility mechanism for custom classes that need to be aware of the tree so that payload objects can read or manipulate it in some way. In developing a data binding framework for Windows Forms that allows you to bind control properties to paths (“PurchaseOrder.Customer.Name”) instead of specific objects (PurchaseOrder.Customer, “Name”), as ASP.NET and WPF data binding works, I needed this ability and came to the conclusion that this would be a useful feature in general. Later in the article, I will magically transform the TreeNode and TreeNodeList classes in such a way that both this interface and the Value property become unnecessary.
Until then, here’s how the interface looks with an example class that uses it.
public interface ITreeNodeAware
{
TreeNode Node { get; set; }
}
public class Task : ITreeNodeAware<Task>
{
public bool Complete = false;
private TreeNode<Task> _Node;
public TreeNode<Task> Node
{
get { return _Node; }
set
{
_Node = value;
// do something when the Node changes
// if non-null, maybe we can do some setup
}
}
// recursive
public void MarkComplete()
{
// mark all children, and their children, etc., complete
foreach (TreeNode<Task> ChildTreeNode in Node.Children)
{
ChildTreeNode.Value.MarkComplete();
}
// now that all decendents are complete, mark this task complete
Complete = true;
}
}
Using the ITreeNodeAware interface means we have another step to make in our implementation, and adds some complexity to its use in terms of discoverability and implementation of the interface by consumers of the Tree structure in creating custom payload classes. By doing this, however, our Task objects will get injected with a Node property value when added to a Tree of Tasks. So the payload object will point to the node via the Node property, and the Node will point to payload object via its Value property. This is a lot of logic for such a simple relationship, but as we’ll see later, there is an elegant way around all of this.
Including Structure Helper Members
There are some common measurements of aspects of the tree’s nodes, as well as operations that you will typically want to perform on a tree or subtree, such as initialization, systematic traversal, pruning and grafting, disposal, and determination of depth, some of which I will discuss here.
Here is a property to determine your current nesting depth, which can be useful while debugging:
public int Depth
{
get
{
//return (Parent == null ? -1 : Parent.Depth) + 1;
int depth = 0;
TreeNode node = this;
while (node.Parent != null)
{
node = node.Parent;
depth++;
}
return depth;
}
}
Because the payload objects (referenced by the Value property) may require disposing, the tree nodes (and therefore the tree as a whole) is IDisposable. Different trees of objects may require being disposed in different orders, so I’ve created a TreeTraversalType, a DisposeTraversal property of this type to specify the order, and have implemented the Dispose method that takes this into consideration.
public enum TreeTraversalType
{
TopDown,
BottomUp
}
private TreeTraversalType _DisposeTraversal = TreeTraversalType.BottomUp;
public TreeTraversalType DisposeTraversal
{
get { return _DisposeTraversal; }
set { _DisposeTraversal = value; }
}
Here is one way to implement IDisposable that includes a property indicating whether a node has been disposed, invokes a Disposing event, and traverses the tree according to the value of DisposeTraversal.
private bool _IsDisposed;
public bool IsDisposed
{
get { return _IsDisposed; }
}
public void Dispose()
{
CheckDisposed();
OnDisposing();
// clean up contained objects (in Value property)
if (Value is IDisposable)
{
if (DisposeTraversal == TreeTraversalType.BottomUp)
{
foreach (TreeNode node in Children)
{
node.Dispose();
}
}
(Value as IDisposable).Dispose();
if (DisposeTraversal == TreeTraversalType.TopDown)
{
foreach (TreeNode node in Children)
{
node.Dispose();
}
}
}
_IsDisposed = true;
}
public event EventHandler Disposing;
protected void OnDisposing()
{
if (Disposing != null)
{
Disposing(this, EventArgs.Empty);
}
}
public void CheckDisposed()
{
if (IsDisposed)
{
throw new ObjectDisposedException(GetType().Name);
}
}
I overrode ToString in the TreeNodeList class above to display the count of children. I do the same thing for TreeNode, which as I mentioned earlier aids a great deal in debugging.
public override string ToString()
{
string Description = string.Empty;
if (Value != null)
{
Description = “[“ + Value.ToString() + “] “;
}
return Description + “Depth=” + Depth.ToString() + “, Children=”
+ Children.Count.ToString();
}
Notice how the Value property, if it’s set, gets included in the ToString value. If you’re looking at a TreeNode in the watch window, you’ll appreciate that your Value object can be represented without having to drill into anything. You can see at a glance what the payload is, how deep it is in the tree, and how many child nodes it has.
The Role of Generics in Representing Payloads
I have already supplied enough logic and sample code for a fully functioning tree data structure for use in the .NET Framework, which incidentally was developed in a Compact Framework project and will therefore work in any .NET environment. That being said, there are some syntactical inconveniences with the approach mentioned so far. Consider the Tree example above in a scenario where we want to access a parent node’s payload from a current node:
TreeNode<Task> CurrentTaskNode = /* get current task node */;
bool IsComplete = CurrentTaskNode.Parent.Value.Complete;
Note that Parent doesn’t return our object of type T, but instead gives us a TreeNode; and our CurrentTaskNode object is also a node object and not a task object. When we think about trees in theory, especially visually in the form of diagrams, the parent of a node is another node, meaning that parent and child are the same type of thing. In our simple implementation so far, however, the parent of a task is not another task, but rather a task-tree-node, which is not the same thing.
If we start from a Task object instead of a TreeNode, the syntax is worse:
Task CurrentTask = /* get current task */;
bool IsComplete = CurrentTask.Node.Parent.Value.Complete;
Notice how each time we access Node or Value, we’re weaving in and out between types. So we must manipulate this data structure and its payload all the while with explicit deference to the type disparity and dualism, and a careful naming of variables is important to avoid confusion between types (CurrentTaskNode vs. CurrentTask). When I first had this realization, it occurred to me why a Tree data type may have been missing from the original .NET Framework. I doubt very much that all the brilliant developers working on the base class libraries didn’t think to include such a useful structure, but perhaps the obvious implementations that came to mind seemed confusing and problematic for real-world use.
Fortunately, we now have capabilities in the CLR as of 2.0—and corresponding language features—that enable us to solve this problem elegantly. I’m referring to generics, and more specifically, to generic constraints.
The simplifying idea is that by creating a payload class that inherits from TreeNode, and applying a simple generic constraint to get around some casting problems that would normally prevent us from compiling, we can make our final syntax look like this:
Task MakeDinner = new Task();
Task PrepareIngredients = MakeDinner.Children.Add(new Task());
Task CookMeal = MakeDinner.Children.Add(new Task());
Task PreheatOven = CookMeal.Children.Add(new Task());
Task BakeAt350 = CookMeal.Children.Add(new Task());
Task Cleanup = MakeDinner.Children.Add(new Task());
bool IsAllDone = BakeAt350.Parent.Parent.Complete;
Notice that in the final statement, we don’t have to navigate from BakeAt350 to some different type object through a Node property, and that we can go directly from Parent to the Complete property. This is because our Task class is defined like this now:
public class Task : TreeNode<Task>
{
public bool Complete = false;
// recursive
public void MarkComplete()
{
// mark all children, and their children, etc., complete
foreach (Task Child in Children)
{
Child.MarkComplete();
}
// now that all decendents are complete, mark this task complete
Complete = true;
}
}
It’s been compressed! The Node property is no longer necessary (since the task is-a node, instead of being contained-by a node), and therefore the ITreeNodeAware interface can also be dispensed with. The MarkComplete method is different, too: we simply write Child.MarkComplete instead of Child.Value.MarkComplete, and we can loop through a collection of Task objects with the Children property directly, instead of going through a set of TreeNode objects in some external Node object.
In our consuming code above, we didn’t even have to mention the Tree or TreeNode type, but if we did declare a variable that way (for the sake of clarity), it would simply be a synonym of Task. It would look like this:
Tree<Task> MakeDinner = new Tree<Task>();
We could use TreeNode as well; it makes no difference. Task = Tree = TreeNode.
To make all of this magic happen, we need to define TreeNode with a generics constraint.
public class TreeNode : IDisposable where T : TreeNode
This tells the compiler that T must inherit from TreeNode, and therefore variables of type T are safe to manipulate as tree nodes. TreeNodeList requires the same constraint:
public class TreeNodeList : List<TreeNode> where T : TreeNode
This breaks us out of a restrictive pattern where normally a custom collection class is unable to richly manipulate the objects within it (unless the collection is instantiated directly from consumer code, which is not the case in this pattern). But because the collection class knows that all of its items will derive from TreeNode, it can manipulate them as tree nodes with no problem.
There is a price to pay for this convenience, however, which is that the tree is restricted to types that inherit from TreeNode. This means that a Tree is no longer possible. You will have to decide how you will likely use trees in your development to determine whether to design something like this into it. If you want this cleaner syntax but still need trees of primitive and other non-TreeNode-derived types, you can create a distinct SimpleTree for this purpose. It may even be possible for Tree to inherit from SimpleTree, hiding the Value property (with a private shadow method shown below) and adding the generic constraint.
Cleaning Up
Now that the basic functionality is in place, I decided to split the Tree class into two. SimpleTree represents a simple tree data structure that can contain as its Value any object; and ComplexTree, which uses the generic constraint described above and supports more complex hierarchical algorithms and tree-aware nodes. I really like the simplicity of the Tree name, but along with the need to support both simple and complex scenarios, there are two more reasons for this name-change decision.
First, in the System.Windows.Forms namespace, there is already a TreeNode class that corresponds to the TreeView control. If I had designed that control, I probably would have named it VisualTree and its node VisualTreeNode to distinguish it from a logical node, but as it is, dealing with two different TreeNode classes, even in different namespaces, could be confusing and messy. Second, the new Task Parallel Library (TPL) contains an implementation of a binary tree called Tree, which is a rather short-sighted name considering that all useful trees are not binary trees, as I’ve demonstrated in this article; BinaryTree would have been a much more appropriate name. Hopefully by the time TPL is released, this identifier will be updated to reflect this.
Conclusion
Elegant implementations of tree data structures in .NET Framework, though problematic in the past, are finally possible with the introduction of generics and generic constraints. With some careful syntax planning for consuming code, as well as experimentation with different language constructs, I hope I have shed some light on how these kinds of problems can be approached and solved.
In future articles, I will be exploring some techniques and specific uses for hierarchical algorithms. Some of the very problems that appear too difficult to solve without a background in mathmatics can be much more easily understood and mastered by using tree data structures and associated visualization techniques.
[This is the first article in a series of intelligent data structures, which is continued here with KeyedList.]


