Critical Development

Language design, framework development, UI design, robotics and more.

Archive for the ‘Windows Mobile’ Category

Spb Mobile Shell: An Alternative Windows Mobile Shell

Posted by Dan Vanderboom on May 6, 2008

Spb Software House has been creating some great Windows Mobile software for a while now, but recently they released their Spb Mobile Shell, and I’m so impressed that I felt the need to tell everyone about it.  The only reason it doesn’t quite rival the iPhone interface is its lack of scope: it doesn’t (yet?) replace all of the built-in applications for managing tasks, calendar items, file exploration, process/task management, and so on.

image image image image

Why am I so enamored with their user interface?  Let me count the ways:

  1. Visual effects such as linear gradients, faded backgrounds for emphasizing foreground popups, fast animated page transitions, and a choice of skin-like color schemes.
  2. Large, touch friendly buttons that eliminate the need to pull out your stylus and poke at impossibly tiny areas of the screen.
  3. A large button bar along the bottom, and the elimination of the start menu along the top and the Windows Mobile menu along the bottom (with only two top-level options).
  4. Selection of phone contacts using photo buttons.
  5. Gesture recognition of finger movements to flip pages.
  6. The ability to customize menus and other settings.

For only $29.95 (or packaged together with three other useful applications for $49.95), Spb Mobile Shell is a steal.  I’ve experimented with a few other shell applications, and had problems with glitch and buggy behavior, but so far this little gem has performed marvelously in all regards.

I hope they eventually provide some way to integrate new applications into their shell.  It would be nice to take advantage of some of their visual layouts, message box pop up effects, and so on, to provide an interface in my own software that’s consistent with their shell.  Better yet, the Windows Mobile team should throw in the towel with their existing shell and buy this one to use as a guideline to replace theirs.  As Mark Miller so rightly observed in the recent Dot Net Rocks episode “The Science of Great UI“, the Windows Mobile 5 user interface sucks.  Companies like Spb wouldn’t be providing alternatives if this wasn’t the case.  From what I’ve seen of Windows Mobile 6, things aren’t looking much better there, either.

Posted in User Interface Design, Windows Mobile | Leave a Comment »

Compact Framework Controls (Part 2): Polygon Clipping

Posted by Dan Vanderboom on May 4, 2008

[This article is part of a series that starts in this article.]

My intention is to cover a full spectrum of activities around custom control development, with an emphasis on the compromises, workarounds, and special care that must be taken when developing controls for the Compact Framework.  In my first article, I talked about how most design-time attributes must be applied to control classes and their members, and what some of those attributes mean.  I have a number of articles planned that explore those attributes more, and will go into extending the design-time experience in more depth, but I’m going to take a detour into custom painting of the control surface first, so we have a control to reference and work with in the examples.

Polygon Clipping

If you’re new to creating graphical effects and unfamiliar with the techniques invovlved, clipping refers to the chopping off of an image based on some kind of border or boundary.  In Windows Forms interfaces, controls are inherently rectangular because clipping occurs automatically at the window’s boundary (which is a shame considering how this presumption of need slows rendering, and WPF takes good advantage of not doing so).  Everything outside the control’s outer shape doesn’t get drawn at all.  You can draw anywhere you want, including negative coordinates, but only the points that fall within the clipping region will be displayed.

Clipping Illustration

But what if you want to make your control a different shape, other than the standard rectangle, like an ellipse or a rounded rectangle?  How do you make sure that whatever you draw inside never leaks outside of your defined shape?  In the full .NET Framework, there is a Region property in the Control class that defines these boundaries, and there are several good articles that explain this.  The clipping mask is applied based on that Region’s definition.  In Compact Framework, the Region property doesn’t exist, and you’re forced to find your own way of defining different shapes.

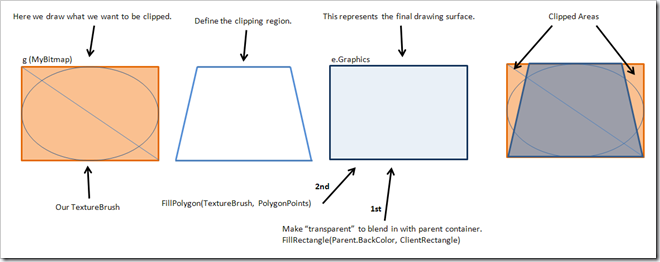
The key to this is to understand the Graphics class’s Fill methods.  While FillEllipse and FillRectangle definitely have their uses, I’d like to focus on situations that are a little bit more demanding, such as when you want to represent a more complex shape like a rounded rectangle (with many points) or some kind of UML diagram element.  FillPolygon takes a list of Points, and with them can define the most eccentric and specific of shapes.  By filling a polygon with an image using a TextureBrush, clipping happens automatically as part of the operation.

Let’s take a look at some code to see how we perform each of these steps: preparing and drawing on a bitmap image in memory, defining our shape’s boundaries, and then clipping that image within the specified shape.

using System;
using System.Collections.Generic;
using System.Windows.Forms;
using System.Drawing;
using System.Reflection;

namespace CustomControlsDemo
{
    public class ClippingControl : Control
    {
        protected override void OnPaint(PaintEventArgs e)
        {
            // define a canvas for the visual content of the control
            Bitmap MyBitmap = new Bitmap(Width, Height);

            // create a painting tools object
            Graphics g = Graphics.FromImage(MyBitmap);

            // draw graphics on our bitmap
            g.FillRectangle(new SolidBrush(Color.PaleGoldenrod), ClientRectangle);
            g.DrawLine(new Pen(Color.Black), 0, 0, Width - 1, Height - 1);
            g.DrawEllipse(new Pen(Color.Black), 0, 0, Width - 1, Height - 1);

            // dispose of the painting tools
            g.Dispose();

            // define the custom shape of the control: a trapezoid in this example
            List<Point> Points = new List<Point>();
            Points.AddRange(new Point[] { new Point(20, 0), new Point(Width - 21, 0), 
                new Point(Width - 1, Height - 1), new Point(0, Height - 1) });

            // draw that content inside our defined shape, clipping everything that falls outside of the region;
            // only if the image is much smaller than the control does it really get "tiled" and act like a textured painting brush
            // but our bitmap image is the same size as the control, so we're just taking advantage of clipping
            Brush ImageBrush = new TextureBrush(MyBitmap);
            e.Graphics.FillPolygon(ImageBrush, Points.ToArray());
        }
    }
}

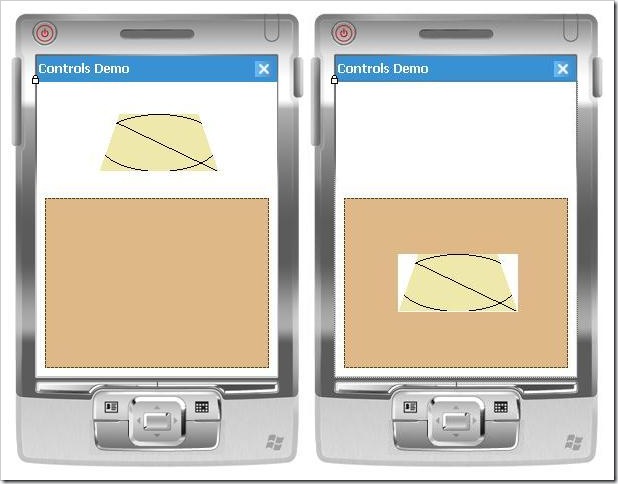
Although this control has a silly shape and doesn’t do much yet, it does illustrate the basics of painting within the bounds of an irregular shape.  As long as we draw on MyBitmap, everything will be properly clipped by the call to FillPolygon.  However, as you can see in the screenshots below, the white background around our custom shape could be a problem.  You can change the BackColor property to match the color of the container its on (a Panel control in this case, which is Color.BurlyWood), but really it makes more sense for BackColor to describe the color within our shape.  We’d like the surrounding background to blend in with whatever container the control is sitting in.

first version

We can accomplish this with two simple changes.  First, at some point before the FillPolygon call, we need to fill the entire control’s area with the BackColor property of the parent control.  We will draw using the e.Graphics object, which paints on the whole rectangular control, not our g Graphics object, whose contents get clipped.  Then, instead of hard coding Color.PaleGodenrod, we can use the BackColor property to specify our fill color.  Here is the changed section of code:

// draw graphics on our bitmap
g.FillRectangle(new SolidBrush(BackColor), ClientRectangle);
g.DrawLine(new Pen(Color.Black), 0, 0, Width - 1, Height - 1);
g.DrawEllipse(new Pen(Color.Black), 0, 0, Width - 1, Height - 1);

// dispose of the painting tools
g.Dispose();

e.Graphics.FillRectangle(new SolidBrush(Parent.BackColor), ClientRectangle);

Now if we set the BackColor to PaleGodenrod, we’ll get this rendering:

transparent background

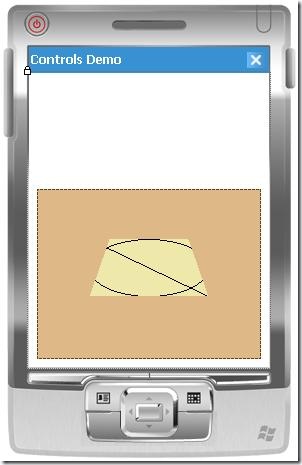
Dragging the control off the panel and into the white area will cause the area around the control to paint white, so now you can see how it blends in with whatever background we have as long as it’s a solid color.

In a future article, after I’ve covered how to draw arcs and curves, I will revisit this technique and demonstrate how to draw rectangles with rounded corners.

[This article is part of a series that continues in this article.]

Posted in Algorithms, Compact Framework, Custom Controls, User Interface Design, Visual Studio, Windows Forms, Windows Mobile | 12 Comments »

Using Extension Methods to Manipulate Control Bitmaps in Compact Framework

Posted by Dan Vanderboom on April 11, 2008

I’m loving extension methods.  All of the methods that I wish BCL classes had, I can now add.  While I consider it highly unfortunate that we can’t yet add extension properties, events, or static members of any kind, still it’s a great amount of power in terms of making functionality discoverable in ways not possible before.

During the implementation of my Compact Framework application’s MVC framework, I wanted to support displaying views modally.  However, using a screen stack of UserControls that are all hosted in a single master Form object, I lose out on this built-in functionality and so found myself in need of creating this behavior myself.  One of the difficulties in doing this is displaying a view that may not cover every portion of other views beneath it; if the user clicks on one of the views “underneath”, that control gets activated, and if pressed on a control, that control will handle the event (such as Button.Click).

My solution to the problem is simple.  Take a snapshot of the master form and everything on it, create a PictureBox control that covers the whole form and bring it to front, and set its image to the snapshot bitmap.  Doing this provides the illusion that the user is still looking at the same form full of controls, and yet if they touch any part of the screen, they’ll be touching a PictureBox that just ignores them.  The application is then free to open a new view UserControl on top of that.  When the window is finally closed, the MVC infrastructure code tears down the PictureBox, and the real interface once again becomes available for interaction.

Screenshots before and after screen capture and darkening

In addition, I wanted the ability to emphasize the modal view, so you can see from the picture above that I decided to accomplish this by de-emphasizing the background bitmap.  By darkening the snapshot, the pop-up modal view really does seem to pop out.  The only problem with bitmap manipulation using the Compact Framework library is that it’s extremely slow, but I get around this by using some unsafe code to manipulate the memory region where the bitmap image gets mapped.  (If you’re unfamiliar with the unsafe keyword, don’t worry: this code actually is safe to use.)

Here is the full source code for taking a snapshot of a form (or any control), as well as adjusting the brightness.

using System;
using System.Linq;
using System.Collections.Generic;
using System.Text;
using System.Drawing;
using System.Drawing.Imaging;
using System.Windows.Forms;
using System.Runtime.InteropServices;

public static class ControlBitmapExtensions
{
    [DllImport("coredll.dll")]
    private static extern bool BitBlt(IntPtr hdc, int nXDest, int nYDest, int nWidth, int nHeight,
        IntPtr hdcSrc, int nXSrc, int nYSrc, int dwRop);

    public struct PixelData
    {
        public byte Blue;
        public byte Green;
        public byte Red;
    }

    public static Bitmap GetSnapshot(this Control Control)
    {
        Rectangle rect = new Rectangle(0, 0, Control.Width, Control.Height - 1);
        Graphics g = Control.CreateGraphics();
        Bitmap Snapshot = new Bitmap(rect.Width, rect.Height);
        Graphics gShapshot = Graphics.FromImage(Snapshot);
        BitBlt(gShapshot.GetHdc(), 0, 0, rect.Width, rect.Height, g.GetHdc(), rect.Left, rect.Top, 0xCC0020);
        gShapshot.Dispose();

        return Snapshot;
    }

    public static unsafe Bitmap AdjustBrightness(this Bitmap Bitmap, decimal Percent)
    {
        Percent /= 100;
        Bitmap Snapshot = (Bitmap)Bitmap.Clone();
        Rectangle rect = new Rectangle(0, 0, Bitmap.Width, Bitmap.Height);

        BitmapData BitmapBase = Snapshot.LockBits(rect, ImageLockMode.ReadWrite, PixelFormat.Format24bppRgb);
        byte* BitmapBaseByte = (byte*)BitmapBase.Scan0.ToPointer();

        // the number of bytes in each row of a bitmap is allocated (internally) to be equally divisible by 4
        int RowByteWidth = rect.Width * 3;
        if (RowByteWidth % 4 != 0)
        {
            RowByteWidth += (4 - (RowByteWidth % 4));
        }

        for (int i = 0; i < RowByteWidth * rect.Height; i += 3)
        {
            PixelData* p = (PixelData*)(BitmapBaseByte + i);

            p->Red = (byte)Math.Round(Math.Min(p->Red * Percent, (decimal)255));
            p->Green = (byte)Math.Round(Math.Min(p->Green * Percent, (decimal)255));
            p->Blue = (byte)Math.Round(Math.Min(p->Blue * Percent, (decimal)255));
        }

        Snapshot.UnlockBits(BitmapBase);
        return Snapshot;
    }

    public static Bitmap Brighten(this Bitmap Bitmap, decimal PercentChange)
    {
        return AdjustBrightness(Bitmap, 100 + PercentChange);
    }

    public static Bitmap Darken(this Bitmap Bitmap, decimal PercentChange)
    {
        return AdjustBrightness(Bitmap, 100 - PercentChange);
    }
}


Because Control is extended by GetSnapshot, and Bitmap is extended by AdjustBrightness, Brighten, and Darken, I can write very clear and simple code like this on the consuming side:

Bitmap bitmap = MyForm.GetSnapshot().Darken(40);

…and voila!  I have a snapshot.  Note that because Darken extends Bitmap, it can now be used with any Bitmap.  As we read from this code from left to right, we’re observing a pipeline of transformations.  MyForm is the source data, GetSnapshot is the first step, Darken is the next change, and with more extension methods on Bitmap we could continue to process this in a way that is very natural to think about and construct.

I do have to admit that I cheated a little, though.  Even with the direct memory manipulation with pointers, it still didn’t perform very well on the Symbol and DAP devices I tested on.  So instead of adjusting the brightness on every pixel, I only darken every third pixel.  They’re close enough together that you can’t really tell the difference; however, the closer to 100 percent you darken or brighten an image, the more apparent the illusion will be, since two thirds of the pixels won’t be participating.  So it’s good for subtle effects, but I wouldn’t count on it for all scenarios.

This every-third-pixel dirty trick happens in the for loop, where you see i += 3, so go ahead and experiment with it.  Just be careful not to set it to large even numbers or you’ll end up with stripes!

Posted in Algorithms, Compact Framework, Object Oriented Design, Problem Modeling, User Interface Design, Windows Forms, Windows Mobile | 5 Comments »

Compact Framework Controls (Part 1): Creating Custom Controls and Designers

Posted by Dan Vanderboom on March 14, 2008

I’ve been having a lot of fun learning how to create rich design-time experiences for custom controls in Compact Framework for the past few days.  It’s been frustrating, and the documentation is hard to find unless you’re already familiar with the metaphors and know the buzzwords.  While this first article won’t be completely comprehensive, I will continue to write about this topic until I have covered all of the bases necessary for you to create professional, polished controls and design-time experiences suitable for commercial use or sale.

I’m going to assume you have at least some experience in creating custom controls, at least for desktop applications.  Creating custom controls for Compact Framework applications is another story, however.  Not because of any particular constraints of memory of screen real estate, but because the typical method for attaching metadata to specify design-time behavior is different.  There are some other subtleties and oddness as well that are specific to the Compact Framework.

In the full .NET Framework, we have many attributes at our disposal to specify design-time behavior; most of these can be found in System.ComponentModel.  We have access to a lot of these for mobile device applications, but because they’re not included in the Compact Framework, we need another way to associate them with our control classes and their members.  This is done through something called the “design-time attributes file”, which has an extension of .xtma.

There are two ways to add this file.  The method that people typically suggest is to add a class diagram to your project (right-click on your project in Solution Explorer, and select View Class Diagram), select an item in the diagram, edit the Custom Attributes property in the property grid (see screenshot below), click on the ellipsis (…) to open a pop-up window, and then enter an attribute such as DesktopCompatible(true).

Custom Attributes in properties

When you click the OK button, a new file will be added to your project called DesignTimeAttributes.xtma, and this file will open in Visual Studio.

This is quite a round-about way to create the file in my opinion, and it presumes that you know a valid attribute to add right from the beginning.  I personally don’t use the class diagrams, and I think it’s easier just to add the .xtma file directly, by right-clicking on your project in Solution Explorer, Add—New Item, and selecting Design-Time Attribute File.  Editing your attributes directly in this XML file instead of the pop-up window in the class designer has the benefit of providing you with some Intellisense (which it gets from the associated XSD file).

I get a little disappointed when I see people list only the most common attributes that I already know about, and then fail to mention the rest of the attributes that are supported in Compact Framework, and since the list isn’t unmanagable—and easily determined from Intellisense—I will list most of them that are supported .xtma file here, and in a future artile will provide the remaining ones.

Here’s a screenshot showing the full list of tags that you can use at the class level.  Most of them are attributes, while some of them like Event, Method, and Property allow you to specify specific members of the class so that you can apply attributes to just those members.

 Xtma attributes

This is what they mean:

  • ApplyDeviceDefaults – I couldn’t find any mention of this in the normal area of MSDN that enumerates all of the classes, but I did find it explained well in this MSDN article.
  • ComplexBindingProperties – For complex data binding, of course.
  • DefaultBindingProperty – This is for simple data binding.
  • DefaultEvent – The default event for Button is Click.  When you double-click on a control in the designer, Visual Studio switches to the code behind file and will automatically generate this event’s handler for you.  Very handy.
  • DefaultProperty – When you select a control in the designer, this is the property in the properties window that gets focus first.  For the Label control, this is the Caption property.
  • Description – The description text appears in the properties window below the grid of property names and values, and can provide useful information about the meaning of a property or event.
  • Designer – The Designer attribute is one of the primary gateways for providing rich design-time experiences for your controls.  Creating custom designers and associating your controls with them is a tricky business, and one I intend to explore in depth in this and future articles.  Because MSDN documentation in this area is rather sparse, I’ve begun contributing to the community content on the MSDN pages, and you’ll see the help I’ve added at the very bottom of the page if you follow the link for this item.
  • DesignerSerializer – Located in System.ComponentModel.Design.Serialization, a DesignerSerializer is used to provide a custom way of serializing your control to code in the designer partial class file.  I haven’t had a need yet to use this, but if someone can think of a real-world scenario that requires it, I will be happy to explore the subject further and write about it.
  • DesignTimeVisible – Indicates whether a control can be shown on a designer, and is supposedly ignored by “components with a UI presense”, whatever that means.  A little more usefully, MSDN states that it is useful when you have a control that accepts child components, such as the TreeView whose node items “should not appear in the component tray because they are drawn by the TreeView control”.  This will require some more exploration.
  • DesktopCompatible – This is the first design-time attribute I became familiar with in working with Compact Framework controls.  If you have a control that makes P/Invoke calls, Visual Studio is uncertain whether they’re device specific OS calls, and to be safe, it doesn’t execute your control’s code, which means your control can’t render itself even on the designer surface.  You get a message telling you that it’s unsafe.  To get around this, and presuming that it is indeed safe to run your control’s code on the desktop (I’ll explain more about this later, or you can read this article by XinYan), just add a DesktopCompatible attribute to the control class, and you’ll be back in business.  I’m not sure where this attribute is located; it’s not a desktop attribute, so it’s not in the full .NET Framework’s System.dll, and a search through Reflector didn’t locate it, so I’ll have to keep looking.  But it’s there, and it works.
  • Docking – Specifies the default docking behavior for controls.  This is located in System.Windows.Forms.
  • Editor – If you need a more powerful experience for editing complex properties within the properties window itself, this attribute will allow you to hook into one.  I’ll be covering over custom editors in detail.
  • ImmutableObject – Specifies that an object has no subproperties capable of being edited, per MSDN documentation.  Not sure what the benefits of that would be: perhaps to hide all properties for a class without having to hide each one separately?
  • InitializationEvent – This is used to support auto data-binding (by Visual Studio wizards I’m guessing), so it knows which event to hook into when generating the data-binding code.
  • LookupBindingProperties
  • RootDesignerSerializer – I’m not sure what this was for originally, but according to bug report, this attribute is both deprecated and broken.
  • Supported – Explained in this blog as part of Platform Verification Task.  Located in Microsoft.CompactFramework.Build.Tasks.  You can use this attribute to indicate that a class or member is not supported for the specific platform.
  • SuppressFiltering – Located in Microsoft.CompactFramework.Build.Tasks.
  • ToolboxBitmap – This simply specifies the bitmap that will be displayed in the toolbox.  Located in System.Drawing.
  • TypeConverter – Specifies the TypeConverter class used for a property.  TypeConverters are an important aspect of the design-time experience and merit further explanation.
  • Browsable – This determines whether a property or event will be displayed in the properties window, and is typically used to hide properties or events that must be public for some reason but aren’t meant to be manipulated during design time.
  • Category – If you set this to an existing category name, your property or event will appear in there; if you create your own category name, a new category will appear in the properties window.

There are a few more that are specific to properties, events, and methods, but this will give us a good start.  I’ll cover the remainder in future articles.

That seems like a lot at first glance, but chances are that you’ll only need a handful at any given time.  With a little exploration and practice (and guidance from myself and others whose blogs and other resources I’ll share), you could soon be a master of rich, no-compromise custom control development for Compact Framework applications.  I believe this is a worthy cause, for one because there is a scarcity of good third-party controls, especially when compared to the abundance that we have for the desktop world of .NET development; but also because I have personally struggled with Compact Framework development and have always thought it would be nice to have a step-by-step series of tutorial to follow for creating custom controls.  I’ve found many useful and helpful articles, but nothing that really brings it all together in a clear manner.

Here is an example .xtma file for a new user control I created that has Category and Description attributes on a property I created called HighlightForeColor:

XTMA

The magic happens when you build your custom control project.  Visual Studio builds not only your control project in its runtime form, but also generates another assembly with .asmmeta.dll after your own target assembly name.

Build output

If you use Reflector to disassemble it, you will see that this is a design-time component that contains all of your classes and their members with real attributes attached.  Strangely, it does not contain any code, and parameters have no names.  The purpose is simply to be a carrier of attributes.  This is a screen shot from Reflector, showing the attached attributes:

Reflector

I’m puzzled by this implementation detail.  Attributes are so insignificant in size, being just metadata tags.  If Microsoft had just included them in the Compact Framework, it seems they could have avoided the requirement for this second, oddly-empty assembly (and there is a third, for custom designers and editors, as you’ll see later).  Unless there’s something else to it that I’m missing…

[This article is part of a series that continues in this article.]

Posted in Compact Framework, Custom Controls, User Interface Design, Visual Studio, Windows Forms, Windows Mobile | 10 Comments »

Listing Storage Card Paths in Compact Framework

Posted by Dan Vanderboom on March 10, 2008

Getting a list of storage card paths on a Windows CE or Windows Mobile device from Compact Framework is a lot more complicated than it should be.  After finding references to FindFirstFlashCard and FindNextFlashCard, which require interop calls, I found this helpful MSDN article which talks about a way of obtaining storage card folder names without using interop. 

However, there are a few problems with it.  First, attrStorageCard is not defined.  If you’re interested in that technique, use this:

FileAttributes attrStorageCard = FileAttributes.Directory | FileAttributes.Temporary;

Second, with the device that I’m working on (made by DAP), that method returned not only the storage card, but also a DiskOnChip folder (fair enough), and a folder called Network, which I can only guess is some kind network-mapped directory.  I didn’t want to include this Network folder and then have to create some kind of exclusion rule for it, so I decided to take the interop route and try FindFirstFlashCard using code from this website.

I didn’t have any luck there either, unfortunately, because the DAP device I’m working with doesn’t have the required note_prj.dll file.  Foo.

Eventually I stumbled across a registry setting at HKEY_LOCAL_MACHINE\System\StorageManager\Profiles\MMC\Folder, which is set to “Storage Card” for my device.  I really dislike using the registry for this, and I’m hoping it will work for other manufacturer’s devices.  Because it’s a Microsoft area of the registry, I’m fairly confident this will be the case.  I was informed that the DAP device I’m developing for likes to randomly change its storage card path to “Storage Card2”, so I’ll have to check that this registry setting is updated when that happens.

I’m going to say a little prayer to the Compact Framework dieties to add some better managed support for accessing common device functionality like storage cards.  CF really is a great platform, but the learning curve is still pretty painful after all this time.

I wonder how Google’s Android API exposes things like this…

Posted in Compact Framework, Windows Mobile | 3 Comments »

The Architecture Journal: Mobile Architecture

Posted by Dan Vanderboom on January 14, 2008

One of my favorite journals is The Architecture Journal: Input for Better Outcomes, published by Microsoft.  I can usually count on it for in-depth, high-level articles about current technologies and design practices, and I was excited to see an issue devoted to one of my favorite topics: mobile architecture.  Although it now requires a Live ID registration, it’s free, and I highly recommend that you take advantage of it.  In fact, you should even go back and read the old issues.  (There’s a cool beta of a reader for this journal that you can download here.)

That being said, I have to admit I’m rather disappointed with this particular issue.  Though I understand that not all mobile solutions will run on Windows CE or Windows Mobile devices, that UMPCs and tablets are considered part of the same market, still… broad remarks are made that don’t even hint at current limitations in the technology—information that architects considering mobile projects would find useful to know.

For example, the first article advocates the use of Microsoft Synchronization Services (“which lets application developers easily add synchronization…”), but fails to mention that it doesn’t support Windows CE or Windows Mobile at all (and who knows when it ever will, or how crippled it will be when it is finally supported?).

The article on extending enterprise applications to mobile devices touched on most of the same issues that I’ve run into over the past several years, but is so narrowly focused on a singular strategy and implementation that I felt it failed to present a more useful, and more abstract, treatment of the issues that could be appreciated and applied in vastly different scenarios.  The long lists of best practices such as “use database stored procedures to write wrapper code for faster data access” represents, I believe, one philosophy of data management in general, and is not wholly relevant to the topic of mobility and its specific ramifications.  What of the update statement that gets executed only a dozen times daily: will 20 milliseconds of faster execution time be worth the accumulated hours of maintenance and updating of those extra database objects as the product evolves?  How many development assets do you want to manage, if you can use an ORM solution like LINQ without incurring that overhead?

Likewise, recommendations to include a history table for every regular table, where you do only inserts and never updates based on triggers, begs the question of “where the hell do you get all of this storage space on your mobile devices that you can be so wasteful?”  You’re really going to make a copy of records from multiple tables when a single row in one of the table is updated in any way?  Every time?

While the article on Test Driven Development and Continuous Integration for Mobile Applications was one of my favorites (the other being an article on automotive applications), the author mentions his open source project wMobinium.net which provides automated testing for mobile devices.  Is this solution necessary now that Visual Studio 2008 supports automated tests for mobile devices?  Isn’t this guy rather late in announcing this project?  (I don’t know, as I’ve only toyed with VS2008’s mobile testing a little and am not aware of its shortcomings.)  He also mentions his appreciation for the release of Compact Framework v2.0, so either this article was written a while back (and is now stale), or this guy doesn’t realize that v3.5 has been out for a couple months now, with betas and CTPs going further back.

When I read an architecture journal, I expect deep, insightful, relevant, up-to-date material by those who preferably have implemented more than one system, and have learned valuable lessons in different contexts that they want to distill into wisdom and share with the community.  Where I have been impressed with past issues, I believe this one has fallen short.  Maybe I’m extra-critical because of my familiarity with the subject.  You be the judge.

But I still look forward to the next issue.  And it encourages me to start jotting down some ideas for future articles of my own.  What are the real gotchas in mobile development?  If we had a map of these pitfalls, and the corresponding opportunities…

To be continued.

Posted in Compact Framework, Problem Modeling, Software Architecture, Windows Mobile | Leave a Comment »

Windows Mobile 5 SDK R2 – Missing Controls From Toolbox (Bad Joo Joo)

Posted by Dan Vanderboom on December 13, 2007

I am plagued by the Windows 5 SDK R2. When it was first installed with Visual Studio 2008, I couldn’t open WM5 projects at all, and when I created them, they wouldn’t appear in Solution Explorer. After uninstalling and reinstalling it, I was able to work with WM5 projects, and I thought that all of my problems had been solved. Now, however, I notice that the toolbox in the Windows Forms designer contains no controls. It’s totally empty! I can copy existing controls on forms and paste them to create copies, and because I use a relatively small set of custom controls for nearly everything in my user interfaces, this will work for the time being. But the only way to get controls in the toolbox is to open or create a Pocket PC 2003 project.

I have a feeling this will require some on-going investigation. Stay tuned.

Posted in Compact Framework, Visual Studio, Windows Mobile | 1 Comment »