Critical Development

Language design, framework development, UI design, robotics and more.

Archive for the ‘Algorithms’ Category

Four Traversal Patterns for Tree<T>

Posted by Dan Vanderboom on April 5, 2010

[Updated 8/14/2014] The source code for this library can be found here at GitHub. Also check out my blog post announcing it.

This is an update to my original article on a non-binary tree data structure.  After receiving multiple requests to complete this, here it is.  The updated source code can be downloaded here.

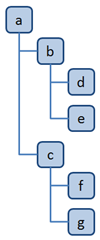
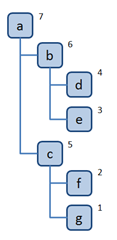
To illustrate the four possible traversal types, the following tree data structure will be used in all of my examples.

image

The enum TreeTraversalType has two possible values: DepthFirst and BreadthFirst.  The other enum involved, TreeTraversalDirection, determines which end of the tree it starts from: TopDown or BottomUp.  There are four possible combinations of these two values, which will each be presented separately.

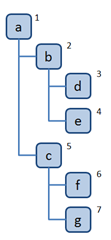
Depth-First, Top-Down

This traversal strategy involves starting at the root and digging as deep into the tree whenever possible.  The order of nodes yielded by our example tree structure would be a-b-d-e-c-f-g.

image

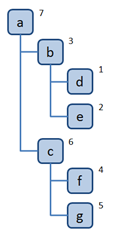
Depth-First, Bottom-Up

Because we’re moving bottom-up in this case, the first thing we have to do is dive to the bottom of the first branch we find.  We skip past a and b, and find d with no children.  D is therefore the first node we’ll yield.  E is it’s peer, so that comes next.  From e, we move up the tree to b.  A is the root, so it has to be the last node yielded, so we’re going to dive into the c branch next, yield f and g, and then yield c and finally a.  The order is: d-e-b-f-g-c-a.

image

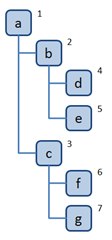
Breadth-First, Top-Down

When we traverse breadth-first, we’re moving through the tree in levels.  With Top-Down, we start with the root a, then move to the second level with b and c, and then finally move to the third level to yield d-e-f-g.

image

Breadth-First, Bottom-Up

The final traversal is the one I had the most trouble with, and I ended up cheating a little by reversing the Breadth-First, Top-Down traversal.

image

Conclusion

Now, with a call to GetEnumerable on a node object, you can specify which of these four traversal patterns to use.  Here is an example of how that code looks:

foreach (SimpleTreeNode<string> node in 
    root.GetEnumerable(TreeTraversalType.DepthFirst, TreeTraversalDirection.TopDown))
{
    // ...
}


Posted in Algorithms, Data Structures | Tagged: | 4 Comments »

Animate.NET: Fluent Animation Library for Silverlight & WPF

Posted by Dan Vanderboom on December 31, 2009

Overview

The basic idea—in Silverlight and WPF—that an animation is just a change in some DependencyProperty over time is simple and powerful.  However, at that level of detail, the API for defining and managing complex animations involves writing a ton of code.  There are code-less animations, of course, such as those created in the Visual State Manager, but when you want to perform really dynamic animations, state-based animations can become impractical or outright impossible.

In response to this, I’ve published my fluent-style code-based animation library for Silverlight and WPF on CodePlex at http://animatedotnet.codeplex.com.  This is an API for making code-based animations intuitive and simple without having to write dozens or even hundreds of lines of code to create and configure storyboards, keyframes, perform repetitive math to calculate alignment, rotation, and other low-level details that distract one from the original purpose of the animation.  In one example, I counted over 120 lines of standard storyboard code, and with the abstractions and fluent API I’ve come up with, reduced that down to half a dozen lines of beautiful, pure intent.  As a result, it’s much more readable and faster to write.

I was initially inspired by Nigel Sampson from his blog article on building a Silverlight animation framework.  The code on his site was a good first step in creating higher-level abstractions, going above DoubleAnimation to define PositionAnimation and RotationAnimation, and I decided to build on top of that, adding other abstractions as well as a fluent-style API in the form of extension methods that hide even those classes.

Concepts

All Animate.NET animations derive from the Animation class which tracks the UI element being modified, the duration of animation, whether it has completed, and fires an event when the animation completes.  It manages building and executing the Storyboard object so you don’t have to.

Subclasses of Animation currently include OpacityAnimation, PositionAnimation, RotationAnimation, SizeAnimation, TransformAnimation, and GroupAnimation.  TransformAnimation is the parent class of RotateAnimation, and in the future ScaleAnimation and TranslateAnimation may also be included.

GroupAnimation is special because it allows you to combine multiple animations.  These groups can be nested and each group can include a wait time before starting (to stagger animations).

The Animate static class includes all of the extension methods that make up the fluent API, and the intention is for this to be the master class for building complex group animations.  Most of these methods come in pairs: you can RotateTo a specific angle or RotateBy relative to your current angle; MoveTo a specific location or MoveBy relative to your current position, etc.

Here’s the list so far:

  • Group and Wait
  • Fade, FadeIn, FadeOut, and CrossFade
  • RotateTo and RotateBy
  • ResizeTo and ResizeBy
  • MoveTo and MoveBy

Examples

Animate.NET can best be understood and appreciated with examples.

Basic Animations

Let’s say you want to resize an element to a new size.  Normally you’d need a storyboard and two DoubleAnimations: one for x and another for y, and for each you’d need to set several properties.  With Animate.NET, you can define and execute your animation beginning with a reference to the element you want to animate:

var rect = new Rectangle()
{
    Height = 250,
    Width = 350,
    Fill = new SolidColorBrush(Colors.Blue)
};
MainStage.Children.Add(rect);
rect.SetPosition(50, 50);

rect.ResizeTo(150, 150, 1.5.seconds()).Begin();


Only a single line of code, the last one, is needed to resize the rect element.

Note the call to Begin.  Without this, the ResizeTo (and all other fluent API calls) will return an object that derives from Animation but will not run.  We can, if needed, obtain a reference to the animation and begin the animation separately, like this:

var anim = rect.ResizeTo(150, 150, 1.5.seconds());
anim.Begin();


This allows us to compose animations into groups and manipulate animations after they’ve started, and is very similar to how LINQ queries are composed and later executed.

You’ll also notice the use of several other extension methods:

  • SetPosition – sets Left and Top currently.  In future versions, you’ll be able to define a registration point for positioning that may be located elsewhere, such as the center of the element.
  • seconds() – along with milliseconds, minutes, etc., allows you to specify a TimeSpan object more fluently.  I saw this in some Ruby code and loved it.  If only the C# team would implement extension properties, it would look even cleaner (eliminate the need for parentheses).
  • Center() and GetCenter() – centers an element immediately, and gets a Point object representing the center of the object respectively.  Not used in these examples, but worth mentioning.

Group Animations

Next I’ll show an example of a group animation using the Animate class’s Group method:

Animate.Group(
    rect.RotateBy(rect.GetCenter(), -90, 1.seconds()),
    rect.FadeOut(1.seconds())
    ).Begin();


This group animation contains two child animations: one to rotate the rectangle 90 degrees counterclockwise, and the other to fade the rectangle out (make it completely transparent).  The method takes a params array, so you can include as many animations as you like.

Because the animations listed are peers in the group, they begin running at the same time.  Often you will want to stagger animations, however.  You can accomplish this with the Wait method, which is the Group method in disguise (it simply includes an additional TimeSpan parameter).

Animate.Group(
    rect.RotateBy(rect.GetCenter(), -90, 1.5.seconds()),
    rect.FadeIn(0.5.seconds()),
    Animate.Wait(1.seconds(),
        rect.FadeOut(0.5.seconds())
        )
    ).Begin();


This animation rotates the rectangle for 1.5 seconds.  During the first 0.5 seconds, it fades in; during the last 0.5 seconds, it fades out.  Only one element, rect, was used in this example, but any number of UI elements can participate.

Animations can be nested and staggered to arbitrary complexity.  Because all animations derive from the Animation class, you can write properties or methods to encapsulate group animations, and assemble them programmatically before executing them.  Because all the ceremony of storyboards and keyframes is abstracted away, it’s very easy to see what’s happening in this code in terms of the end result.

Method Chaining

One of the benefits of a fluent API is the ability to chain together methods that modify a primary object.  For example, the Animation class defines a WhenComplete method that can be used to respond to the completion of an animation.  In the samples project on CodePlex, I create new UI objects at the beginning of each animation, and remove them afterward:

rect.ResizeTo(150, 150, 1.5.seconds())
    .WhenComplete(a =>
    {
        Thread.Sleep(2000);
        MainStage.Children.Remove(rect);
    })
    .Begin();


I pause for a couple seconds after displaying the final result before removing that object from its container.

Extension methods will be used more in the future for this library.  Uses will include modifying the animation to apply easing functions, responding to collision detection (by stopping or reversing), and so on.  This might end up looking something like:

rect.ResizeTo(150, 150, 1.5.seconds())
    .Ease(EasingFunction.Cubic(0.5))
    .StopIf(a => Animate.Collision(GetCollisionObjects()))
    .Begin();
 

Feedback and Future Direction

I’m releasing this as a very early experiment, and I’m interested in your feedback on the library and its API.

What kind of functionality would you like to see added?  Do the method names and syntax feel right?  What major, common animation scenarios have I omitted?  What other kinds of samples would you like to see?

Download the library and samples and give it a try!

Posted in Algorithms, Animation, Composability, Data Structures, Design Patterns, Dynamic Programming, Fluent API, Silverlight, WPF | 5 Comments »

Filtering with Metadata in the Managed Extensibility Framework

Posted by Dan Vanderboom on September 19, 2009

The Managed Extensibility Framework (MEF) is the new extensibility framework from Microsoft.  Pioneered by Glenn Block in the patterns & practices group, and leveraged by the behemoth Visual Studio 2010, it has a striking resemblance to my own Inversion of Control (IoC) and Dependency Injection (DI) framework—which led to me to have a couple great conversations about IoC with Glenn at Tech Ed 2008 and then again at PDC 2008.

But MEF isn’t really written to be your IoC.  Instead, the IoC engine and DI aspects are implementation details, allowing you to do really no more than “MEF things together”.  The core concept of MEF is to provide very simple and powerful application composability.  Not in the user interface composition sense—for that, see Prism for WPF and Silverlight (explained in MSDN Magazine, September 2008)—but for virtually all other dynamic component assembly needs, MEF is your best friend.

The two things I like most about MEF is its simplicity as its lack of presumption on how it will be used.  Compose collections of strings, single method delegates, or implementations of complex services.  All you’re doing is importing and exporting things, with little code required to wire things up.

MEF is currently in its seventh preview release, so expect beta-like quality.  My own experience with it has been very positive, but there are a number of shortcomings in the API.  This article is about a few of them and what can be done to add some much-needed functionality.

System.AddIn vs. MEF

There’s been some confusion with Microsoft coopetition among products with similar aims, and extensibility and composition are no exception.  The AddIn API (team blog) serves a similar purpose as MEF.  (See this two-part MSDN article on System.AddIn: first and second.)  The primary differentiator, from my understanding, is that the AddIn API is a bit more robust and a lot more complicated, and supports such things as isolating extensions in separate AppDomains.

With Visual Studio siding with MEF, it’s personally hard for me to imagine using the AddIn API.  If MEF is flexible and robust enough for Visual Studio, is it really likely to fall short for my own much smaller software systems?  Krzysztof Cwalina suggests they are complementary approaches, but I find that hard to swallow.  Why would I want to use two different extensibility frameworks instead of one coherent API?  If anything, I imagine that the lessons learned from the AddIn API will eventually migrate to MEF.

Daniel Moth notes that with the AddIn API, “there are many design decisions to make and quite a few subtleties in implementing those decisions in particular when it comes to discovering addins, version resiliency, isolation from the host etc.”  A customer of mine using the AddIn API was using a Visual Studio plug-in to manage pipelines, and things were a real mess.  There were a bunch of assemblies, a lot of generated code, and not much clarity or confidence that it was all really necessary.

MEF: Import & ImportMany

In MEF, the Import attribute allows you to inject a value that is exported somewhere else using the Export attribute—typically from another assembly.  There is also an ImportMany attribute which is useful when you expect several exports that use the same contract.  By defining an IEnumerable<T> field or property and decorating it with the ImportMany attribute, all matching exports will be added to an enumerable type.

[ImportMany]
public IEnumerable<IVehicle> Vehicles;

What if you want to filter the exported vehicle types by some kind of metadata, though?  Let’s take a look at the IVehicle contract and some concrete classes that implement the contract.

public interface IVehicle { }

[Export(typeof(IVehicle))]
[ExportMetadata("Speed", "Slow")]
public class ToyotaPrius : IVehicle
{
    public ToyotaPrius() { }
}

[Export(typeof(IVehicle))]
[ExportMetadata("Speed", "Fast")]
public class LamborghiniDiablo : IVehicle
{
    public LamborghiniDiablo() { }
}

The object model isn’t very interesting, but that’s not the point.  What is interesting is that MEF allows us to supply metadata corresponding to our exports.  In this case, my contrived example has defined a metadata variable of “Speed”, with two possible values: “Fast” and “Slow”.  The variable name must be a string, but its value can be any value; that is, any value that’s supported from within an attribute, which means string literals and constants, type objects, and the like.

Filtering Imports on Metadata

What if you want to ImportMany for all exports that have a particular metadata value?  Unfortunately, there are no such options in the ImportMany attribute class.

In my scenario, I’ve defined a static factory class called VehicleFactory, which at some imaginary point in the future will be responsible for building a city full of trafic.

public static class TrafficFactory
{
    // type initialization fails without a static constructor
    static TrafficFactory() { }

    public static IEnumerable<IVehicle> SlowVehicles =
        App.Container.GetExportedValues<IVehicle>(metadata => metadata.ContainsKeyWithValue("Speed", "Slow"));

    public static IEnumerable<IVehicle> FastVehicles =
        App.Container.GetExportedValues<IVehicle>(metadata => metadata.ContainsKeyWithValue("Speed", "Fast"));

    public static IDictionary<object, IVehicle> AllVehicles =
        App.Container.GetKeyedExportedValues<IVehicle>("Speed");
}

This is what I want to do, but there is no overload of GetExportedValues that supplies a metadata-dependent predicate function.  Adding one is easy, though.  While we’re at it, we’ll also add the ContainsKeyWithValue which I borrow from The Code Junky article also on MEF container filtering.

public static class IDictionaryExtensions
{
    public static bool ContainsKeyWithValue<KeyType, KeyValue>(
        this IDictionary<KeyType, ValueType> Dictionary,
        KeyType Key, ValueType Value)
    {
        return (Dictionary.ContainsKey(Key) && Dictionary[Key].Equals(Value));
    }
}

public static class MEFExtensions
{
    public static IEnumerable<T> GetExportedValues<T>(this CompositionContainer Container,
        Func<IDictionary<string, object>, bool> Predicate)
    {
        var result = new List<T>();

        foreach (var PartDef in Container.Catalog.Parts)
        {
            foreach (var ExportDef in PartDef.ExportDefinitions)
            {
                if (ExportDef.ContractName == typeof(T).FullName)
                {
                    if (Predicate(ExportDef.Metadata))
                        result.Add((T)PartDef.CreatePart().GetExportedValue(ExportDef));
                }
            }
        }

        return result;
    }
}

Now we can test this logic by wiring up MEF and then accessing the two filtered collections of cars, which will each contain a single IVehicle instance.

class App
{
    [Export]
    public CompositionContainer Container;

    static void Main(string[] args)
    {
        AssemblyCatalog catalog = new AssemblyCatalog(Assembly.GetExecutingAssembly());
        Container = new CompositionContainer(catalog);
        Container.ComposeParts();

        var FastCars = TrafficFactory.FastVehicles;
        var SlowCars = TrafficFactory.SlowVehicles;
    }
}

Viola!  We have metadata-based filtering.

You’ll also noticed that I added an Export attribute to the Container itself.  By doing this, you can Import the container into any module that gets dynamically loaded.  It’s not used in this article, but getting to the container from a module is otherwise impossible without some kind of work-around.  (Thanks for pointing out the problem, Damon.)

Using Metadata to Assign Dictionary Keys

Let’s take this one step further.  Let’s say you want to import many instances of MEF exported values into a Dictionary, using one of the metadata properties as the key.  This is how I’d like it to work:

public static IDictionary<object, IVehicle> AllVehicles =
    App.Container.GetKeyedExportedValues<IVehicle>("Speed");

Again, the current MEF Preview doesn’t support this, but another extension method is all we need.  We’ll add two, so that one version gives us all exported values and the other allows us to filter that selection based on other metadata.

public static IDictionary<object, T> GetKeyedExportedValues<T>(this CompositionContainer Container,
    string MetadataKey, Func<IDictionary<string, object>, bool> Predicate)
{
    var result = new Dictionary<object, T>();

    foreach (var PartDef in Container.Catalog.Parts)
    {
        foreach (var ExportDef in PartDef.ExportDefinitions)
        {
            if (ExportDef.ContractName == typeof(T).FullName)
            {
                if (Predicate(ExportDef.Metadata))
                    result.Add(ExportDef.Metadata[MetadataKey], 
                        (T)PartDef.CreatePart().GetExportedValue(ExportDef));
            }
        }
    }

    return result;
}

public static IDictionary<object, T> GetKeyedExportedValues<T>(this CompositionContainer Container,
    string MetadataKey)
{
    return GetKeyedExportedValues<T>(Container, MetadataKey, metadata => true);
}

Add an assignment to TrafficFactory.AllVehicles in the App.Main method and see for yourself that it works.

If you’re using metadata values as Dictionary keys, it’s probably important for you not to mess them up.  I recommend using enum values for both metadata property names as well as valid values if it’s possible to enumerate them, and string const values otherwise.

Now go forth and start using MEF!

Posted in Algorithms, Component Based Engineering, Composability, Design Patterns, Visual Studio Extensibility | Tagged: , , , , | 4 Comments »

A KeyedList Implementation: Syntax Subtleties for an Intuitive API

Posted by Dan Vanderboom on November 28, 2008

[This article is a follow-up on the theme of data structures started in my article on a Non-Binary Tree Data Structure.] 

Clear API Design

When designing object models, there are often times when a Dictionary is the best choice for rapid lookup and access of items.  However, when attempting to make those object models as intuitive and simple as possible, sometimes the fact that a dictionary is being used is an implementation detail and needn’t be exposed externally.

Take this model, for example:

class Database
{
    public IEnumerable<Table> Tables;

    public Database()
    {
        _Tables = new List<Table>();
    }
}

class Table
{
    public string TableName;

    public Table(string TableName)
    {
        this.TableName = TableName;
    }
}

This is nice and simple.  I can loop through the Tables collection like this:

Database db = new Database();

foreach (var table in db.Tables)
{
    Console.WriteLine(table.TableName);
}

So it's too bad that the consumer end of this has to change when we use a dictionary.  By making a change to our Database type...

class Database
{
    public Dictionary<string, Table> Tables;

    public Database()
    {
        Tables = new Dictionary<string, Table>();
    }
}

... we now have to specify the "Values" collection to get an IEnumerable<T> of the correct type.

foreach (var table in db.Tables.Values)
{
    Console.WriteLine(table.TableName);
}

The consumers of our API may not care about iterating through key-value pairs, but now they have to remember to use this Values property or face the wrath of red squiggles and compiler errors when they forget.  Of course, there’s a pattern we could use to hide this dictionary inner goo from the outside.

class Database
{
    public IEnumerable<Table> Tables { get { return _Tables.Values; } }
    private Dictionary<string, Table> _Tables { get; set; }

    public Database()
    {
        _Tables = new Dictionary<string, Table>();
    }
}

Now from the outside, we can foreach over db.Tables, but inside we can use the Dictionary for fast access to elements by key.

The Need for a Dictionary-List Hybrid

This is an either-or approach: that is, it assumes that the API consumer is better off with an IEnumerable collection and won’t have any need for keyed access to data (or even adding data, in this case).  How can we have the best of both words, with the ability to write this kind of code?

Database db = new Database();

foreach (var table in db.Tables)
{
    Console.WriteLine(table.TableName);
}

Table t = db.Tables["Customers"];

This is a hybrid of a Dictionary and a List.  (Don’t confuse this with a HybridDictionary, which is purely a dictionary with runtime-adapting storage strategies.)  It provides an IEnumerable<T> enumerator (instead of IEnumerable<K, T>), as well as an indexer for convenient lookup by key.

There’s another aspect of working with dictionaries that has always bugged me:

db.Tables.Add("Vendors", new Table("Vendors"));

This is repetitive, plus it says the same thing twice.  What if I misspell my key in one of these two places?  What I’d really like is to tell my collection which property of the Table class to use, and have it fill in the key for me.  How can I do that?  Well, I know I can select a property value concisely (in a compiler-checked and refactoring-friendly way) with a lambda expression.  So perhaps I can supply that expression in the collection’s constructor.  I decided to call my new collection KeyedList<K, T>, which inherits from Dictionary so I don’t have to do all the heavy lifting.  Here’s how construction looks:

Tables = new KeyedList<string, Table>(t => t.TableName);

Now I can add Table objects to my collection, and the collection will use my lambda expression to fill in the key for me.

Tables.Add(new Table("Vendors"));

How does this work, exactly?  Here's a first cut at our KeyedList class:

public class KeyedList<K, T> : Dictionary<K, T>, IEnumerable<T>
{
    private Func<T, K> LinkedValue;

    public KeyedList()
    {
        LinkedValue = null;
    }

    public KeyedList(Func<T, K> LinkedValue)
    {
        this.LinkedValue = LinkedValue;
    }

    public void Add(T item)
    {
        if (LinkedValue == null)
            throw new InvalidOperationException("Can't call KeyedList<K, T>.Add(T) " +
                "unless a LinkedValue function has been assigned");

        Add(LinkedValue(item), item);
    }

    public new IEnumerator<T> GetEnumerator()
    {
        foreach (var item in Values)
        {
            yield return item;
        }
        yield break;
    }
}

This is still pretty simple, but I can think of one thing that it’s missing (aside from a more complete IList<T> implementation).  With a collection class like this, with tightly-integrated knowledge about the relationship between the key property of an item and the key in the Dictionary, what happens when we change that key property in the item?  Suddenly it doesn’t match the dictionary key, and we have to remember to update this in an explicit separate step in our code whenever this happens.  It seems that this is a great opportunity to forget something and introduce a bug into our code.  How could our KeyedCollection class track and update this for us?

Unfortunately, there’s no perfect solution.  “Data binding” in .NET is weak in my opinion, and requires implementation of INotifyPropertyChanged in our classes to participate; and when it does so, we only get notification of the property name that changed (supplied as a string), and have no idea what the old value was unless we store that somewhere ourselves.  Automatically injecting all classes with data binding code isn’t practical, of course, even using AOP (since many BCL classes, for example, reside in signed assemblies).  Hopefully a future CLR will be able to perform some tricks, such as intelligently and dynamically modifing those classes, for which other class’s data binding code specify interest, so we can have effortless and universal data binding.

Now back to reality.  I want to mention that although my code typically works just as well in Compact Framework as it does in Full Framework, I’m going off the reservation here.  I’m going to be using expression trees, which are not supported in Compact Framework at all.

Expressions

The Expression class (in System.Linq.Expressions) is really neat.  With it, you can wrap a delegate type to create an expression tree, which you can explore and modify, and at some point even compile into a function which you can invoke.  The best part is that lambda expressions can be assigned to Expression types in the same way that they can be assigned to normal delegates.

Func<int> func = () => 5;
Expression<Func<int>> expr = () => 5;

The first line defines a function that returns an int, and a function is supplied as a lambda that returns the constant 5.  The second line defines an expression tree of a function that returns an int.  This extra level of indirection allows us to take a step back and look at the structure of the function itself in a precompiled state.  The structure is a tree, which can be arbitrarily complex.  You can think of this as a way of modeling the expression in a data structure.  While func can be executed immediately, expr requires that we compile it by calling the Compile method (which generates IL for the method and returns Func<int>).

int FuncResult1 = func.Invoke();
int FuncResult2 = func();

int ExprResult1 = expr.Compile().Invoke();
int ExprResult2 = expr.Compile()();

The first two lines are equivalent, as are the last two.  I just wanted to point out here, with the two ways of calling the functions, how they are in fact the same, even though the last line looks funky.

Synchronizing Item & Dictionary Keys

So why do we need expressions?  Because we need to know the name of the property we’ve supplied in our KeyedList constructor.  You can’t extract that information out of a function (supplied as a lambda expression or otherwise).  But expressions contain all the metadata we need.  Note that for this synchronization to work, it requires that the items in our collection implement INotifyPropertyChanged.

class Table : INotifyPropertyChanged
{
    public event PropertyChangedEventHandler PropertyChanged;

    private string _TableName;
    public string TableName
    {
        get { return _TableName; }
        set
        {
            _TableName = value;

            if (PropertyChanged != null)
                PropertyChanged(this, new PropertyChangedEventArgs("TableName"));
        }
    }

    public Table(string TableName)
    {
        this.TableName = TableName;
    }
}

This is tedious work, and though there are some patterns and code snippets I use to ease the burden a little, it’s still a lot of work to go through to implement such a primitive ability as data binding.

In order to get at the expression metadata, we’ll have to update our constructor to ask for an expression:

public KeyedList(Expression<Func<T, K>> LinkedValueExpression)
{
    this.LinkedValueExpression = LinkedValueExpression;
}

We’ll also need to define a field to store this, and a property will help to compile it for us.

private Func<T, K> LinkedValue;

private Expression<Func<T, K>> _LinkedValueExpression;
public Expression<Func<T, K>> LinkedValueExpression
{
    get { return _LinkedValueExpression; }
    set
    {
        _LinkedValueExpression = value;
        LinkedValue = (value == null) ? null : _LinkedValueExpression.Compile();
    }
}

Now that the groundwork has been set, we can hook into the PropertyChanged event if it’s implemented, which we do by shadowing the Add method.

public new void Add(K key, T item)
{
    base.Add(key, item);

    if (typeof(INotifyPropertyChanged).IsAssignableFrom(typeof(T)))
        (this[key] as INotifyPropertyChanged).PropertyChanged += new PropertyChangedEventHandler(KeyList_PropertyChanged);
}

One caveat about this approach: our shadowing method Add will unfortunately not be called if accessed through a variable of the base class.  That is, if you assign a KeyedList object to a Dictionary object, and call Add from that Dictionary variable, the Dictionary.Add method will be called and not KeyedList.Add, so synchronization of keys will not work properly in that case.  It’s extremely rare that you’d do such a thing, but I want to point it out regardless.  As inheritor of a base class, I would prefer the derived class be in fuller control of these behaviors, but we work with what we have.  I’ll actually take advantage of this later on in a helper method.

Finally, the tricky part.  We need to examine our lambda’s expression tree and extract the property or field name from it.  We’ll compare that to the property name reported to us as changed.  The comparison is actually done between two MemberInfo variables, which is possible because reflection ensures that only one MemberInfo object will exist for each member.  The MemberExpression object, which iniherits from Expression, possesses a Member property, and the other we get from typeof(T).GetMember.  Here’s what that looks like:

private void KeyList_PropertyChanged(object sender, PropertyChangedEventArgs e)
{
    var lambda = LinkedValueExpression as LambdaExpression;
    if (lambda == null)
        return;

    var expr = lambda.Body as MemberExpression;
    if (expr == null)
        return;

    MemberInfo[] members = typeof(T).GetMember(e.PropertyName, MemberTypes.Property | MemberTypes.Field, BindingFlags.Instance | BindingFlags.Public);
    if (members.Length == 0)
        throw new ApplicationException("Field or property " + e.PropertyName + " not found in type " + typeof(T).FullName);

    MemberInfo mi = members[0];
    if (mi == expr.Member)
    {
        // we don't know what the old key was, so we have to find the object in the dictionary
        // then remove it and re-add it
        foreach (var kvp in KeyValuePairs)
        {
            if ((typeof(T).IsValueType && kvp.Value.Equals(sender)) || (kvp.Value as object) == (sender as object))
            {
                T item = this[kvp.Key];
                Remove(kvp.Key);
                Add(item);
                return;
            }
        }
    }
}

This code makes an important assumption; namely, that a lambda expression will be used, which will contain a single field or property access.  It does not support composite or calculated keys, such as (t.SchemaName + “.” + t.TableName), though it’s possible.  I’m currently working on a method that recursively explores an Expression tree and checks for member access anywhere in the tree, to support scenarios like this.  For now, and for the purpose of this article, we’ll stick to the simple case of single member access.

I found that having access to the list of KeyValuePairs was actually useful in my code, and to keep the PropertyChanged handler concise, I added a new KeyValuePairs property to expose the base Dictionary’s enumerator, which you can find in the complete listing of the KeyedList class toward the end of this article.  I now have two iterators; and the way I’ve flipped it around, the default iterator of the base class has become a secondary, named iterator of KeyedList.

Here is a test program to demonstrate the functionality and flexibility of the KeyedList class.

class Program
{
    static void Main(string[] args)
    {
        // use a lambda expression to select the member of Table to use as the dictionary key
        var Tables = new KeyedList<string, Table>(t => t.TableName);
        
        // add a Table object to our KeyList like an old-fashioned Dictionary
        Tables.Add("Customers", new Table("Customers"));

        // add a Table object to our KeyList without explicitly specifying a key
        Tables.Add(new Table("Vendors"));

        // prove that a change in an item's key property updates the corresponding dictionary key
        Table Vendors = Tables["Vendors"];
        Vendors.TableName = "VENDORS";
        Console.WriteLine("Is 'Vendors' a valid dictionary key? " + Tables.ContainsKey("Vendors"));
        Console.WriteLine("Is 'VENDORS' a valid dictionary key? " + Tables.ContainsKey("VENDORS"));

        // prove that the IEnumerable<T> iterator works
        // note that we don't have to loop through Tables.Values
        foreach (var table in Tables)
        {
            Console.WriteLine(table.TableName);
        }

        Console.ReadKey();
    }
}

Complete Source for KeyedList

For your convenience, here is the complete listing of KeyedList.

public class KeyedList<K, T> : Dictionary<K, T>, IEnumerable<T>
{
    private Func<T, K> LinkedValue;

    private Expression<Func<T, K>> _LinkedValueExpression;
    public Expression<Func<T, K>> LinkedValueExpression
    {
        get { return _LinkedValueExpression; }
        set
        {
            _LinkedValueExpression = value;
            LinkedValue = (value == null) ? null : _LinkedValueExpression.Compile();
        }
    }

    public KeyedList()
    {
        LinkedValueExpression = null;
    }

    public KeyedList(Expression<Func<T, K>> LinkedValueExpression)
    {
        this.LinkedValueExpression = LinkedValueExpression;
    }

    public void Add(T item)
    {
        if (LinkedValue == null)
            throw new InvalidOperationException("Can't call KeyedList<K, T>.Add(T) " +
                "unless a LinkedValue function has been assigned");

        Add(LinkedValue(item), item);
    }

    public new void Add(K key, T item)
    {
        base.Add(key, item);

        if (typeof(INotifyPropertyChanged).IsAssignableFrom(typeof(T)))
            (this[key] as INotifyPropertyChanged).PropertyChanged += new PropertyChangedEventHandler(KeyList_PropertyChanged);
    }

    private void KeyList_PropertyChanged(object sender, PropertyChangedEventArgs e)
    {
        var lambda = LinkedValueExpression as LambdaExpression;
        if (lambda == null)
            return;

        var expr = lambda.Body as MemberExpression;
        if (expr == null)
            return;

        MemberInfo[] members = typeof(T).GetMember(e.PropertyName, 
            MemberTypes.Property | MemberTypes.Field, 
            BindingFlags.Instance | BindingFlags.Public);
        if (members.Length == 0)
            throw new ApplicationException("Field or property " + e.PropertyName + " not found in type " + typeof(T).FullName);

        MemberInfo mi = members[0];
        if (mi == expr.Member)
        {
            // we don't know what the old key was, so we have to find the object in the dictionary
            // then remove it and re-add it
            foreach (var kvp in KeyValuePairs)
            {
                if ((typeof(T).IsValueType && kvp.Value.Equals(sender)) 
                    || (!typeof(T).IsValueType && (kvp.Value as object) == (sender as object)))
                {
                    T item = this[kvp.Key];
                    Remove(kvp.Key);
                    Add(item);
                    return;
                }
            }
        }
    }

    public new IEnumerator<T> GetEnumerator()
    {
        foreach (var item in Values)
        {
            yield return item;
        }
        yield break;
    }

    public IEnumerable<KeyValuePair<K, T>> KeyValuePairs
    {
        get
        {
            // because GetEnumerator is shadowed (to provide the more intuitive IEnumerable<T>), 
            // and foreach'ing over "base" isn't allowed,
            // we use a Dictionary variable pointing to "this"
            // so we can use its IEnumerable<KeyValuePair<K, T>>
            Dictionary<K, T> dict = this;
            foreach (var kvp in dict)
            {
                yield return kvp;
            }
            yield break;
        }
    }
}

Conclusion

As with the non-binary Tree data structure I created in this article, I prefer to work with more intelligent object containers that establish tighter integration between the container itself and the elements they contain.  I believe this reduces mental friction, both for author and consumer of components (or the author and consumer roles when they are the same person), and allows a single generic data structure to be used where custom collection classes are normally defined.  Additionally, by using data structures that expose more flexible surface areas, we can often reap the benefits of having powerful lookup features without locking ourselves out of the simple List facades that serve so well in our APIs.

The Achilles Heel of this solution is a weak and un-guaranteed data binding infrastructure combined with lack of support for Expressions in Compact Framework.  In other words, items have to play along, and it’s not platform universal.

Clearly, more work needs to be done.  Event handlers need to be unhooked when items are removed, optimizations could be done to speed up key synchronization, and more complex expressions could be supported without too much trouble.  Ultimately what I’d like to see is a core collection class with the ability to add and access multiple indexes (such as with a database), instead of presuming that a Dictionary with its solitary key is all we can or should use.  The hashed key of a Dictionary seems like a great adornment to an existing collection class, rather than a hard-coded stand-alone structure.  But I think this is a good start toward addressing some of the fundamental shortcomings of these existing approaches, and hopefully demonstrating the value of more intelligent collection and container classes.

Other Implementations

I was at a loss for a while as to what to call this collection class; I considered DictionaryList (and ListDictionary), as well as HashedList, before arriving at KeyedList.  To my amazement, I found several other implementations of the same kind of data structure with the same name, so it must be a good name.  The implementations here and here are more complete than mine, but neither auto-assign keys with a key-selection function or update dictionary keys using data binding, which ultimately is what I’m emphasizing here.  Hint: it wouldn’t be tough to combine what I have here with either of them.

Posted in Algorithms, Data Binding, Data Structures, Design Patterns, Object Oriented Design, Reflection | 5 Comments »

Technology Research Highlights: C5, YIIHAW, and MemJet

Posted by Dan Vanderboom on October 7, 2008

When I’m not designing or writing code, I’m usually doing some kind of research.  Looking for new gadgets, toys, technologies, groundbreaking research, or following my favorite blogs and podcasts.  Because I haven’t been highly focused on any single project lately, I thought I’d share some of the more interesting things I’ve come across.

Peter Sestoft, C5 Generics Collection Library, and YIIHAW

Peter Sestoft is a brilliant professor at the very old (founded 1479) Copenhagen IT University in Denmark, which actually has a student body consisting of a female majority (59%)!  I discovered Sestoft’s works while doing research for some new, more powerful collection class I was working on (Tree<T> and Set<T>).  He was featured on Channel 9 back in January on a show primarily about the C5 Collection Library.

C5 Generics Collection Library

The C5 Collection Library is an extremely powerful and well-designed library, based on earlier Java and Smalltalk collection library designs, and completely blows away the standard collection classes delivered as part of the .NET Framework.  An earlier version was covered well in a Dr. Dobb’s article, but to summarize: C5 is interface-based, provides convenient but hard-to-implement functionality (such as persistent sorted collections and sublist views), provides useful abstractions such as lists, sets, bags, priority queues, double-ended queues, stacks, dictionaries, and optimizes access of these data structures for asymptotic complexity.

Unless you’re an expert—as with encryption—if you find yourself creating your own complex data structures, chances are you’re going to do it wrong.  So it’s nice to know that the mathematical experts have taken the time to very carefully design and construct a wide assortment of useful data structures for the rest of us to use, complete with unit tests.  And the best part, in the spirit of true science, C5 has a very liberal open source license, so it can be used in open source and commercial software alike.  It’s reportedly being used by the military, video game shops, web server software, and more.

Sestoft and his colleagues have the excellent habit of providing copious documentation: a book’s worth, in fact!  It can be found online here.

I think it’s an excellent candidate for being included in the .NET Framework itself, and I highly recommend that you check it out the next time you need a fancy data structure and are tempted to write it yourself, and to consider for optimizing performance of existing code that relies heavily on data structures (which is almost everywhere).

Getting the fundamentals right is probably the hardest thing to do.  It’s easy (and tempting) to build as tall as we can, but getting a firm foundation in place is much more important.  That’s why the C5 Collections Library is so amazing.  So what are you waiting for?  Go download it!

YIIHAW Is an Intelligent and High-performing Aspect Weaver

What really gets me excited is Sestoft’s YIIHAW, a high-performance static aspect weaver for .NET.

Aspect Oriented Programming (AOP) is a paradigm for addressing cross-cutting concerns in software.  That is, logic that operates orthogonally to business logic, such as logging, security, configuration, and more.  There are a number of open source aspect weavers available today, and they generally fall into two camps: static or compile-time weavers, and dynamic or runtime weavers.

While incredibly useful, several factors have kept AOP from entering the mainstream.  For one, a good set of tools hasn’t yet emerged to enable easy debugging of aspects.  When we step through lines of code in Visual Studio, the debugger has no way of knowing if or when some other injected piece of code should pick up the thread of execution, since weaving isn’t a natively recognized and supported activity within the debugger.

Another hindrance is performance: aspect weavers typically inject logic (called advices) in the form of method calls at the beginning and/or ending of existing methods (the locations are called join points) which are selected with special selector statements (called pointcuts).  The typical trick, as I just alluded to, is to include a new method in the class (called an introduction) and then insert method invocation statements at the beginning and end of the methods to be modified.  This isn’t a big deal in many cases, but in performance-critical sections of calls, the additional method calls and the stack manipulations that accompany them prevent these techniques from being practical in performance-critical scenarios.

Data structures play a pivotal role in high-performance algorithms, of course, and Sestoft’s experience in building the C5 Collections Library provided the perfect context in which to consider how some of the specific features of his data structures might adversely affect performance.  For example: his collections fire events to inform any interested parties that a collection had an item inserted, deleted, or modified in some other way, eliminating the need for defining specialized collections that trigger specific actions outside of that collection (see my article on a Tree<T> structure I created that makes use of this).

If the C5 library could start with the basic, slimmed down, super high-performant data structures, and then “weave in” aspects to include features such as event notifications only when needed, the problem might be solved.  The problem with the typical approach, however, is that insertion of method calls provides as much or more overhead than the simple checks to activate those features to begin with (if not null, then invoke event), so he knew he’d have to go with a different approach.

After evaluating the capabilities and measuring the performance of existing open source aspect weavers, they were all found to be inadequate, and the YIIHAW thesis project was born.  You can find the fascinating thesis (which I just finished reading) here.  In a nutshell, YIIHAW employs an advanced technique called advice inlining, in which CIL instructions are woven directly into their target methods.  There are a surprising number of challenges to this approach, including the need to convert the original methods RET (return) instructions to jumps, remapping jump addresses, updating the method stack size, and much more.  The students who worked on this thesis (Rasmus Johansen and Stephan Spangenberg), under Sestoft’s direction, did a masterful job of overcoming all of these challenges, the result of which is a highly-capable static aspect weaver with no performance penalty!

This is truly amazing, and it enables aspects to be woven into an assembly repeatedly: one for feature A, another for feature B, etc., all with the assurance of type safety and performance equivalent to writing the code by hand with all features included in the first place.

Another positive of the YIIHAW thesis is the light it shines on CIL instructions, their organization and function.  The advice inlining techniques provide a great tutorial for those wanting a deeper understanding of how to manipulate things at the CIL level.  Many who have attempted AOP have either not considered this approach, or else turned away from this path due to the complexity and challenge.  Not so with the YIIHAW team, who faced the problem head on and accomplished something fundamentally great as a result.  The fantastic Mono.Cecil library, despite being poorly documented, is used for analysis and manipulation of CIL code, and several other ideas came to mind as I saw how this tool was put to use.

My only criticism of their application of this technology for the generation of specialized data structures at compile time is that you may find yourself needing different versions of the same data structure in different parts of your application.  In a class that performs analysis of visual data for extracting spatial cues, you may need a Tree with as little overhead as possible (i.e., no event notifications, no serialization capability), and in the user interface, you may need another Tree with those additional characteristics.  By making a single decision at compile/weave time, your options will be limited at runtime.

There’s also the issue of supporting the debugging process, which can’t be dismissed lightly.  But YIIHAW has gone to extreme measures to overcome some of AOP’s largest obstacles; and in addition to interceptions (weaving logic into existing methods), YIIHAW also supports introductions (adding new types and members), and typestructure modifications (changing a class’s base class, or making a class implement an interface).

Overall, YIIHAW’s potential is huge, and I believe that it won’t be long before the tooling catches up to the point where AOP becomes a mainstream approach to complex cross-cutting systems problems, simplifying designs and the engineering process overall.

Memjet Printer

Color printing is about to get a whole lot faster.  At 60 pages per minute (ppm), the Memjet printer, developed by Kia Silverbrook, a prolific inventor with over 1400 patents.  Check out the YouTube video to see it in action.

I’ve seen a lot of speculation that Memjet is a hoax, and a technological leap forward this large certainly warrants skepticism.  However, the technology was written about in a very respectable science magazine, one of my favorites: Scientific American, in June 2007.  It’s also been covered in several articles by PC Magazine, for example in May 2007, which mentions the Memjet appearing at the 2007 Global Ink Jet Printing Conference.  (Talk about specific conferences!)

The print heads are page-width, so they don’t have to move back and forth across the page.  The “MEM” in Memjet stands for microelectromechanical, and refers to the fabrication process that involves CMOS chips on a silicon wafer for precision layout.

With ink spraying at 900 million 1-2 picoliter drops per second, drop size small enough to dry within a second, and an estimated price tag under $200 (compared to the comparable HP Edgeline at $16,000), waiting around for long documents to print will soon be a thing of the past for everyone.  The first devices are expected to appear in 2009.

Posted in Algorithms, Aspect Oriented Programming, Data Structures, Design Patterns, Research | Leave a Comment »

Concurrency & Coordination With Futures in C#

Posted by Dan Vanderboom on July 3, 2008

A future is a proxy or placeholder for a value that may not yet be known, usually because the calculation is time consuming.  It is used as a synchronization construct, and it is an effective way to define dependencies among computations that will execute when all of their factors have been calculated, or in other words, to construct an expression tree with each node potentially computing in parallel.  According to the Wikipedia article on futures and promises, using them can dramatically reduce latency in distributed systems.

Damon pointed out that the Parallel Extensions library contains a Future<T> class, so I started looking around for examples and explanations of how they work, what the syntax is like, and I ran across a frightening example implementing the asynchronous programming model with Future<T>, as well as going in the other direction, wrapping an APM implementation with Future<T>.  Other articles give pretty good explanations but trivial examples.  From what I gathered briefly, the ContinueWith method for specifying the next step of calculation to process doesn’t seem to provide an intuitive way to indicate that several calculations may be depending upon the current one (unless it can be called multiple times?).  Using ContinueWith, you’re always specifying forward the calculation task that depends on the current future object.  It also surprised me a little that Future inherits from Task, because my understanding of a future is that it’s primarily defined as a value-holding object.  But considering that a future really holds an expression that needs to be calculated, making Future a Task doesn’t seem so odd.

So I decided to implement my own Future<T> class before looking at the parallel extensions library too deeply.  I didn’t want to prejudice my solution, because I wanted to make an exercise of it and see what I would naturally come up with.

Though I tried avoiding prejudice, I still wound up characterizing it in my head as an task, and thought that a future would simply be a pair of Action and Reaction methods (both of the Action delegate type).  The Action would execute and could do whatever it liked, including evaluate some expression and store it in a variable.  If the Action completed, the Reaction method (a continuation) would run, and these could be specified using lambdas.  Because I was storing the results in a local variable (result), swallowed up and made accessible with a closure, I didn’t see a need for a Value property in the future and therefore no need to make the type generic.  Ultimately I thought it silly to have a Reaction method, since anything you needed to happen sequentially after a successful Action, you could simply store at the end of the Action method itself.

FutureTask task = new FutureTask(
    () => result = CalculatePi(10),
    () => new FutureTask(
        () => result += "...",
        () => Console.WriteLine(result),
        ex2 => Console.WriteLine("ex2: " + ex2.Message)),
    ex1 => Console.WriteLine("ex1: " + ex1.Message));

The syntax is what I was most concerned with, and as I started playing around with nesting of futures to compose my calculation, I started to feel like I was onto something.  After all, it was almost starting to resemble some of the F# code I’ve been looking at, and I took that style of functional composition to be a good sign.  As you can see from the code above, I also include a constructor parameter of type Action<Exception> for compensation logic to run in the event that the original action fails.  (The result variable is a string, CalculatePi returns a string, and so the concatenation of the ellipsis really does make sense here.)

The problem that started nagging me was the thought that a composite computation of future objects might not be able to be defined all in one statement like this, not building the dependency tree from the bottom up.  You can really only define the most basic factors (the leaf nodes of a dependency tree) at the beginning this way, and then the expressions that depend directly upon those leaf nodes, etc.  What if you have 50 different starting future values, and you can only proceed with the next step in the calculation once 5 of those specific futures have completed evaluation?  How would you express those dependencies with this approach?

That’s when I started to think about futures as top-down hierarchical data container objects, instead of tasks that have pointers to some next task in a sequence.  I created a Future<T> class whose constructor takes an optional name (to aid debugging), a method of type Func<T> (which is a simple expression, supplied as a lambda in my examples), and finally an optional params list of other Future<T> objects on which that future value depends.

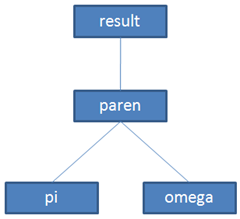
The first two futures in the code below start calculating pi (3.1415926535) and omega (which I made up to be a string of 9s).  They have no dependencies, so they can start calculating right away.  The paren future has two dependencies, supplied as two parameters at the end of the argument list: pi and omega.  You can see that the values pi.Value and omega.Value are used in the expression, which will simply surround the concatenated string value with parentheses and spaces.

var pi = new Future<string>("pi", () => CalculatePi(10));
var omega = new Future<string>("omega", () => CalculateOmega());

var paren = new Future<string>("parenthesize", () => Parenthesize(pi.Value + " < " + omega.Value), pi, omega);

var result = new Future<string>("bracket", () => Bracket(paren.Value), paren);

Finally, the result future has a dependency on the paren future.  This surrounds the result of paren.Value with brackets and spaces.  Because the operations here are trivial, I’ve added Thread.Sleep statements to all of these methods to simulate more computationally expensive work.

Dependencies Among Futures

The program starts calculating pi and omega concurrently, and then immediately builds the paren future, which because of its dependencies waits for completion of the pi and omega futures.  But it doesn’t block the thread.  Execution continues immediately to build the result future, and then moves on to the next part of the program.  When each part of the expression, each future, completes, it will set a Complete boolean property to true and invoke a Completed event.  Any attempt to access the Value property of one of these futures will block the thread until it (and all of the futures it depends on) have completed evaluation.

Furthermore, if an exception occurs, all of the futures that depend on it will no longer attempt to evaluate, and the exceptions will be thrown as part of an AggregateException when accessing the Value property.  This AggregateException contains all of the individual exceptions that were thrown as part of evaluating each future expression.  If both pi and omega fail, result should be able to hand me a list of all Exceptions below it in the tree structure that automatically gets formed.

There are two bits of code I added as icing on this cake.  The first is the use of the implicit operator to convert a variable of type Future<T> to type T.  In other words, if you have a Future<string> called result, you can now pass result into methods where a string parameter is expected, etc.  In the code listing at the end of the article, you’ll notice that I reference pi and omega instead of pi.Value and omega.Value (as in the code snippet above).

public static implicit operator T(Future<T> Future)
{
    return Future.Value;
}

The other helpful bit is an override of ToString, which allows you to hover over a future variable in debug mode and see its name (if you named it), whether it’s Complete or Incomplete, and any errors encountered during evaluation.

public override string ToString()
{
    return Name + ", " + (Complete ? "Complete" : "Incomplete") + (Error != null ? "Error=" + Error.Message : string.Empty);
}

Debug Experience of Future

What I’d really like to do is have the ability to construct this composite expression in a hierarchical form in the language, with a functionally composed syntax, replacing any parameter T with a Future<T>, something like this:

var result = new Future<string>("bracket", () => Bracket(
    new Future<string>("parenthesize", () => Parenthesize(
        new Future<string>("pi", () => CalculatePi(10))
        + " < " +
        new Future<string>("omega", () => CalculateOmega())
    ))
));

The Bracket and Parenthesize methods both require a string, but I give them an object that will at some point (“in the future”) evaluate to a string.  Another term used for future is promise, although there is a distinction in some languages that support both, but you can think in terms of giving those methods the promise that they’ll get a string later, at which time they can proceed with their own evaluation.  This effectively creates lazy evaluation, sometimes referred to as normal-order evaluation.

There are a few problems with this code, however.  First of all, though it’s composed functionally from the top down and returns the correct answer, it takes too long to do it: about 8 seconds instead of 4.  That means it’s processing all of the steps sequentially.  This happens because the future objects we’re handing to the Parenthesize and Bracket methods have to be converted from Future<string> to string before they can be evaluated in the expression, and doing that activates the implicit operator, which executes the Value property getter.  This completely destroys the asynchronous behavior we’re going for, by insisting on resolving it immediately with the wait built-into the Value property.  The string concatenation expression evaluates sequentially one piece at a time, and when that’s done, the next level up evaluates, and so on.

The solution is to declare our futures as factors we depend on at each level, which start them executing right away due to C#’s order of evaluation, and declare the operations we want to perform in terms of those predefined futures.  After a few hours of rearranging definitions, declaration order, and experimenting with many other details (including a brief foray into being more indirect with Func<Future<T>>), this is the working code I came up with:

Future<string> FuturePi = null, FutureOmega = null, FutureConcat = null, FutureParen = null;

var result = new Future<string>(
    () => Bracket(FutureParen),
    (FutureParen = new Future<string>(
        () => Parenthesize(FutureConcat),
        (FutureConcat = new Future<String>(
            () => FuturePi + " < " + FutureOmega,
            (FuturePi = new Future<string>(() => CalculatePi(10))),
            (FutureOmega = new Future<string>(() => CalculateOmega()))
        ))
    ))
);

In F# and other more functional languages, I imagine we could use let statements to define and assign these variables as part of the overall expression, instead of having to define the variables in a separate statement as shown here.

The Future<T> class I wrote works fairly well for exploration and study of futures and the possible syntax to define them and access their values, and I’ll share it so that you can experiment with it if you like, but understand that this is (even more so than usual) not production ready code.  I’m making some very naive assumptions, not taking advantage of any task managers or thread pools, there is no intelligent scheduling going on, and I haven’t tested this in any real world applications.  With that disclaimer out of the way, here it is, complete with the consuming test code.

using System;
using System.Collections.Generic;
using System.Threading;
using System.Linq;

namespace FutureExpressionExample
{
    class Program
    {
        static void Main(string[] args)
        {
            DateTime StartTime = DateTime.Now;

            Future<string> FuturePi = null, FutureOmega = null, FutureConcat = null, FutureParen = null;

            var result = new Future<string>("bracket",
                () => Bracket(FutureParen),
                (FutureParen = new Future<string>("parenthesize",
                    () => Parenthesize(FutureConcat),
                    (FutureConcat = new Future<String>("concat",
                        () => FuturePi + " < " + FutureOmega,
                        (FuturePi = new Future<string>("pi", () => CalculatePi(10))),
                        (FutureOmega = new Future<string>("omega", () => CalculateOmega()))
                    ))
                ))
            );

            /* Alternative
             
            // first group of expressions evaluating in parallel
            var pi = new Future<string>("pi", () => CalculatePi(10));
            var omega = new Future<string>("omega", () => CalculateOmega());

            // a single future expression dependent on all of the futures in the first group
            var paren = new Future<string>("parenthesize", () => Parenthesize(pi + " < " + omega), pi, omega);
                        
            // another single future expression dependent on the paren future
            var result = new Future<string>("bracket", () => Bracket(paren), paren);

            */

            Console.WriteLine("Do other stuff while calculation occurs...");

            try
            {
                Console.WriteLine("\n" + result);
            }
            catch (AggregateException ex)
            {
                Console.WriteLine("\n" + ex.Message);
            }

            TimeSpan ts = DateTime.Now - StartTime;
            Console.WriteLine("\n" + ts.TotalSeconds.ToString() + " seconds");

            Console.ReadKey();
        }

        static string CalculatePi(int NumberDigits)
        {
            //throw new ApplicationException("Failed to calculate Pi");
            Thread.Sleep(3000);
            return "3.1415926535";
        }

        static string CalculateOmega()
        {
            //throw new ApplicationException("Failed to calculate Omega");
            Thread.Sleep(3000);
            return "999999999999999";
        }

        static string Parenthesize(string Text)
        {
            Thread.Sleep(500);
            return "( " + Text + " )";
        }

        static string Bracket(string Text)
        {
            Thread.Sleep(500);
            return "[ " + Text + " ]";
        }
    }

    public class Future<T> : IDisposable
    {
        public string Name { get; set; }
        public bool Complete { get; protected set; }
        public Exception Error { get; protected set; }

        protected Func<T> Expression { get; set; }

        protected List<Future<T>> Factors;
        protected List<Future<T>> FactorsCompleted;
        protected List<Future<T>> FactorsFailed;

        public event Action<Future<T>> Completed;
        protected void OnCompleted()
        {
            Complete = true;

            if (Completed != null)
                Completed(this);
        }

        private T _Value;
        public T Value
        {
            get
            {
                // block until complete
                while (!Complete)
                {
                    Thread.Sleep(1);
                }

                if (Exceptions.Count > 0)
                    throw new AggregateException(Exceptions);

                return _Value;
            }
            private set { _Value = value; }
        }

        public List<Exception> Exceptions
        {
            get
            {
                var list = new List<Exception>();

                foreach (Future<T> Factor in Factors)
                {
                    list.AddRange(Factor.Exceptions);
                }

                if (Error != null)
                    list.Add(Error);

                return list;
            }
        }

        public static implicit operator T(Future<T> Future)
        {
            return Future.Value;
        }

        // naming a Future is optional
        public Future(Func<T> Expression, params Future<T>[] Factors) : this("<not named>", Expression, Factors) { }

        public Future(string Name, Func<T> Expression, params Future<T>[] Factors)
        {
            this.Name = Name;
            this.Expression = Expression;
            this.Factors = new List<Future<T>>(Factors);
            
            FactorsCompleted = new List<Future<T>>();
            FactorsFailed = new List<Future<T>>();

            foreach (Future<T> Factor in this.Factors)
            {
                if (Factor.Complete)
                    FactorsCompleted.Add(Factor);
                else
                    Factor.Completed += new Action<Future<T>>(Factor_Completed);
            }

            // there may not be any factors, or they may all be complete
            if (FactorsCompleted.Count == this.Factors.Count)
                Expression.BeginInvoke(ReceiveCallback, null);
        }

        private void Factor_Completed(Future<T> Factor)
        {
            if (!FactorsCompleted.Contains(Factor))
                FactorsCompleted.Add(Factor);

            if (Factor.Error != null && !FactorsFailed.Contains(Factor))
                FactorsFailed.Add(Factor);

            Factor.Completed -= new Action<Future<T>>(Factor_Completed);

            if (Exceptions.Count > 0)
            {
                Dispose();
                OnCompleted();
                return;
            }

            if (FactorsCompleted.Count == Factors.Count)
                Expression.BeginInvoke(ReceiveCallback, null);
        }

        private void ReceiveCallback(IAsyncResult AsyncResult)
        {
            try
            {
                Value = Expression.EndInvoke(AsyncResult);
            }
            catch (Exception ex)
            {
                Error = ex;
            }
            
            Dispose();

            // computation is completed, regardless of whether it succeeded or failed
            OnCompleted();
        }

        public void Dispose()
        {
            foreach (Future<T> Factor in Factors)
            {
                Factor.Completed -= new Action<Future<T>>(Factor_Completed);
            }
        }

        // helpful for debugging
        public override string ToString()
        {
            return Name + ", " + (Complete ? "Complete" : "Incomplete") + (Error != null ? ", Error=" + Error.Message : string.Empty);
        }
    }

    public class AggregateException : Exception
    {
        public List<Exception> Exceptions;

        public AggregateException(IEnumerable<Exception> Exceptions)
        {
            this.Exceptions = new List<Exception>(Exceptions);
        }

        public override string Message
        {
            get
            {
                string message = string.Empty;
                foreach (Exception ex in Exceptions)
                {
                    message += ex.Message + "\n";
                }
                return message;
            }
        }
    }
}

Posted in Algorithms, Concurrency, Data Structures, Design Patterns, Functional Programming | 1 Comment »

Control Invoke Pattern Using Lambdas

Posted by Dan Vanderboom on July 1, 2008

In Windows Forms development, there are often times when you need to update the user interface in response to something happening on another thread.  This could be a timer firing every second, some service running in the background and notifying the client of updated status on its own (background) thread, etc.  If you’ve been working with Windows Forms for any length of time, you’ve doubtless run into exceptions that kindly inform you that you can’t update controls on a thread other than the one that created those controls. We’ll consider the simple issue of a timer firing every second, and the display of elapsed time in a label, for our example here, and introduce a new pattern to make this cleaner and more intuitive.

First we’ll set up our start time and the thread.  I use the System.Threading.Timer to ensure that we’re using a non-UI thread.

StartTime = DateTime.Now;

Timer = new System.Threading.Timer(new TimerCallback(Timer_Tick));
Timer.Change(0, 1000);

Here’s the event handler that calculates the elapsed time and calls Invoke, as well as the method we’re invoking, which will run on the UI thread, where it can safely update the lblElapsedTime label control.

private void Timer_Tick(object state)
{
    TimeSpan ts = DateTime.Now - StartTime;
    Invoke(new StringDelegate(DisplayText), ts.TotalSeconds.ToString());
}

private void DisplayText(string Text)
{
    lblElapsedTime.Text = Text;
}

In order to make this work, we need the event handler, a separate method to run in the UI thread, and also a delegate that matches the invoked method.

public delegate void StringDelegate(string Text);

This is a lot of moving parts for such a small piece of functionality.  To make matters worse, you may need to repeat this pattern many times, depending on the controls (or combinations thereof) that you need to update.  In a modern multi-threaded application, your class can become littered with these invocations, handlers, and delegates.

What I’d really like to do is call Invoke and pass in an anonymous method (in lambda form).  Unfortunately, Invoke takes a Delegate parameter, which is an abstract type.  This forces you to instantiate a concrete delegate type.  So while we eliminate our need for a separate method, we’re still dependent on our delegate type.

private void Timer_Tick(object state)
{
    TimeSpan ts = DateTime.Now - StartTime;
    Invoke(new StringDelegate(s => lblElapsedTime.Text = s), ts.TotalSeconds.ToString());
}

Or are we?  By using the Action (or MethodInvoker) delegate for all of these invocations, and relying on C# and its support for closures, we can make a reference to the TimeSpan variable from within the anonymous method body, like this:

private void Timer_Tick(object state)
{
    TimeSpan ts = DateTime.Now - StartTime;
    Invoke(new Action(() => lblElapsedTime.Text = ts.TotalSeconds.ToString()));
}

Here it’s contained within a single method, and no additional delegates will be necessary to make this work.  That’s pretty nice!  (A similar approach is taken here.)  But it’s still not quite as slick and intuitive as I’d like.  By creating an extension method, adding another overload of Invoke to the Control class, we can allow Invoke to assume a concrete Action delegate class, and write code like this:

private void Timer_Tick(object state)
{
    TimeSpan ts = DateTime.Now - StartTime;
    this.Invoke(() => lblElapsedTime.Text = ts.TotalSeconds.ToString());
}

Now that’s clean.  Just call Invoke, and pass in the lambda to execute.  Or several statements in a code block if you like.  It’s very succinct.  The only part that bothers me is the this keyword that’s required.  Extension methods don’t register in Intellisense, nor do they compile successfully, if they’re used without a variable, this, base, or something else with a dot after them.  If we’re really going to push the illusion of extending a class, I think we need to go all the way and make it work without having to explicitly type this.  But it is what it is for now; hopefully this will be fixed in the next version of C# (along with adding support for extension properties, events, and operators).

That being said, here is the extension method to make this work:

public static void Invoke(this Control Control, Action Action)
{
    Control.Invoke(Action);
}

It couldn’t be simpler (thanks to a little help from Mads Torgersen)!  I’ll include the finished program for those of you who want to run it to see and experiment; you’ll just need to create the Program.cs with the startup code yourself.  Create a new Windows Forms app and use what’s there, renaming the form listed in Application.Run to match this one.

using System;
using System.Drawing;
using System.Windows.Forms;
using System.Threading;

namespace ControlInvokeLambda
{
    public partial class frmTestInvokeLambda : Form
    {
        private Button btnExit;
        private Label lblElapsedTime;

        // make sure we're using the Threading Timer for our example, which runs on a non-UI thread
        private System.Threading.Timer Timer;
        
        private DateTime StartTime;

        public frmTestInvokeLambda()
        {
            // initialize controls
            
            btnExit = new Button();
            btnExit.Location = new Point(88, 80);
            btnExit.Name = "btnExit";
            btnExit.Size = new Size(118, 26);
            btnExit.TabIndex = 0;
            btnExit.Text = "Exit";
            btnExit.UseVisualStyleBackColor = true;
            btnExit.Click += new EventHandler(this.btnExit_Click);

            lblElapsedTime = new Label();
            lblElapsedTime.AutoSize = true;
            lblElapsedTime.Location = new Point(140, 36);
            lblElapsedTime.Name = "lblElapsedTime";
            lblElapsedTime.Size = new Size(13, 13);
            lblElapsedTime.TabIndex = 1;
            lblElapsedTime.Text = "0";

            AutoScaleDimensions = new SizeF(6F, 13F);
            AutoScaleMode = AutoScaleMode.Font;
            ClientSize = new Size(292, 136);
            Controls.Add(lblElapsedTime);
            Controls.Add(btnExit);
            Name = "frmTestInvokeLambda";
            Text = "Invoke Lambda";
            PerformLayout();

            // remember start time and startup timer

            StartTime = DateTime.Now;

            Timer = new System.Threading.Timer(new TimerCallback(Timer_Tick));
            Timer.Change(0, 1000);
        }

        private void btnExit_Click(object sender, EventArgs e)
        {
            Timer.Change(Timeout.Infinite, Timeout.Infinite);
            Application.Exit();
        }

        private void Timer_Tick(object state)
        {
            TimeSpan ts = DateTime.Now - StartTime;
            this.Invoke(() => lblElapsedTime.Text = ts.TotalSeconds.ToString());
        }
    }

    public static class ControlExtensions
    {
        public static void Invoke(this Control Control, Action Action)
        {
            Control.Invoke(Action);
        }
    }
}

Posted in Algorithms, Concurrency, Design Patterns, Windows Forms | 2 Comments »

New Spin on Spawning Threads

Posted by Dan Vanderboom on June 23, 2008

There are several good libraries (PFX, PLinq, CCR, etc.) available and coming out soon that help to write concurrent logic, providing various abstractions and control patterns.  Until I can incorporate these into my Compact Framework applications, however, I find myself spinning up threads in the usual way, and sometimes what I need to run concurrently doesn’t require any fancy coordination.

Here is the thread-spawning pattern I’ve used, and have seen used, countless times:

protected override void OnStart()
{
    Thread t = new Thread(new ThreadStart(Go));
    t.Name = "PrefetchLookupData";
    t.IsBackground = true;
    t.Priority = ThreadPriority.AboveNormal;
    t.Start();
}

private void Go()
{
    var c1 = LookupListDA.CustomerTypes;
    var c2 = LookupListDA.SalesOrderStates;
    var c3 = LookupListDA.VendorTypes;
}

The data layer shown in the example caches each lookup list internally the first time its property getter is accessed, so we can assign them to variables that are never used here and effectively “pre-fetch” our lookup list data while the user is waiting in the main menu, for example.

Using a lambda statement (anonymous method), we can consolidate this into a single named method, and avoid cluttering our class with a potential plethora of methods that may perform some ad hoc background thread processing.

protected override void OnStart()
{
    Thread t = new Thread(new ThreadStart(() =>
    {
        var c1 = LookupListDA.CustomerTypes;
        var c2 = LookupListDA.SalesOrderStates;
        var c3 = LookupListDA.VendorTypes;
    }));

    t.Name = "PrefetchLookupData";
    t.IsBackground = true;
    t.Priority = ThreadPriority.AboveNormal;
    t.Start();
}

After a little reflection, I came up with a similar pattern that further encapsulates the details, and in doing so, created an abstraction called LogicStream.  Other names that work are ExecutionStream or CodeStream, with the central concept being that you’re specifying a sequential set (stream) of instructions that runs parallel to the stream that defines it.

protected override void OnStart()
{
    new LogicStream("PrefetchLookupData", s =>
        {
            var c1 = LookupListDA.CustomerTypes;
            var c2 = LookupListDA.SalesOrderStates;
            var c3 = LookupListDA.VendorTypes;
        });
}

Like the second example, this approach doesn’t require a separate method, but it’s also completely self-contained: there is no thread manipulation code outside of this code block; any setup we need to do can either be done via parameters (“PrefetchLookupData” names the thread) or by specifying an additional code block for thread configuration (an example is shown below).  Finally, the LogicStream constructor immediately invokes the thread, which is a background thread by default, so nothing additional needs to be done.

Here’s a slightly more complicated example, showing how you can configure the thread and pass in multiple parameters.

using System;
using System.Threading;

namespace Demo
{
    class Program
    {
        static void Main(string[] args)
        {
            Thread.CurrentThread.Name = "Main";

            new LogicStream("ThreadX", s =>
            {
                // rename parameters passed into thread
                string ExtraInfo = s.Get<string>(0);
                int StartIndex = s.Get<int>(1);
                int EndIndex = s.Get<int>(2);

                // do work
                for (int x = StartIndex; x <= EndIndex; x++)
                {
                    Console.WriteLine("x = " + x.ToString().PadRight(10) + s.Name);
                    Thread.Sleep(50);

                    // this code has access to the Thread object via the LogicStream
                    if (x > 90)
                        s.Thread.Abort();
                }
            }, "Width Data", 0, 100); // optional parameters passed into the LogicStream

            new LogicStream(t =>
                {
                    // configure thread with complete flexibility
                    t.Name = "ThreadY";
                    t.IsBackground = true;
                    t.Priority = ThreadPriority.Highest;
                    t.SetApartmentState(ApartmentState.MTA);
                },
                s =>
                {
                    for (int y = 0; y < 100; y++)
                    {
                        Console.WriteLine("y = " + y.ToString().PadRight(10) + s.Name.PadLeft(15));
                        Thread.Sleep(50);
                    }
                });

            new LogicStream("ThreadZ", ThreadPriority.Lowest, s =>
                {
                    for (int z = 0; z < 100; z++)
                    {
                        Console.WriteLine("z = " + z.ToString().PadRight(10) + s.Name.PadLeft(23));
                        Thread.Sleep(50);
                    }
                });

            Console.ReadKey();
        }
    }
}

When this program runs, three threads will fire up and start processing, but because all of the worker threads are background threads, at any time the console receives a key press, the application will exit.

The parameters passed into the first thread are constants, which of course could be defined within the LogicStream’s code block itself.  Because anonymous methods in C# create closures when necessary, you could use a variable defined within the method (in this case, Main), or make reference to the method’s argument, args, without needing to pass in any parameters at all.

Finally, here is the LogicStream class to make this work.

using System;

namespace System.Threading
{
    public class LogicStream
    {
        public Thread Thread { get; private set; }
        public object[] Parameters { get; set; }

        protected Action<LogicStream> Action;
        protected long InstanceID;
        protected  static long NextInstanceID = 0;

        public LogicStream(Action<LogicStream> Action, params object[] Parameters)
            : this("LogicStream" + InstanceID.ToString(), ThreadPriority.Normal, true, Action, Parameters) { }

        public LogicStream(string Name, Action<LogicStream> Action, params object[] Parameters)
            : this(Name, ThreadPriority.Normal, Action, Parameters) { }

        public LogicStream(string Name, ThreadPriority Priority, Action<LogicStream> Action, params object[] Parameters)
            : this(Name, Priority, true, Action, Parameters) { }

        public LogicStream(string Name, ThreadPriority Priority, bool IsBackground, Action<LogicStream> Action, params object[] Parameters)
        {
            this.Action = Action;
            this.Parameters = Parameters;

            InstanceID = NextInstanceID;
            Interlocked.Increment(ref NextInstanceID);

            Thread = new Thread(new ThreadStart(InvokeAction));
            Thread.Name = Name;
            Thread.Priority = Priority;
            Thread.IsBackground = IsBackground;
            Thread.Start();
        }

        public LogicStream(Action<Thread> Config, Action<LogicStream> Action, params object[] Parameters)
        {
            this.Action = Action;

            Thread = new Thread(new ThreadStart(InvokeAction));
            Config(Thread);

            InstanceID = NextInstanceID;
            Interlocked.Increment(ref NextInstanceID);

            Thread.Start();
        }

        protected void InvokeAction()
        {
            Action(this);
        }

        public T Get<T>(int ParameterIndex)
        {
            return (T)Parameters[ParameterIndex];
        }
    }
}

It’s very simple, but that’s the best part.  You have the choice to configure the thread properties through various constructor parameters, or by defining an anonymous configuration method that can line up nicely with your anonymous action method.  If you’re lazy and don’t want to name your thread, or if you’re spinning up a bunch of them to perform the same task, you’ll still get a thread name differentiated by an auto-incrementing InstanceID.

So this isn’t anything big, of course.  Just a little syntactic wrapper around Thread and ThreadStart classes, with simple patterns built in for passing and fetching parameters, and defining streams of parallel logic a little more intuitively and concisely.  The trick to concurrent programming is coordination among parallel threads: passing messages (posting to ports), serializing use of certain resources, and so on.

I spent much of yesterday watching all of the CCR videos again and studying that implementation, so I expect to be writing more about that in the near future.

Posted in Algorithms, Concurrency, Design Patterns | 6 Comments »

Compact Framework Controls (Part 3): Linear Gradients

Posted by Dan Vanderboom on May 5, 2008

[This article is part of a series that starts in this article and precedes this one here.]

Linear Gradients

Linear gradients are a nice, subtle effect that can turn a boring control into something more interesting and professional looking.  You can use a linear gradient for the entire background of your control, which I’ll demonstrate in this article, or you can paint one or more regions selectively to display a gradient.  A linear gradient is a gradual transition from one color to another, and while you can transition through multiple colors along an axis, going from blue to red to green to white to black if you wanted, I’m going to start simple and create a control that blends between only two colors.  You can also define the line of change to be any angle: vertical (as shown in the example below), horizontal, or some other angle.  I’ll show how to draw just the vertical and horizontal linear gradients.

Linear Gradient Example

I’ll be using the control from my previous article, and adding to it, to demonstrate linear gradients.  We’re going to need some new properties to support gradients, so first we need to add a couple enumerations.

public enum RegionFillStyle
{
    SolidColor,
    LinearGradient
}

public enum LinearGradientDirection
{
    Horizontal,
    Vertical
}

And now the new properties.

private RegionFillStyle _FillStyle = RegionFillStyle.SolidColor;
[DefaultValue(RegionFillStyle.SolidColor)]
public RegionFillStyle FillStyle
{
    get { return _FillStyle; }
    set { _FillStyle = value; Refresh(); }
}

private LinearGradientDirection _LinearGradientDirection = LinearGradientDirection.Vertical;
[DefaultValue(LinearGradientDirection.Vertical)]
public LinearGradientDirection LinearGradientDirection
{
    get { return _LinearGradientDirection; }
    set { _LinearGradientDirection = value; Refresh(); }
}

private Color _BackColor2 = Color.White;
public Color BackColor2
{
    get { return _BackColor2; }
    set { _BackColor2 = value; Refresh();  }
}

The goal is to draw a background for our control that is a linear gradient, fading from BackColor to BackColor2.  We’re going to use a technique called interpolation, which is the calculation of new data points based on the values of adjacent data points.  In our case, we’re going to be interpolating color values.  We know the color at the top and the bottom (in the case of a vertical gradient), so a pixel halfway between them spatially should have a color value that is halfway between the color values at both ends.  Because colors are manipulated in bitmaps with an RGB scheme (using red, blue, and green aspects), we actually have three component values that need to be interpolated.

Understanding the Math

If our control is 100 pixels tall, and the color at the bottom is 100 units less blue than at the top, the translation is very simple: as we move down each pixel from top to bottom, we’ll subtract 1 unit of color from the blue value.  The challenge lies in the fact that we can’t assume our height and our color values will line up so nicely.  Furthermore, we have two other colors to deal with, and they may need to change at different rates or in different directions: the color may become slightly more red while simultaneously becoming drastically less green.

So we’re going to need some way of finding the scaling factor between the height or width of the control and the distance in color values for red, green, and blue separately.  In our example of 100 pixels to 100 color units, we have a 1:1 scaling factor.  If we instead had to make a color change of 200 units, we’d have a scaling factor of 1:2, or 1 pixel for 2 units of color change.  Another way to think of this is to say that for every pixel we move along the line, we’re going to increase or decrease our color by 2 units.

double RedScale = (double)Height / (BackColor2.R - BackColor.R);

The RedScale variable divides our height by our gradient’s difference (or change) in redness, and we make the same scaling calculation with green and blue.  This scaling takes increasing and decreasing color changes into account based on whether the subtraction expression on the right results in a positive or negative number.  As we move along the y axis, we’ll create a color that uses BackColor as a base and adds RGB values to it that divide the current y position with this scaling factor.  Let’s take a look at that code:

Bitmap LinearGradient = null;

if (LinearGradientDirection == LinearGradientDirection.Vertical)
{
    double RedScale = (double)Height / (BackColor2.R - BackColor.R);
    double GreenScale = (double)Height / (BackColor2.G - BackColor.G);
    double BlueScale = (double)Height / (BackColor2.B - BackColor.B);

    LinearGradient = new Bitmap(1, Height);
    for (int y = 0; y < Height; y++)
    {
        int red = BackColor.R + (int)((double)y / RedScale;
        int green = BackColor.G + (int)((double)y / GreenScale;
        int blue = BackColor.B + (int)((double)y / BlueScale;

        Color color = Color.FromArgb(red, green, blue);
        LinearGradient.SetPixel(0, y, color);
    }
}

if (LinearGradient != null)
{
    FillBrush = new TextureBrush(LinearGradient);
}

After calculating our scaling factors, we define a bitmap that’s as tall as our control, but only one pixel wide.  You can see this bitmap being used to create a TextureBrush at the bottom of the code.  This brush will be used to fill the entire area from left to right, copying the bitmap across the entire surface, so there’s no need to make it any wider than a single pixel.  (For horizontal gradients, we do the opposite: create a bitmap as wide as our control but only one pixel tall.)

In our hypothetical 100-pixel-tall control, with a red value that decreases 200 units from top to bottom (and therefore has a scaling factor of -0.5), we calculate each pixel’s redness by dividing y by -0.5.  At pixel y=25, which is 25% of the way down, we get a value of -50, which is 25% of -200.  At pixel y=75, we get 75 / -0.5 = -150.  So we take our original BackColor.R, and add this negative number, which makes it decrease from the base color as desired.

The only thing we need to do now is to ensure that each of our three color values never go outside the range of 0 to 255, otherwise we’ll get an error thrown from the Bitmap class.  We can do this with the Math class’s methods Min and Max, like this:

int red = Math.Max(Math.Min(BackColor.R + (int)((double)y / RedScale), 255), 0);
int green = Math.Max(Math.Min(BackColor.G + (int)((double)y / GreenScale), 255), 0);
int blue = Math.Max(Math.Min(BackColor.B + (int)((double)y / BlueScale), 255), 0);

Min returns the smaller of two numbers, and since we pass in 255 along with our calculated color, if our calculation is over 255, then the value it will return is 255.  Max does the opposite, and the combination ensures we stay within the valid range.

Results

The code sample above only showed the code for a vertical gradient, so here is the complete listing of our control with the logic for horizontal gradients as well.

using System;
using System.Collections.Generic;
using System.Windows.Forms;
using System.Drawing;
using System.Reflection;
using System.ComponentModel;

namespace CustomControlsDemo
{
    public class ClippingControl : Control
    {
        private RegionFillStyle _FillStyle = RegionFillStyle.SolidColor;
        [DefaultValue(RegionFillStyle.SolidColor)]
        public RegionFillStyle FillStyle
        {
            get { return _FillStyle; }
            set { _FillStyle = value; Refresh(); }
        }
        
        private LinearGradientDirection _LinearGradientDirection = LinearGradientDirection.Vertical;
        [DefaultValue(LinearGradientDirection.Vertical)]
        public LinearGradientDirection LinearGradientDirection
        {
            get { return _LinearGradientDirection; }
            set { _LinearGradientDirection = value; Refresh(); }
        }
        
        private Color _BackColor2 = Color.White;
        public Color BackColor2
        {
            get { return _BackColor2; }
            set { _BackColor2 = value; Refresh(); }
        }

        protected override void OnPaint(PaintEventArgs e)
        {
            // define a canvas for the visual content of the control
            Bitmap MyBitmap = new Bitmap(Width, Height);
            Graphics g = Graphics.FromImage(MyBitmap);

            Brush FillBrush = null;
            if (FillStyle == RegionFillStyle.SolidColor)
            {
                FillBrush = new SolidBrush(BackColor);
            }
            else if (FillStyle == RegionFillStyle.LinearGradient)
            {
                Bitmap LinearGradient = null;

                if (LinearGradientDirection == LinearGradientDirection.Horizontal)
                {
                    double RedScale = (double)Width / (BackColor2.R - BackColor.R);
                    double GreenScale = (double)Width / (BackColor2.G - BackColor.G);
                    double BlueScale = (double)Width / (BackColor2.B - BackColor.B);

                    LinearGradient = new Bitmap(Width, 1);
                    for (int x = 0; x < Width; x++)
                    {
                        int red = Math.Max(Math.Min(BackColor.R + (int)((double)x / RedScale), 255), 0);
                        int green = Math.Max(Math.Min(BackColor.G + (int)((double)x / GreenScale), 255), 0);
                        int blue = Math.Max(Math.Min(BackColor.B + (int)((double)x / BlueScale), 255), 0);

                        Color color = Color.FromArgb(red, green, blue);
                        LinearGradient.SetPixel(x, 0, color);
                    }
                }
                else if (LinearGradientDirection == LinearGradientDirection.Vertical)
                {
                    double RedScale = (double)Height / (BackColor2.R - BackColor.R);
                    double GreenScale = (double)Height / (BackColor2.G - BackColor.G);
                    double BlueScale = (double)Height / (BackColor2.B - BackColor.B);

                    LinearGradient = new Bitmap(1, Height);
                    for (int y = 0; y < Height; y++)
                    {
                        int red = Math.Max(Math.Min(BackColor.R + (int)((double)y / RedScale), 255), 0);
                        int green = Math.Max(Math.Min(BackColor.G + (int)((double)y / GreenScale), 255), 0);
                        int blue = Math.Max(Math.Min(BackColor.B + (int)((double)y / BlueScale), 255), 0);

                        Color color = Color.FromArgb(red, green, blue);
                        LinearGradient.SetPixel(0, y, color);
                    }
                }

                if (LinearGradient != null)
                {
                    FillBrush = new TextureBrush(LinearGradient);
                }
            }

            if (FillBrush != null)
            {
                g.FillRectangle(FillBrush, ClientRectangle);
            }

            // draw graphics on our bitmap
            g.DrawLine(new Pen(Color.Black), 0, 0, Width - 1, Height - 1);
            g.DrawEllipse(new Pen(Color.Black), 0, 0, Width - 1, Height - 1);

            // dispose of the painting tools
            g.Dispose();

            // paint the background to match the Parent control so it blends in
            e.Graphics.FillRectangle(new SolidBrush(Parent.BackColor), ClientRectangle);

            // define the custom shape of the control: a trapezoid in this example
            List<Point> Points = new List<Point>();
            Points.AddRange(new Point[] { new Point(20, 0), new Point(Width - 21, 0), 
                new Point(Width - 1, Height - 1), new Point(0, Height - 1) });

            // draw that content inside our defined shape, clipping everything that falls outside of the region;
            // only if the image is much smaller than the control does it really get "tiled" and act like a textured painting brush
            // but our bitmap image is the same size as the control, so we're just taking advantage of clipping
            Brush ImageBrush = new TextureBrush(MyBitmap);

            e.Graphics.FillPolygon(ImageBrush, Points.ToArray());
        }
    }
}

Placing a couple of these controls on a form, I can set one of them to use a solid background (yellow), and the others to use vertical and horizontal linear gradients.

Linear Gradient Control Screenshot

Conclusion

Linear gradients are a great effect to have in your repertoire of techniques.  Compact Framework applications especially tend to be flat and dull, with an unimpressive array of built-in controls, and with more focus on user interfaces like the iPhone and some of the cool new HTC touch devices, the desire for fancier interfaces is growing.  As we start to mix operations like polygon clipping and quasi-transparency (presented in the previous article), linear gradients, and others, we can put together a bag of tricks for composing beautiful and interesting user experiences.

Posted in Algorithms, Compact Framework, Custom Controls, User Interface Design, Windows Forms | 9 Comments »

Compact Framework Controls (Part 2): Polygon Clipping

Posted by Dan Vanderboom on May 4, 2008

[This article is part of a series that starts in this article.]

My intention is to cover a full spectrum of activities around custom control development, with an emphasis on the compromises, workarounds, and special care that must be taken when developing controls for the Compact Framework.  In my first article, I talked about how most design-time attributes must be applied to control classes and their members, and what some of those attributes mean.  I have a number of articles planned that explore those attributes more, and will go into extending the design-time experience in more depth, but I’m going to take a detour into custom painting of the control surface first, so we have a control to reference and work with in the examples.

Polygon Clipping

If you’re new to creating graphical effects and unfamiliar with the techniques invovlved, clipping refers to the chopping off of an image based on some kind of border or boundary.  In Windows Forms interfaces, controls are inherently rectangular because clipping occurs automatically at the window’s boundary (which is a shame considering how this presumption of need slows rendering, and WPF takes good advantage of not doing so).  Everything outside the control’s outer shape doesn’t get drawn at all.  You can draw anywhere you want, including negative coordinates, but only the points that fall within the clipping region will be displayed.

Clipping Illustration

But what if you want to make your control a different shape, other than the standard rectangle, like an ellipse or a rounded rectangle?  How do you make sure that whatever you draw inside never leaks outside of your defined shape?  In the full .NET Framework, there is a Region property in the Control class that defines these boundaries, and there are several good articles that explain this.  The clipping mask is applied based on that Region’s definition.  In Compact Framework, the Region property doesn’t exist, and you’re forced to find your own way of defining different shapes.

The key to this is to understand the Graphics class’s Fill methods.  While FillEllipse and FillRectangle definitely have their uses, I’d like to focus on situations that are a little bit more demanding, such as when you want to represent a more complex shape like a rounded rectangle (with many points) or some kind of UML diagram element.  FillPolygon takes a list of Points, and with them can define the most eccentric and specific of shapes.  By filling a polygon with an image using a TextureBrush, clipping happens automatically as part of the operation.

Let’s take a look at some code to see how we perform each of these steps: preparing and drawing on a bitmap image in memory, defining our shape’s boundaries, and then clipping that image within the specified shape.

using System;
using System.Collections.Generic;
using System.Windows.Forms;
using System.Drawing;
using System.Reflection;

namespace CustomControlsDemo
{
    public class ClippingControl : Control
    {
        protected override void OnPaint(PaintEventArgs e)
        {
            // define a canvas for the visual content of the control
            Bitmap MyBitmap = new Bitmap(Width, Height);

            // create a painting tools object
            Graphics g = Graphics.FromImage(MyBitmap);

            // draw graphics on our bitmap
            g.FillRectangle(new SolidBrush(Color.PaleGoldenrod), ClientRectangle);
            g.DrawLine(new Pen(Color.Black), 0, 0, Width - 1, Height - 1);
            g.DrawEllipse(new Pen(Color.Black), 0, 0, Width - 1, Height - 1);

            // dispose of the painting tools
            g.Dispose();

            // define the custom shape of the control: a trapezoid in this example
            List<Point> Points = new List<Point>();
            Points.AddRange(new Point[] { new Point(20, 0), new Point(Width - 21, 0), 
                new Point(Width - 1, Height - 1), new Point(0, Height - 1) });

            // draw that content inside our defined shape, clipping everything that falls outside of the region;
            // only if the image is much smaller than the control does it really get "tiled" and act like a textured painting brush
            // but our bitmap image is the same size as the control, so we're just taking advantage of clipping
            Brush ImageBrush = new TextureBrush(MyBitmap);
            e.Graphics.FillPolygon(ImageBrush, Points.ToArray());
        }
    }
}

Although this control has a silly shape and doesn’t do much yet, it does illustrate the basics of painting within the bounds of an irregular shape.  As long as we draw on MyBitmap, everything will be properly clipped by the call to FillPolygon.  However, as you can see in the screenshots below, the white background around our custom shape could be a problem.  You can change the BackColor property to match the color of the container its on (a Panel control in this case, which is Color.BurlyWood), but really it makes more sense for BackColor to describe the color within our shape.  We’d like the surrounding background to blend in with whatever container the control is sitting in.

first version

We can accomplish this with two simple changes.  First, at some point before the FillPolygon call, we need to fill the entire control’s area with the BackColor property of the parent control.  We will draw using the e.Graphics object, which paints on the whole rectangular control, not our g Graphics object, whose contents get clipped.  Then, instead of hard coding Color.PaleGodenrod, we can use the BackColor property to specify our fill color.  Here is the changed section of code:

// draw graphics on our bitmap
g.FillRectangle(new SolidBrush(BackColor), ClientRectangle);
g.DrawLine(new Pen(Color.Black), 0, 0, Width - 1, Height - 1);
g.DrawEllipse(new Pen(Color.Black), 0, 0, Width - 1, Height - 1);

// dispose of the painting tools
g.Dispose();

e.Graphics.FillRectangle(new SolidBrush(Parent.BackColor), ClientRectangle);

Now if we set the BackColor to PaleGodenrod, we’ll get this rendering:

transparent background

Dragging the control off the panel and into the white area will cause the area around the control to paint white, so now you can see how it blends in with whatever background we have as long as it’s a solid color.

In a future article, after I’ve covered how to draw arcs and curves, I will revisit this technique and demonstrate how to draw rectangles with rounded corners.

[This article is part of a series that continues in this article.]

Posted in Algorithms, Compact Framework, Custom Controls, User Interface Design, Visual Studio, Windows Forms, Windows Mobile | 12 Comments »